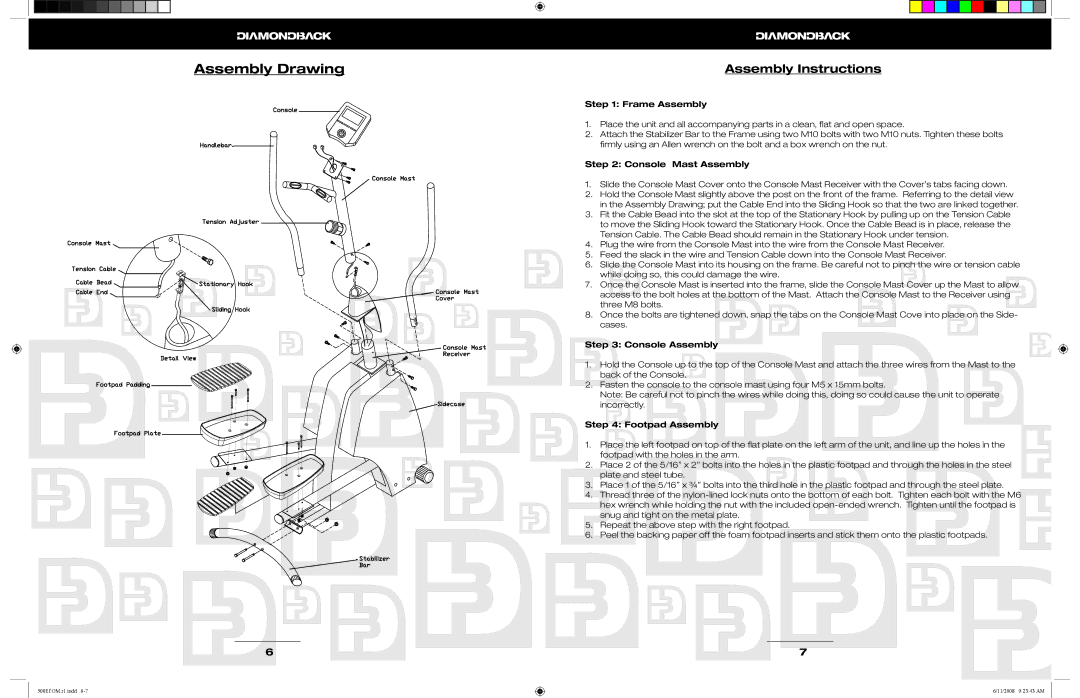
Assembly Drawing

6

500Ef OM.r1.indd 6-7

Assembly Instructions

Step 1: Frame Assembly

1.Place the unit and all accompanying parts in a clean, fl at and open space.

2.Attach the Stabilizer Bar to the Frame using two M10 bolts with two M10 nuts. Tighten these bolts fi rmly using an Allen wrench on the bolt and a box wrench on the nut.

Step 2: Console Mast Assembly

1.Slide the Console Mast Cover onto the Console Mast Receiver with the Cover’s tabs facing down.

2.Hold the Console Mast slightly above the post on the front of the frame. Referring to the detail view in the Assembly Drawing; put the Cable End into the Sliding Hook so that the two are linked together.

3.Fit the Cable Bead into the slot at the top of the Stationary Hook by pulling up on the Tension Cable to move the Sliding Hook toward the Stationary Hook. Once the Cable Bead is in place, release the Tension Cable. The Cable Bead should remain in the Stationary Hook under tension.

4.Plug the wire from the Console Mast into the wire from the Console Mast Receiver.

5.Feed the slack in the wire and Tension Cable down into the Console Mast Receiver.

6.Slide the Console Mast into its housing on the frame. Be careful not to pinch the wire or tension cable while doing so, this could damage the wire.

7.Once the Console Mast is inserted into the frame, slide the Console Mast Cover up the Mast to allow access to the bolt holes at the bottom of the Mast. Attach the Console Mast to the Receiver using three M8 bolts.

8.Once the bolts are tightened down, snap the tabs on the Console Mast Cove into place on the Side- cases.

Step 3: Console Assembly

1.Hold the Console up to the top of the Console Mast and attach the three wires from the Mast to the back of the Console.

2.Fasten the console to the console mast using four M5 x 15mm bolts.

Note: Be careful not to pinch the wires while doing this, doing so could cause the unit to operate incorrectly.

Step 4: Footpad Assembly

1.Place the left footpad on top of the fl at plate on the left arm of the unit, and line up the holes in the footpad with the holes in the arm.

2.Place 2 of the 5/16” x 2” bolts into the holes in the plastic footpad and through the holes in the steel plate and steel tube.

3.Place 1 of the 5/16” x ¾” bolts into the third hole in the plastic footpad and through the steel plate.

4.Thread three of the nylon-lined lock nuts onto the bottom of each bolt. Tighten each bolt with the M6 hex wrench while holding the nut with the included open-ended wrench. Tighten until the footpad is snug and tight on the metal plate.

5.Repeat the above step with the right footpad.

6.Peel the backing paper off the foam footpad inserts and stick them onto the plastic footpads.

7

6/11/2008 9:23:43 AM

Page 3
Image 3
Diamondback 500Ef manual Assembly Drawing, Assembly Instructions

500Ef specifications

The Diamondback 500EF is an impressive addition to the world of bicycles, particularly designed for enthusiasts seeking a high-performance ride. This model seamlessly blends advanced technology with user-friendly features, making it suitable for both novice and experienced riders.

One of the standout features of the Diamondback 500EF is its lightweight aluminum frame. The use of aluminum not only enhances durability but also provides a superior strength-to-weight ratio, ensuring that riders can navigate a variety of terrains with ease. The geometry of the frame is designed for optimal comfort and control, allowing for efficient power transfer while maintaining stability at high speeds.

Equipped with a high-quality suspension system, the 500EF features a front fork that absorbs shocks and bumps, making it ideal for rough trails and uneven surfaces. This system enhances ride quality, providing the rider with confidence when tackling challenging terrains. The bike is also outfitted with dependable disc brakes, which offer superior stopping power in various weather conditions. This is a crucial safety feature for riders who venture into mountainous trails or ride in the rain.

Another notable technology in the Diamondback 500EF is its precision gear system. With a wide range of gears, riders can easily adjust to changing terrains and inclines. This is complemented by smooth-shifting technology that ensures seamless transitions between gears, improving overall riding efficiency.

The tires on the 500EF are designed for versatility, featuring a tread pattern that grips both on and off the road. This allows riders to experience a stable ride, whether they find themselves on gravel paths or city streets.

Additionally, the Diamondback 500EF is compatible with various accessories, including racks and fenders, catering to those who may want to customize their bike for commuting or touring.

Overall, the Diamondback 500EF stands out due to its combination of advanced features, high-quality materials, and user-oriented design. It appeals to a wide range of cyclists, offering an exceptional blend of performance, comfort, and reliability that can be relied upon for both exhilarating rides and everyday commutes.