MPS 409 Setup Guide (Continued)
In
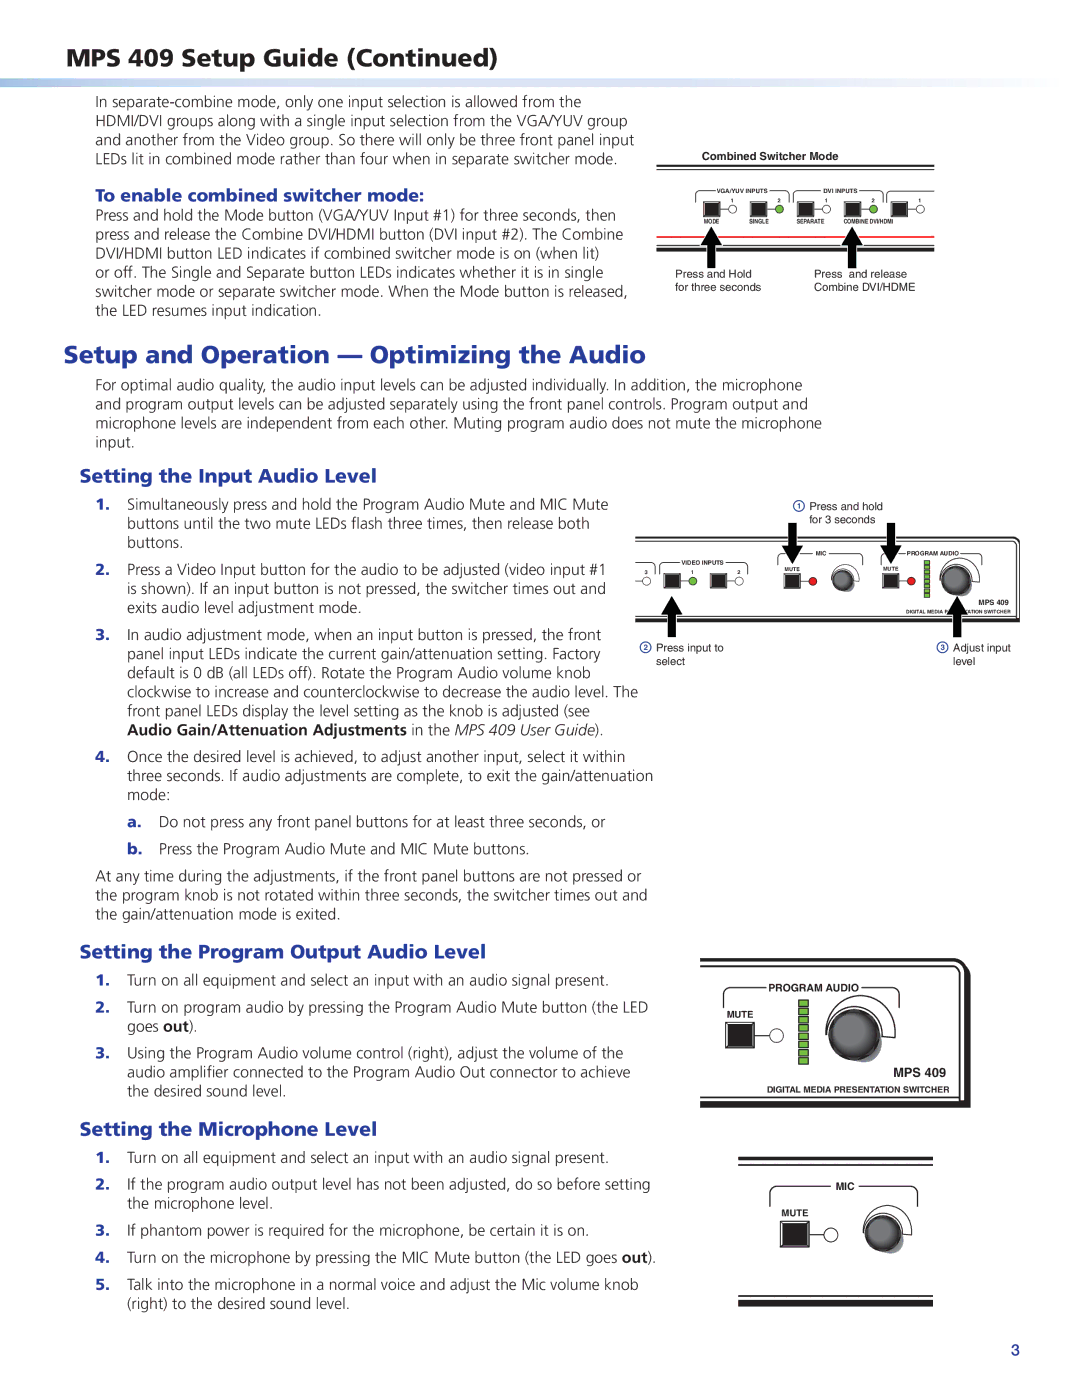
To enable combined switcher mode:
Combined Switcher Mode
VGA/YUV INPUTS |
| DVI INPUTS |
|
|
1 | 2 | 1 | 2 | 1 |
Press and hold the Mode button (VGA/YUV Input #1) for three seconds, then | MODE | SINGLE | SEPARATE | COMBINE DVI/HDMI |
press and release the Combine DVI/HDMI button (DVI input #2). The Combine |
|
|
|
|
DVI/HDMI button LED indicates if combined switcher mode is on (when lit) |
|
|
|
|
or off. The Single and Separate button LEDs indicates whether it is in single | Press and Hold | Press and release | ||
switcher mode or separate switcher mode. When the Mode button is released, | for three seconds | Combine DVI/HDME | ||
|
|
|
| |
the LED resumes input indication. |
|
|
|
|
Setup and Operation — Optimizing the Audio
For optimal audio quality, the audio input levels can be adjusted individually. In addition, the microphone and program output levels can be adjusted separately using the front panel controls. Program output and microphone levels are independent from each other. Muting program audio does not mute the microphone input.
Setting the Input Audio Level
1.Simultaneously press and hold the Program Audio Mute and MIC Mute buttons until the two mute LEDs flash three times, then release both buttons.
aPress and hold for 3 seconds
|
|
|
| MIC | PROGRAM AUDIO | |
2. Press a Video Input button for the audio to be adjusted (video input #1 |
| VIDEO INPUTS |
| MUTE | MUTE | |
3 | 1 | 2 | ||||
|
|
| ||||
is shown). If an input button is not pressed, the switcher times out and |
|
|
|
| MPS 409 | |
exits audio level adjustment mode. |
|
|
|
| ||
|
|
|
| DIGITAL MEDIA ATION SWITCHER | ||
3. In audio adjustment mode, when an input button is pressed, the front | b Press input to |
|
| c Adjust input | ||
panel input LEDs indicate the current gain/attenuation setting. Factory |
|
| ||||
| select |
|
| level | ||
default is 0 dB (all LEDs off). Rotate the Program Audio volume knob |
|
|
| |||
|
|
|
|
| ||
clockwise to increase and counterclockwise to decrease the audio level. The front panel LEDs display the level setting as the knob is adjusted (see Audio Gain/Attenuation Adjustments in the MPS 409 User Guide).
4.Once the desired level is achieved, to adjust another input, select it within three seconds. If audio adjustments are complete, to exit the gain/attenuation mode:
a.Do not press any front panel buttons for at least three seconds, or
b.Press the Program Audio Mute and MIC Mute buttons.
At any time during the adjustments, if the front panel buttons are not pressed or the program knob is not rotated within three seconds, the switcher times out and the gain/attenuation mode is exited.
Setting the Program Output Audio Level
1.Turn on all equipment and select an input with an audio signal present.
2.Turn on program audio by pressing the Program Audio Mute button (the LED goes out).
3.Using the Program Audio volume control (right), adjust the volume of the audio amplifier connected to the Program Audio Out connector to achieve the desired sound level.
Setting the Microphone Level
1.Turn on all equipment and select an input with an audio signal present.
2.If the program audio output level has not been adjusted, do so before setting the microphone level.
3.If phantom power is required for the microphone, be certain it is on.
4.Turn on the microphone by pressing the MIC Mute button (the LED goes out).
5.Talk into the microphone in a normal voice and adjust the Mic volume knob (right) to the desired sound level.
PROGRAM AUDIO
MUTE
MPS 409
DIGITAL MEDIA PRESENTATION SWITCHER
MIC
MUTE
3