deuxième écran, sélectionner le média (le média nommé « MEMORY» est la mémoire interne). Appuyer sur le bouton ENTER pouractiver le média. Le troisième écran montre le nom des dossiers texte sur le médiasélectionné. Appuyer sur le bouton ENTER pour lire. L’écran affichera le texte. Utiliser les flèches de défilement Haut et Bas pour naviguer a travers les lignes, et Droit et Gauche pour naviguer a travers les pages. Appuyer sur le bouton Menu pour y mettre fin et retourner au menu principal.
Edit/Édition
This is the function used to delete files from the internal memory or to copy files from an external device to the internal memory. To copy files, follow these steps:
1.Go to the Main menu.
2.Select “EDIT”, press ENTER.
3.Select the device on which the file to be copied is located and press ENTER. Use the up or down arrows to navigate through your files.
4.Select the files you want to copy by pressing the right arrow. (Marked by a paw.)
5.Press the left arrow to return to the media device menu.
6.Highlight the device the images are to be copied to and press ENTER.
7.Press the COPY/DEL button, select the copy option (briefcase) and press ENTER
8.You should then see a message saying “Finished!” Press ENTER once you see this message.
Cette fonction sert à copier ou effacer des fichiers depuis la mémoire externe vers la mémoire interne comme suit :
1.Aller au menu principal.
2.Sélectionner « EDIT » , appuyer sur ENTER.
3.Sélectionner le support depuis lequel vous désirez copier et appuyer ensuite sur ENTER. Utiliser les flèches Haut et Bas pour naviguer parmi vos fichiers.
4.Sélectionner les fichiers que vous désirez copier en appuyant sur la flèche droite (Identifiée par une patte).
5.Appuyer sur la flèche gauche pour revenir au menu Media
6.Mettre en évidence le dispositif sur lequel les photos seront copiées et appuyer sur
ENTER.
7.Appuyer sur le bouton COPY/DEL, sélectionner l'option copie
8.Vous devriez alors voir un message disant « Finished! » [Terminé] Appuyer sur ENTER quand vous voyez ce message.
Setup/Configuration
This function is used to set up personalized operational parameters. Functions include language, slide show management, clock settings, alarm settings,
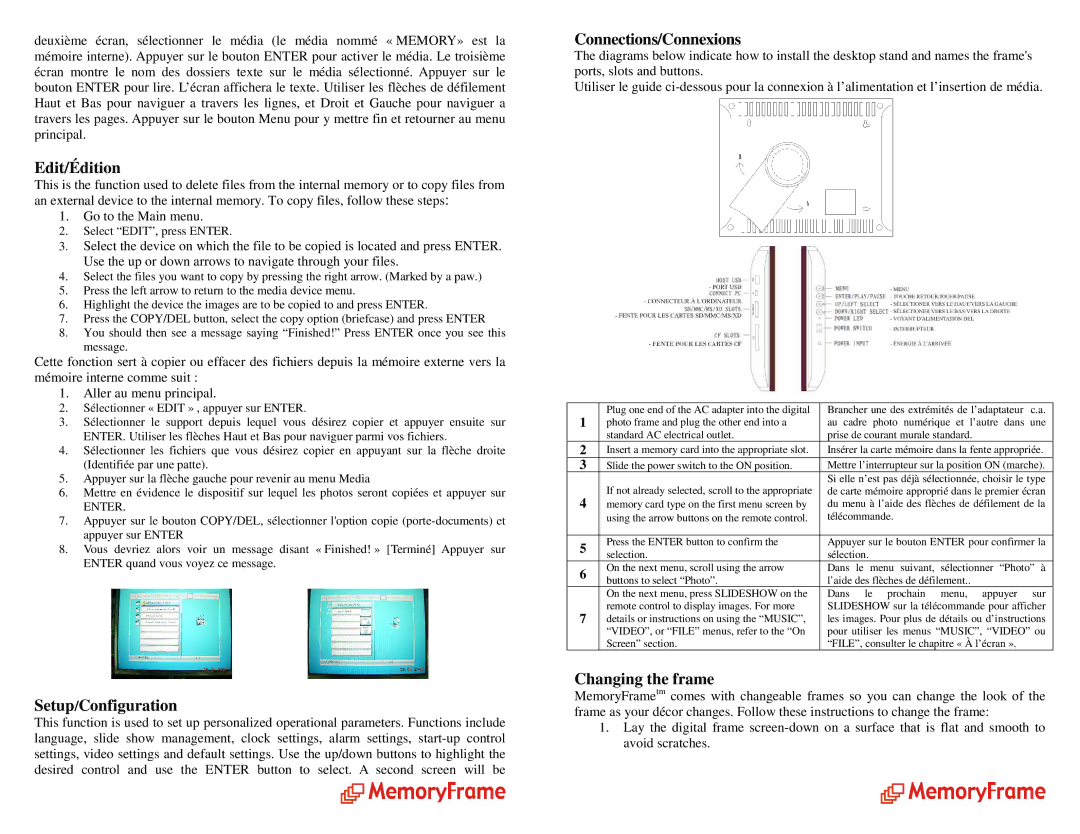
Connections/Connexions
The diagrams below indicate how to install the desktop stand and names the frame's ports, slots and buttons.
Utiliser le guide
1 | Plug one end of the AC adapter into the digital | Brancher une des extrémités de l’adaptateur c.a. | |
photo frame and plug the other end into a | au cadre photo numérique et l’autre dans une | ||
| standard AC electrical outlet. | prise de courant murale standard. | |
2 | Insert a memory card into the appropriate slot. | Insérer la carte mémoire dans la fente appropriée. | |
3 | Slide the power switch to the ON position. | Mettre l’interrupteur sur la position ON (marche). | |
| If not already selected, scroll to the appropriate | Si elle n’est pas déjà sélectionnée, choisir le type | |
4 | de carte mémoire approprié dans le premier écran | ||
memory card type on the first menu screen by | du menu à l’aide des flèches de défilement de la | ||
| using the arrow buttons on the remote control. | télécommande. | |
|
|
| |
5 | Press the ENTER button to confirm the | Appuyer sur le bouton ENTER pour confirmer la | |
selection. | sélection. | ||
| |||
6 | On the next menu, scroll using the arrow | Dans le menu suivant, sélectionner “Photo” à | |
buttons to select “Photo”. | l’aide des flèches de défilement.. | ||
| |||
| On the next menu, press SLIDESHOW on the | Dans le prochain menu, appuyer sur | |
7 | remote control to display images. For more | SLIDESHOW sur la télécommande pour afficher | |
details or instructions on using the “MUSIC”, | les images. Pour plus de détails ou d’instructions | ||
| “VIDEO”, or “FILE” menus, refer to the “On | pour utiliser les menus “MUSIC”, “VIDEO” ou | |
| Screen” section. | “FILE”, consulter le chapitre « À l’écran ». |
Changing the frame
MemoryFrametm comes with changeable frames so you can change the look of the frame as your décor changes. Follow these instructions to change the frame:
1.Lay the digital frame