Remote Control Operation

General

The remote control consists of 5 control buttons and a LCD display with a visible area of 40x40mm.

The maximum range of use for the remote control is 15metres.

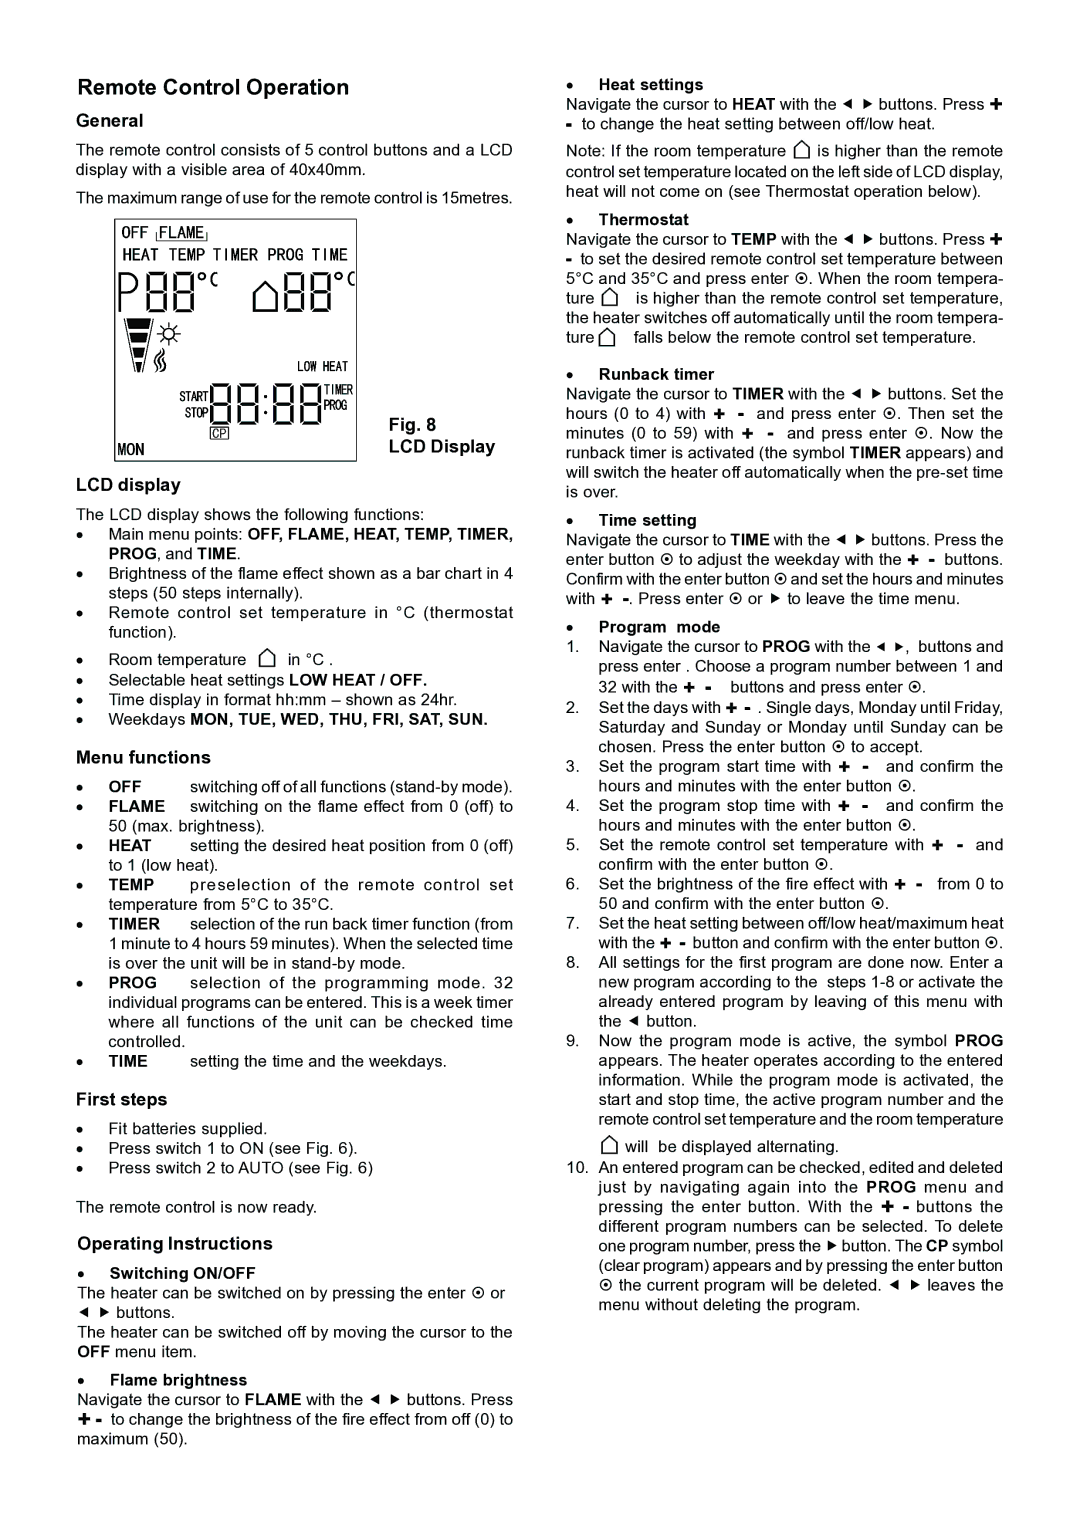
Fig. 8

LCD Display

LCD display

The LCD display shows the following functions:

Main menu points: OFF, FLAME, HEAT, TEMP, TIMER, PROG, and TIME.

Brightness of the flame effect shown as a bar chart in 4 steps (50 steps internally).

Remote control set temperature in °C (thermostat function).

Room temperature in °C .

Selectable heat settings LOW HEAT / OFF.

Time display in format hh:mm – shown as 24hr.

Weekdays MON, TUE, WED, THU, FRI, SAT, SUN.

Menu functions

OFF switching off of all functions (stand-by mode).

FLAME switching on the flame effect from 0 (off) to 50 (max. brightness).

HEAT setting the desired heat position from 0 (off) to 1 (low heat).

TEMP preselection of the remote control set temperature from 5°C to 35°C.

TIMER selection of the run back timer function (from 1 minute to 4 hours 59 minutes). When the selected time is over the unit will be in stand-by mode.

PROG selection of the programming mode. 32 individual programs can be entered. This is a week timer where all functions of the unit can be checked time controlled.

TIME setting the time and the weekdays.

First steps

Fit batteries supplied.

Press switch 1 to ON (see Fig. 6).

Press switch 2 to AUTO (see Fig. 6)

The remote control is now ready.

Operating Instructions

Switching ON/OFF

The heater can be switched on by pressing the enter ~ or e f buttons.

The heater can be switched off by moving the cursor to the OFF menu item.

Flame brightness

Navigate the cursor to FLAME with the e f buttons. Press

­- to change the brightness of the fire effect from off (0) to maximum (50).

Heat settings

Navigate the cursor to HEAT with the e f buttons. Press ­

-to change the heat setting between off/low heat.

Note: If the room temperature is higher than the remote control set temperature located on the left side of LCD display, heat will not come on (see Thermostat operation below).

Thermostat

Navigate the cursor to TEMP with the e f buttons. Press ­

-to set the desired remote control set temperature between 5°C and 35°C and press enter ~. When the room tempera-

ture is higher than the remote control set temperature, the heater switches off automatically until the room tempera-

ture

falls below the remote control set temperature.

Runback timer

Navigate the cursor to TIMER with the e f buttons. Set the hours (0 to 4) with ­ - and press enter ~. Then set the minutes (0 to 59) with ­ - and press enter ~. Now the runback timer is activated (the symbol TIMER appears) and will switch the heater off automatically when the pre-set time is over.

Time setting

Navigate the cursor to TIME with the e f buttons. Press the enter button ~ to adjust the weekday with the ­ - buttons. Confirm with the enter button ~and set the hours and minutes with ­ -. Press enter ~ or f to leave the time menu.

Program mode

1.Navigate the cursor to PROG with the e f, buttons and press enter . Choose a program number between 1 and 32 with the ­ - buttons and press enter ~.

2.Set the days with ­ - . Single days, Monday until Friday, Saturday and Sunday or Monday until Sunday can be


chosen. Press the enter button ~ to accept.

3.

Set the program start time with ­ -

and confirm the


hours and minutes with the enter button ~.

4.

Set the program stop time with ­ -

and confirm the

hours and minutes with the enter button ~.

5.Set the remote control set temperature with ­ - and confirm with the enter button ~.

6. Set the brightness of the fire effect with ­ - from 0 to 50 and confirm with the enter button ~.

7.Set the heat setting between off/low heat/maximum heat with the ­ - button and confirm with the enter button ~.

8.All settings for the first program are done now. Enter a new program according to the steps 1-8 or activate the already entered program by leaving of this menu with the e button.

9.Now the program mode is active, the symbol PROG appears. The heater operates according to the entered information. While the program mode is activated, the start and stop time, the active program number and the remote control set temperature and the room temperature will be displayed alternating.

10.An entered program can be checked, edited and deleted just by navigating again into the PROG menu and pressing the enter button. With the ­ - buttons the different program numbers can be selected. To delete one program number, press the fbutton. The CP symbol (clear program) appears and by pressing the enter button ~ the current program will be deleted. e f leaves the menu without deleting the program.

Page 4
Image 4
Dimplex SP420 dimensions Remote Control Operation

SP420 specifications

The Dimplex SP420 is a revolutionary electric fireplace that combines functionality and aesthetics, making it a popular choice among homeowners looking for an efficient heating solution with a touch of elegance. This model is designed to complement modern interiors while providing warmth and ambiance, serving as both a heating appliance and a striking visual centerpiece.

At the heart of the Dimplex SP420 is its advanced electric heating technology, which allows for rapid heat distribution and user-friendly operation. The fireplace operates quietly, ensuring that it can be a part of any living space, without the distracting sounds often associated with traditional heating methods. It offers a powerful output of up to 2 kW, capable of effectively warming up medium to large-sized rooms.

One of the standout features of the SP420 is its patented LED flame technology, which generates a lifelike realistic fire effect. Unlike traditional fireplaces, the Dimplex SP420 does not burn wood or produce smoke, making it a cleaner and safer alternative. The LED flames can be operated independently of the heat settings, allowing users to enjoy the visual appeal of a fire even in warmer months.

The SP420 also comes equipped with a remote control, facilitating seamless operation from anywhere in the room. Additional user-friendly features include a programmable timer and adjustable thermostat, giving homeowners complete control over their heating preferences. The unit can be installed easily in various settings, whether it’s a wall-mounted fixture or a freestanding model, providing flexibility for any space.

Energy efficiency is another critical characteristic of the Dimplex SP420. The electric fireplace uses less energy compared to traditional heating methods, allowing homeowners to save on utility costs while maintaining a cozy environment. Its sleek design and stylish finish make it an attractive addition to any room, enhancing the overall aesthetic while also serving a practical purpose.

With its combination of sophisticated design, advanced technology, and efficient heating capabilities, the Dimplex SP420 stands out as an ideal choice for those who want to add warmth and style to their home without the hassle of traditional fireplaces. Whether for ambient enjoyment or as a primary heat source, the Dimplex SP420 is a versatile solution that meets diverse lifestyle needs.