IMPORTANT SAFETY
INSTRUCTIONS
CONTROL REFERENCE GUIDE
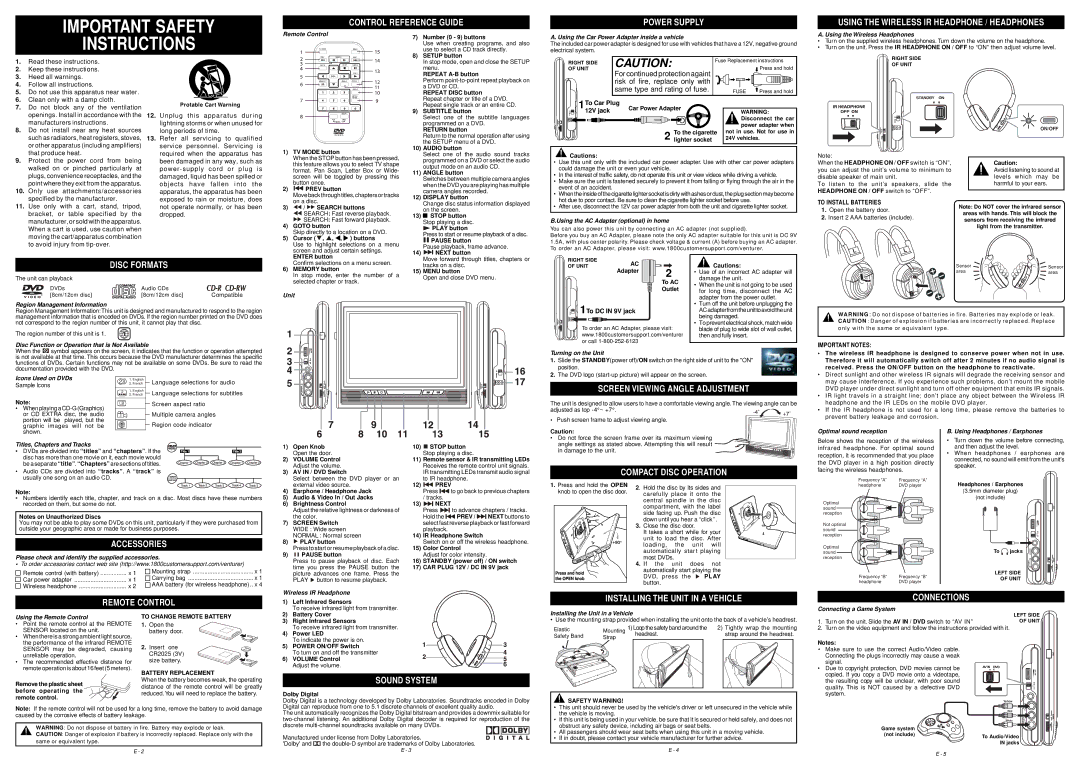
Remote Control
7) | Number (0 - 9) buttons |
| Use when creating programs, and also |
| use to select a CD track directly. |
8) | SETUP button |
POWER SUPPLY
A. Using the Car Power Adapter inside a vehicle
The included car power adapter is designed for use with vehicles that have a 12V, negative ground electrical system.
USING THE WIRELESS IR HEADPHONE / HEADPHONES
A. Using the Wireless Headphones
•Turn on the supplied wireless headphones. Turn down the volume on the headphone.
•Turn on the unit. Press the IR HEADPHONE ON / OFF to “ON” then adjust volume level.
1.Read these instructions.
2.Keep these instructions.
3.Heed all warnings.
4.Follow all instructions.
5.Do not use this apparatus near water.
6.Clean only with a damp cloth.
7.Do not block any of the ventilation openings. Install in accordance with the manufacturers instructions.
8.Do not install near any heat sources such as radiators, heat registers, stoves, or other apparatus (including amplifiers) that produce heat.
9.Protect the power cord from being walked on or pinched particularly at plugs, convenience receptacles, and the point where they exit from the apparatus.
10.Only use attachments/accessories specified by the manufacturer.
11.Use only with a cart, stand, tripod, bracket, or table specified by the manufacturer, or sold with the apparatus. When a cart is used, use caution when moving the cart/apparatus combination to avoid injury from tip-over.
Protable Cart Warning
12.Unplug this apparatus during lightning storms or when unused for long periods of time.
13.Refer all servicing to qualified service personnel. Servicing is required when the apparatus has been damaged in any way, such as power-supply cord or plug is damaged, liquid has been spilled or objects have fallen into the apparatus, the apparatus has been exposed to rain or moisture, does not operate normally, or has been dropped.
| | | |
1) | TV MODE button |
| When the STOP button has been pressed, |
| this feature allows you to select TV shape |
| format. Pan Scan, Letter Box or Wide- |
| screen will be toggled by pressing this |
2) | button once. |
| PREV button |
| Move back through titles, chapters or tracks |
3) | on a disc. |
/ | SEARCH buttons |
| | SEARCH: Fast reverse playback. |
| | SEARCH: Fast forward playback. |
4) | GOTO button |
| Skip directly to a location on a DVD. |
5) | Cursor ( | , , , ) buttons |
| Use to highlight selections on a menu |
| screen and adjust certain settings. |
| In stop mode, open and close the SETUP |
| menu. |
| REPEAT A-B button |
| Perform point-to-point repeat playback on |
| a DVD or CD. |
| REPEAT DISC button |
| Repeat chapter or title of a DVD. |
| Repeat single track or an entire CD. |
9) | SUBTITLE button |
| Select one of the subtitle languages |
| programmed on a DVD. |
| RETURN button |
| Return to the normal operation after using |
| the SETUP menu of a DVD. |
10) | AUDIO button |
| Select one of the audio sound tracks |
| programmed on a DVD or select the audio |
| output mode on an audio CD. |
11) | ANGLE button |
| Switches between multiple camera angles |
| when the DVD you are playing has multiple |
| camera angles recorded. |
12) | DISPLAY button |
| Change disc status information displayed |
13) | on the screen. |
| | STOP button |
| |
| |
| Stop playing a disc. |
| | | | PLAY button |
| Press to start or resume playback of a disc. |
| | | PAUSE button |
| Pause playback, frame advance. |
14) | | | | NEXT button |
RIGHT SIDE | CAUTION: | Fuse Replacement instructions |
| |
| | | | Press and hold |
OF UNIT | For continued protection againt | | |
| | | |
| risk of fire, replace only with | | | |
| same type and rating of fuse. | | FUSE | Press and hold |
1To Car Plug | Car Power Adapter | | WARNING: |
12V jack | | | |
| | | | Disconnect the car |
| | | | power adapter when |
| | To the cigarette | not in use. Not for use in |
| | 2 lighter socket | | 24V vehicles. |
 Cautions:
•Use this unit only with the included car power adapter. Use with other car power adapters could damage the unit or even your vehicle.
•In the interest of traffic safety, do not operate this unit or view videos while driving a vehicle.
•Make sure the unit is fastened securely to prevent it from falling or flying through the air in the event of an accident.
•Whentheinsideofthecigarettelightersocketisdirtywithashesordust,theplugsectionmaybecome hot due to poor contact. Be sure to clean the cigarette lighter socket before use.
•After use, disconnect the 12V car power adapter from both the unit and cigarette lighter socket.
B.Using the AC Adapter (optional) in home
You can also power this unit by connecting an AC adapter (not supplied).
Before you buy an AC Adapter, please note the only AC adapter suitable for this unit is DC 9V 1.5A, with plus center polarity. Please check voltage & current (A) before buying an AC adapter. To order an AC Adapter, please visit: www.1800customersupport.com/venturer.
RIGHT SIDE
OF UNIT
| | | ON/OFF |
| Note: | | |
| When the HEADPHONE ON / OFF switch is “ON”, | Caution: |
| you can adjust the unit’s volume to minimum to | Avoid listening to sound at |
| disable speaker of main unit. | | levels which may be |
| To listen to the unit’s speakers, slide the | harmful to your ears. |
| HEADPHONE ON / OFF switch to “OFF”. | |
| TO INSTALL BATTERIES | | Note: Do NOT cover the infrared sensor |
| 1. Open the battery door. | |
| | areas with hands. This will block the |
| 2. Insert 2 AAA batteries (include). |
| sensors from receiving the infrared |
| | |
| | | light from the transmitter. |
| L | L | |
DISC FORMATS
The unit can playback
DVDs | Audio CDs | |
[8cm/12cm disc] | [8cm/12cm disc] | Compatible |
Region Management Information
Region Management Information: This unit is designed and manufactured to respond to the region management information that is encoded on DVDs. If the region number printed on the DVD does not correspond to the region number of this unit, it cannot play that disc.
The region number of this unit is 1.
Disc Function or Operation that is Not Available
ENTER button |
Confirm selections on a menu screen. |
6) MEMORY button |
In stop mode, enter the number of a |
selected chapter or track. |
Unit
Move forward through titles, chapters or |
tracks on a disc. |
15) MENU button |
Open and close DVD menu. |
| RIGHT SIDE | AC | |
| OF UNIT | 2 |
| Adapter |
| |
| | |
To AC
Outlet
1To DC IN 9V jack
To order an AC Adapter, please visit: www.1800customersupport.com/venturer or call 1-800-252-6123
 Cautions:
•Use of an incorrect AC adapter will damage the unit.
•When the unit is not going to be used for long time, disconnect the AC adapter from the power outlet.
•Turn off the unit before unplugging the ACadapterfromtheunittoavoidtheunit being damaged.
•To prevent electrical shock, match wide blade of plug to wide slot of wall outlet, then and fully insert.
WARNING : Do not dispose of batteries in fire. Batteries may explode or leak.
CAUTION : Danger of explosion if batter ies are incorrectly replaced . Replace only with the same or equivalent type.
IMPORTANT NOTES:
When the  symbol appears on the screen, it indicates that the function or operation attempted is not available at that time. This occurs because the DVD manufacturer determines the specific functions of DVDs. Certain functions may not be available on some DVDs. Be sure to read the documentation provided with the DVD.
Icons Used on DVDs | | 2 | | 1. English | | Language selections for audio |
Sample lcons | | 2. French | | |
| | | | | |
| | | 2 | | 1. English | | Language selections for subtitles |
| | | | | 2. French | | |
| | | | | | | |
Note: | | | | | | Screen aspect ratio |
LB | | | |
| | |
• When playing a CD-G (Graphics) | | | | | | | |
or CD EXTRA disc, the audio | | | | | | | Multiple camera angles |
| 2 | | | |
| | | | |
portion will be played, but the | | | | | | | | Region code indicator |
| | | | | |
| | 1 | | | | |
graphic images will not be | | | | |
| | | |
Turning on the Unit
1.Slide the STANDBY(power off)/ON switch on the right side of unit to the "ON" position.
2.The DVD logo (start-up picture) will appear on the screen.
SCREEN VIEWING ANGLE ADJUSTMENT
The unit is designed to allow users to have a comfortable viewing angle.The viewing angle can be adjusted as top -4°~ +7°.
•Push screen frame to adjust viewing angle.
•The wireless IR headphone is designed to conserve power when not in use. Therefore it will automatically switch off after 2 minutes if no audio signal is received. Press the ON/OFF button on the headphone to reactivate.
•Direct sunlight and other wireless IR signals will degrade the receiving sensor and may cause interference. If you experience such problems, don’t mount the mobile DVD player under direct sunlight and turn off other equipment that emits IR signals.
•IR light travels in a straight line; don’t place any object between the Wireless IR headphone and the IR LEDs on the mobile DVD player.
•If the IR headphone is not used for a long time, please remove the batteries to
prevent battery leakage and corrosion.
Titles, Chapters and Tracks
• DVDs are divided into “titles” and “chapters”. If the disc has more than one movie on it, each movie would be a separate “title”. “Chapters” are sections of titles.
• Audio CDs are divided into “tracks”. A “track” is usually one song on an audio CD.
1) | Open Knob |
| Open the door. |
2) | VOLUME Control |
| Adjust the volume. |
3) | AV IN / DVD Switch |
| Select between the DVD player or an |
10) | | | STOP button |
| |
| Stop playing a disc. |
11) | Remote sensor & IR transmitting LEDs |
| Receives the remote control unit signals. |
| IR transmitting LEDs transmit audio signal |
| to IR headphone. |
Caution:
• Do not force the screen frame over its maximum viewing angle settings as stated above. Attempting this will result in damage to the unit.
COMPACT DISC OPERATION
Optimal sound reception
Below shows the reception of the wireless infrared headphone. For optimal sound reception, it is recommended that you place the DVD player in a high position directly facing the wireless headphones.
Frequency “A” | Frequency “A” |
B. Using Headphones / Earphones
•Turn down the volume before connecting, and then adjust the level.
•When headphones / earphones are connected, no sound will emit from the unit's speaker.
Note:
•Numbers identify each title, chapter, and track on a disc. Most discs have these numbers recorded on them, but some do not.
Notes on Unauthorized Discs
You may not be able to play some DVDs on this unit, particularly if they were purchased from outside your geographic area or made for business purposes.
ACCESSORIES
Please check and identify the supplied accessories.
•To order accessories contact web site (http://www.1800customersupport.com/venturer)
| Remote control (with battery) | x 1 | Mounting strap | x 1 |
| Carrying bag | x 1 |
| Car power adapter | x 1 |
| AAA battery (for wireless headphone) | x 4 |
| Wireless headphone | x 2 |
| | |
| external video source. |
4) | Earphone / Headphone Jack |
5) | Audio & Video In / Out Jacks |
6) | Brightness Control |
| Adjust the relative lightness or darkness of |
| the color. |
7) | SCREEN Switch |
| WIDE : Wide screen |
| NORMAL : Normal screen |
8) | PLAY button |
| Press to start or resume playback of a disc. |
9) | PAUSE button |
Press to pause playback of disc. Each time you press the PAUSE button the picture advances one frame. Press the PLAY  button to resume playback.
Wireless IR Headphone
| | | | | | | | | | | |
12) | | | PREV | |
| Press | | | | | to go back to previous chapters |
| |
| / tracks. | | | | | |
13) | | | NEXT | |
| Press | | to advance chapters / tracks. |
| |
| Hold the | | | PREV / | | | NEXT buttons to |
| | | |
| select fast reverse playback or fast forward |
| playback. | | | | | |
14) | IR Headphone Switch | |
| Switch on or off the wireless headphone. |
15) | Color Control | |
| Adjust for color intensity. | |
16) | STANDBY (power off) / ON switch |
17) | CAR PLUG 12V / DC IN 9V jack |
1.Press and hold the OPEN knob to open the disc door.
2. Hold the disc by its sides and carefully place it onto the central spindle in the disc compartment, with the label side facing up. Push the disc down until you hear a “click” .
3.Close the disc door.
It takes a short while for your unit to load the disc. After loading, the unit will automatically start playing most DVDs.
4.If the unit does not automatically start playing the
DVD, press the  PLAY button.
Optimal sound reception
Not optimal sound reception
Optimal sound reception
Frequency “B” | Frequency “B” |
headphone | DVD player |
Headphones / Earphones
(3.5mm diameter plug)
(not include)
To  jacks
jacks
LEFT SIDE
OF UNIT
Using the Remote Control
•Point the remote control at the REMOTE SENSOR located on the unit.
•When there is a strong ambient light source, the performance of the infrared REMOTE SENSOR may be degraded, causing unreliable operation.
•The recommended effective distance for remote operation is about 16 feet (5 meters).
Remove the plastic sheet before operating the remote control.
TO CHANGE REMOTE BATTERY
1.Open the
battery door.
2. Insert one CR2025 (3V) size battery.
BATTERY REPLACEMENT
When the battery becomes weak, the operating distance of the remote control will be greatly reduced. You will need to replace the battery.
2) | Battery Cover |
3) | Right Infrared Sensors |
| To receive infrared light from transmitter. |
4) | Power LED |
| To indicate the power is on. |
5) | POWER ON/OFF Switch |
| To turn on and off the transmitter |
6) | VOLUME Control |
| Adjust the volume. |
SOUND SYSTEM
Dolby Digital
Dolby Digital is a technology developed by Dolby Laboratories. Soundtracks encoded in Dolby
Installing the Unit in a Vehicle
• Use the mounting strap provided when installing the unit onto the back of a vehicle’s headrest.
Elastic | Mounting | 1) Loop the safety band around the | 2) Tightly wrap the mounting |
Safety Band | Strap | | headrest. | | strap around the headrest. |
| | | | | | | |
 SAFETY WARNING!
1.Turn on the unit. Slide the AV IN / DVD switch to “AV IN”
2.Turn on the video equipment and follow the instructions provided with it.
Notes:
•Make sure to use the correct Audio/Video cable. Connecting the plugs incorrectly may cause a weak signal.
• Due to copyright protection, DVD movies cannot be copied. If you copy a DVD movie onto a videotape, the resulting copy will be unclear, with poor sound quality. This is NOT caused by a defective DVD system.
Yellow
Note: If the remote control will not be used for a long time, remove the battery to avoid damage caused by the corrosive effects of battery leakage.
WARNING: Do not dispose of battery in fire. Battery may explode or leak.
CAUTION: Danger of explosion if battery is incorrectly replaced. Replace only with the same or equivalent type.
Digital can reproduce from one to 5.1 discrete channels of excellent quality audio.
The unit automatically recognizes the Dolby Digital bitstream and provides a downmix suitable for two-channel listening. An additional Dolby Digital decoder is required for reproduction of the discrete multi-channel soundtracks available on many DVDs.
Manufactured under license from Dolby Laboratories.
'Dolby' and  the double-D symbol are trademarks of Dolby Laboratories.
•This unit should never be used by the vehicle's driver or left unsecured in the vehicle while the vehicle is moving.
•If this unit is being used in your vehicle, be sure that it is secured or held safely, and does not obstruct any safety device, including air bags or seat belts.
•All passengers should wear seat belts when using this unit in a moving vehicle.
•If in doubt, please contact your vehicle manufacturer for further advice.
Red
White
Game system
(not include)  To Audio/Video IN jacks