In a caravan on tow, the usual continuous rolling and pitching motion, even on long hill climbs, will not normally cause the operation of the cooling unit to be affected unduly, but when the caravan is at rest for more than about half an hour, a list of more than about 3º in any direction may interfere with the operation. (Note: 3º corresponds to about 50 mm at the end of a metre-long plum-line, or 1 1/2" at the end of a 30" plumb-line). If the list does not exceed 8º, cooling is usually resumed when the refrigerator returns to the upright position, but if it does exceed 8º, the burner should be extinguished or the electricity supply disconnected, as applicable, soon after the list has occurred otherwise the cooling unit may become damaged due to overheating of the boiler.
When the caravan is to be at rest for a period, with the refrigerator operating, the caravan should be levelled, in both directions, so that the refrigerator is level. This can be checked with a small spirit level placed on the ice-tray shelf inside the refrigerator, viewed from above with the aid of a small mirror. If it is not convenient to level the vehicle and it is to stand out of level for more than half an hour, the refrigerator should be temporarily turned off.
Note:-Having checked initially that the refrigerator has been installed level in both directions in relation to the caravan, you may find a more accessible flat surface on which to place the spirit level during future levelling operations. A position on the caravan draw-bar, for instance, for placing (or permanently fixing) a 2-way or circular spirit level, where it may be viewed whilst adjusting the jockey wheel height, will be an aid to speedy levelling of the caravan and, therefore, the refrigerator.
15. GAS PRESSURE
Before using the refrigerator on bottled gas check that the types of gas pressure regulator that you intend to use are compatible with the size of burner jet and gas control valve fitted to the refrigerator.
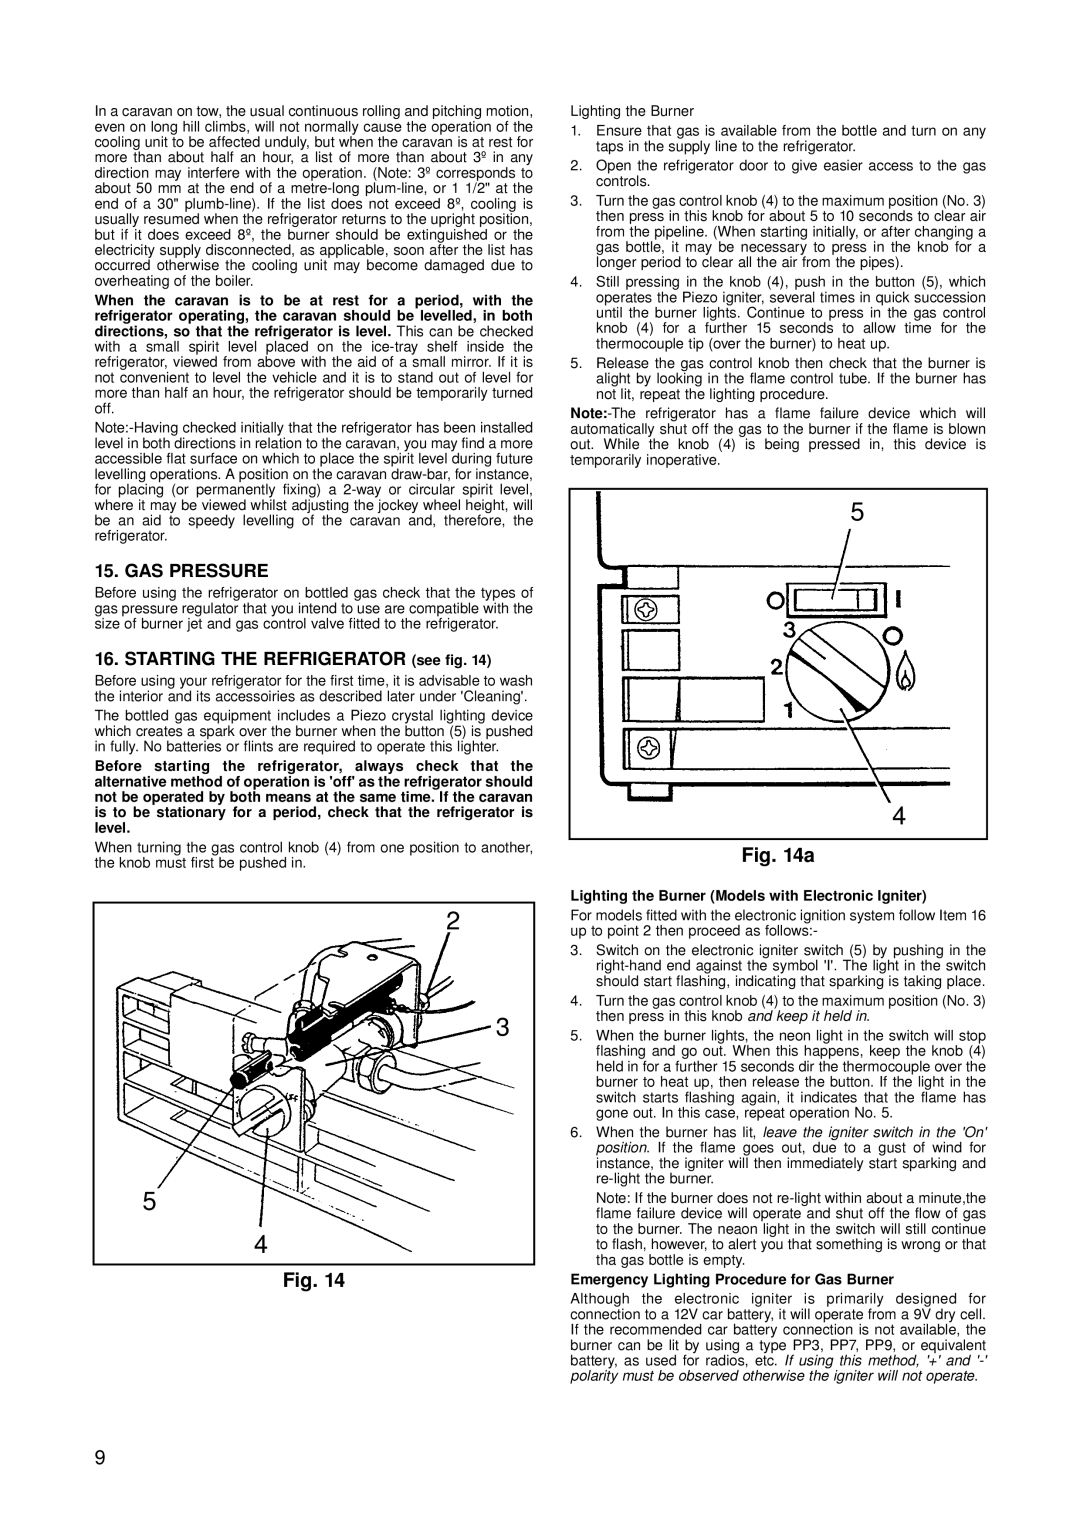
16. STARTING THE REFRIGERATOR (see fig. 14)
Before using your refrigerator for the first time, it is advisable to wash the interior and its accessoiries as described later under 'Cleaning'.
The bottled gas equipment includes a Piezo crystal lighting device which creates a spark over the burner when the button (5) is pushed in fully. No batteries or flints are required to operate this lighter.
Before starting the refrigerator, always check that the alternative method of operation is 'off' as the refrigerator should not be operated by both means at the same time. If the caravan is to be stationary for a period, check that the refrigerator is level.
When turning the gas control knob (4) from one position to another, the knob must first be pushed in.
2
3
5
4
Fig. 14
Lighting the Burner
1.Ensure that gas is available from the bottle and turn on any taps in the supply line to the refrigerator.
2.Open the refrigerator door to give easier access to the gas controls.
3.Turn the gas control knob (4) to the maximum position (No. 3) then press in this knob for about 5 to 10 seconds to clear air from the pipeline. (When starting initially, or after changing a gas bottle, it may be necessary to press in the knob for a longer period to clear all the air from the pipes).
4.Still pressing in the knob (4), push in the button (5), which operates the Piezo igniter, several times in quick succession until the burner lights. Continue to press in the gas control knob (4) for a further 15 seconds to allow time for the thermocouple tip (over the burner) to heat up.
5.Release the gas control knob then check that the burner is alight by looking in the flame control tube. If the burner has not lit, repeat the lighting procedure.
Note:-The refrigerator has a flame failure device which will automatically shut off the gas to the burner if the flame is blown out. While the knob (4) is being pressed in, this device is temporarily inoperative.
5
4
Fig. 14a
Lighting the Burner (Models with Electronic Igniter)
For models fitted with the electronic ignition system follow Item 16 up to point 2 then proceed as follows:-
3.Switch on the electronic igniter switch (5) by pushing in the right-hand end against the symbol 'I'. The light in the switch should start flashing, indicating that sparking is taking place.
4.Turn the gas control knob (4) to the maximum position (No. 3) then press in this knob and keep it held in.
5.When the burner lights, the neon light in the switch will stop flashing and go out. When this happens, keep the knob (4) held in for a further 15 seconds dir the thermocouple over the burner to heat up, then release the button. If the light in the switch starts flashing again, it indicates that the flame has gone out. In this case, repeat operation No. 5.
6.When the burner has lit, leave the igniter switch in the 'On' position. If the flame goes out, due to a gust of wind for instance, the igniter will then immediately start sparking and re-light the burner.
Note: If the burner does not re-light within about a minute,the flame failure device will operate and shut off the flow of gas to the burner. The neaon light in the switch will still continue to flash, however, to alert you that something is wrong or that tha gas bottle is empty.
Emergency Lighting Procedure for Gas Burner
Although the electronic igniter is primarily designed for connection to a 12V car battery, it will operate from a 9V dry cell. If the recommended car battery connection is not available, the burner can be lit by using a type PP3, PP7, PP9, or equivalent battery, as used for radios, etc. If using this method, '+' and '-' polarity must be observed otherwise the igniter will not operate.