Using the Label Maker for the First Time

The first time you turn on the power, you are asked to select the language and label width. These selections remain set until you change them.

To set up the label maker

1Press to turn on the label maker.

The first time you turn on the label maker, the system may take a few moments to start up.

2Select the language and tap Next.

3Select the width of the label cassette currently in the label maker and tap Done.

You are now ready to print your first label.

To print a label

1Using the keyboard, enter text to create a simple label.

2Press .

The label prints and is

automatically cut. To turn off the Split backing auto-cut feature, see Turning

off Auto-Cut on page 14.

3Remove the backing from the label to expose the adhesive, and then attach the label.

Congratulations! You printed your first label. Continue reading to learn more about the features available for creating labels.

Getting to Know the Label Maker

Become familiar with the location of the function keys on your label maker. Refer to Figure 1 on page 5. The following sections describe each feature in detail.

Power

The

key turns the label maker power on and off. To

save power, the label maker goes into standby mode

after two minutes of inactivity. Pressing the

key once

exits standby mode.


To turn the power completely off, press and hold the key for five seconds.

When the charging adapter is connected, a clock appears in the display while the label maker is in standby mode.

When the charging adapter is not connected, the clock does not appear and the label maker remains in standby for two additional minutes before the power is turned off.

When the label maker power is turned off automatically, the current label text and formatting are remembered and will be displayed when power to the label maker is turned back on.

When the label maker power is turned off manually or when the battery pack is removed and the power adapter is disconnected, the current label text and formatting are lost.

Home

The key displays the Home screen or cancels any dialog box or pop-up message.

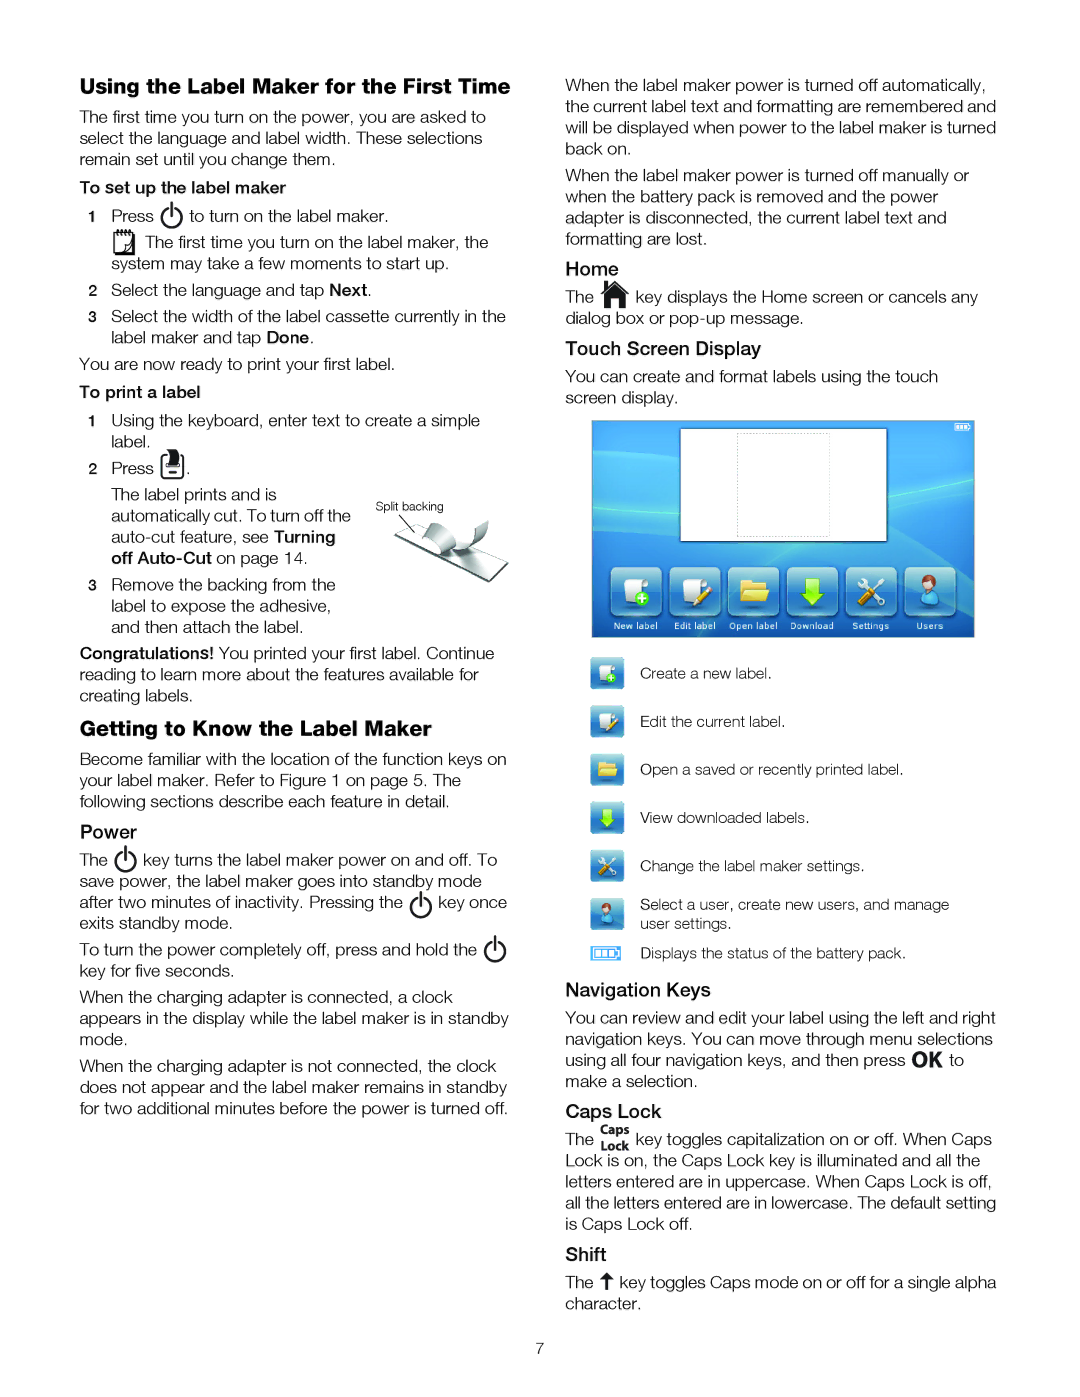
Touch Screen Display

You can create and format labels using the touch screen display.

Create a new label.

Edit the current label.

Open a saved or recently printed label.

View downloaded labels.

Change the label maker settings.

Select a user, create new users, and manage user settings.

Displays the status of the battery pack.

Navigation Keys

You can review and edit your label using the left and right navigation keys. You can move through menu selections

using all four navigation keys, and then press to make a selection.

Caps Lock

The key toggles capitalization on or off. When Caps Lock is on, the Caps Lock key is illuminated and all the letters entered are in uppercase. When Caps Lock is off, all the letters entered are in lowercase. The default setting is Caps Lock off.

Shift

The key toggles Caps mode on or off for a single alpha character.

7

Page 7
Image 7
Dymo 1790417, 500TS manual Using the Label Maker for the First Time, Getting to Know the Label Maker

1790417, 500TS specifications

The Dymo 500TS (Model Number: 1790417) is a high-performance label maker designed to meet the varied needs of professionals, home users, and businesses alike. This innovative device excels in producing high-quality, versatile labels, making it a valuable tool for organizing, identifying, and categorizing items efficiently.

One of the standout features of the Dymo 500TS is its intuitive touchscreen interface. This user-friendly display allows for easy navigation through the device’s extensive range of functions and settings. Users can quickly select label types, input text, and choose from a selection of fonts and styles, all with a simple touch of the screen. The touchscreen also enhances the overall user experience by minimizing mistakes and streamlining the labeling process.

The Dymo 500TS employs thermal printing technology, which means it does not require ink or toner to produce sharp, clear labels. This feature not only reduces ongoing costs but also contributes to the environmental sustainability of using the device. The labels produced are resistant to smudging and water, ensuring durability and longevity, making them suitable for both indoor and outdoor applications.

This label maker supports a variety of label sizes and types, allowing users to create labels for a wide range of applications—whether it’s organizing files, labeling equipment, or even crafting personalized gifts. The Dymo 500TS is compatible with Dymo’s extensive label stock offerings, including various colors and materials, giving users limitless creativity in their labeling projects.

In terms of connectivity, the Dymo 500TS can easily connect to a computer via USB. This enables users to design labels using Dymo’s software, which offers additional features such as importing images, adding barcodes, and more. The ability to design labels on a computer and then print directly from the Dymo 500TS adds another layer of versatility and precision to this already capable device.

The compact design of the Dymo 500TS makes it easy to use in various settings, from home offices to large businesses. Its portable nature means users can take it wherever needed, making it an excellent choice for on-the-go labeling tasks.

Overall, the Dymo 500TS (1790417) offers a combination of advanced technology, user-friendly features, and durability, making it an essential tool for anyone in need of high-quality labeling solutions. Whether for professional use or personal projects, this label maker stands out as a reliable and efficient choice.