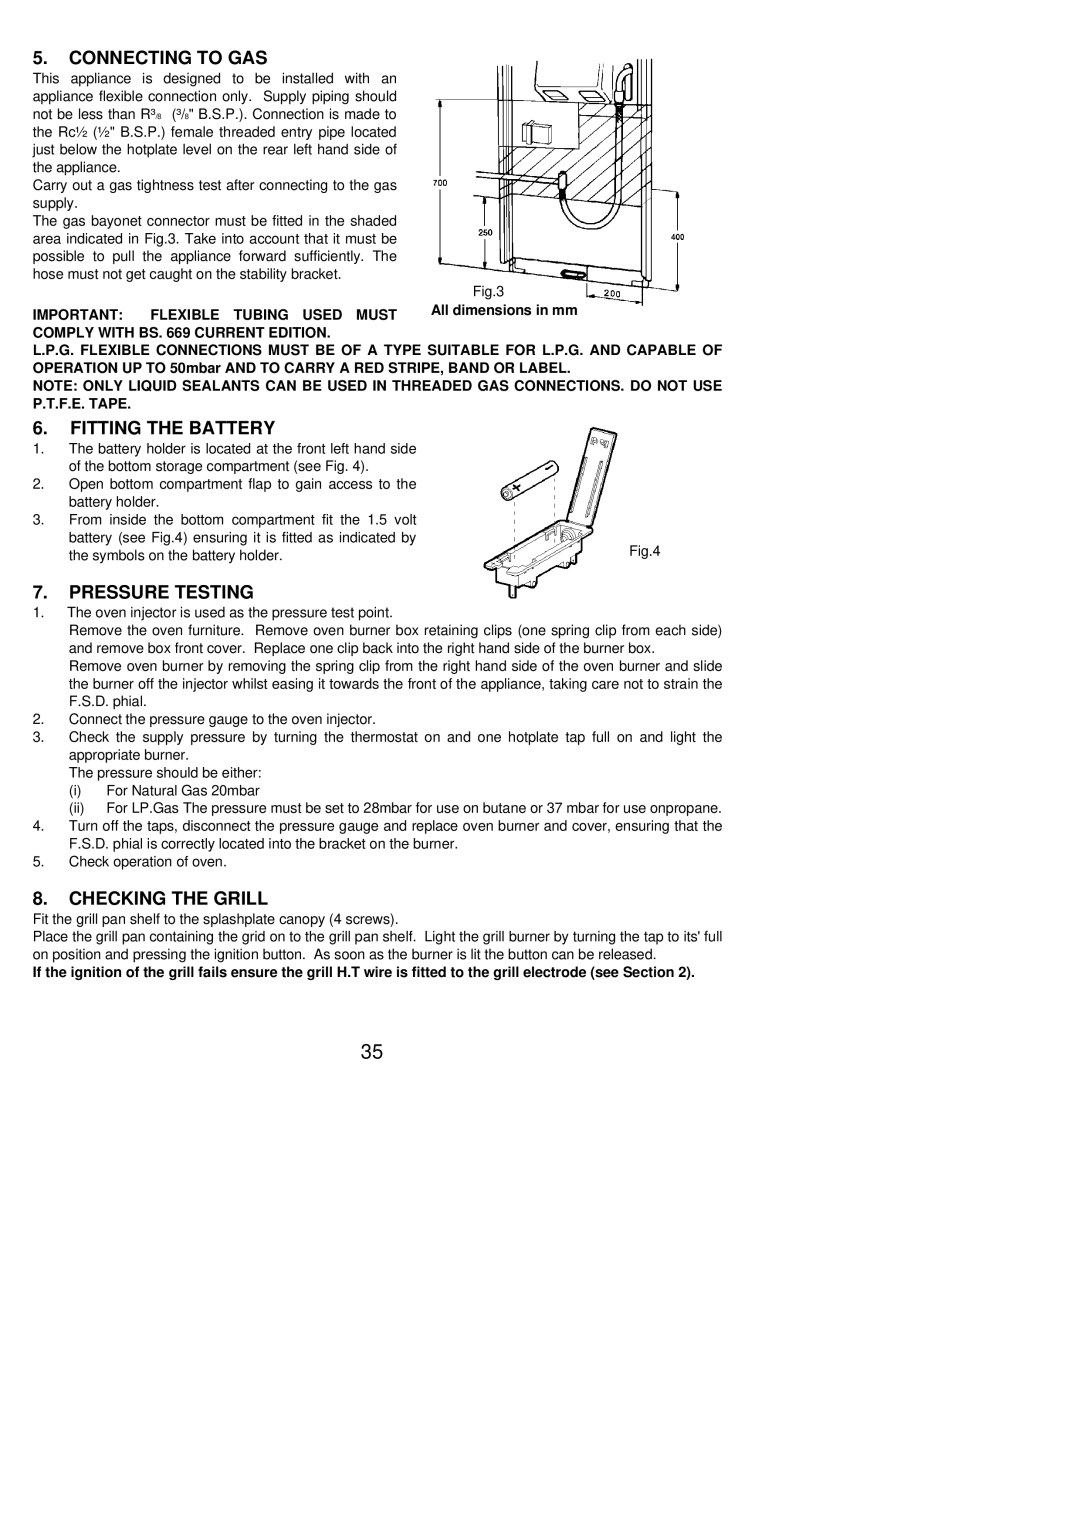
Fig.3
All dimensions in mm

5.CONNECTING TO GAS

This appliance is designed to be installed with an appliance flexible connection only. Supply piping should not be less than R³/8 (³/8" B.S.P.). Connection is made to the Rc½ (½" B.S.P.) female threaded entry pipe located just below the hotplate level on the rear left hand side of the appliance.

Carry out a gas tightness test after connecting to the gas supply.

The gas bayonet connector must be fitted in the shaded area indicated in Fig.3. Take into account that it must be possible to pull the appliance forward sufficiently. The hose must not get caught on the stability bracket.

IMPORTANT: FLEXIBLE TUBING USED MUST COMPLY WITH BS. 669 CURRENT EDITION.

L.P.G. FLEXIBLE CONNECTIONS MUST BE OF A TYPE SUITABLE FOR L.P.G. AND CAPABLE OF OPERATION UP TO 50mbar AND TO CARRY A RED STRIPE, BAND OR LABEL.

NOTE: ONLY LIQUID SEALANTS CAN BE USED IN THREADED GAS CONNECTIONS. DO NOT USE P.T.F.E. TAPE.

6.FITTING THE BATTERY

1.The battery holder is located at the front left hand side of the bottom storage compartment (see Fig. 4).

2.Open bottom compartment flap to gain access to the battery holder.

3.From inside the bottom compartment fit the 1.5 volt

battery (see Fig.4) ensuring it is fitted as indicated by

Fig.4

the symbols on the battery holder.


7.PRESSURE TESTING

1.The oven injector is used as the pressure test point.

Remove the oven furniture. Remove oven burner box retaining clips (one spring clip from each side) and remove box front cover. Replace one clip back into the right hand side of the burner box.

Remove oven burner by removing the spring clip from the right hand side of the oven burner and slide the burner off the injector whilst easing it towards the front of the appliance, taking care not to strain the F.S.D. phial.

2.Connect the pressure gauge to the oven injector.

3.Check the supply pressure by turning the thermostat on and one hotplate tap full on and light the appropriate burner.

The pressure should be either:

(i)For Natural Gas 20mbar

(ii)For LP.Gas The pressure must be set to 28mbar for use on butane or 37 mbar for use onpropane.

4.Turn off the taps, disconnect the pressure gauge and replace oven burner and cover, ensuring that the F.S.D. phial is correctly located into the bracket on the burner.

5.Check operation of oven.

8.CHECKING THE GRILL

Fit the grill pan shelf to the splashplate canopy (4 screws).

Place the grill pan containing the grid on to the grill pan shelf. Light the grill burner by turning the tap to its' full on position and pressing the ignition button. As soon as the burner is lit the button can be released.

If the ignition of the grill fails ensure the grill H.T wire is fitted to the grill electrode (see Section 2).

35

Page 35
Image 35
Electrolux 55GS1 installation instructions Connecting to GAS, Fitting the Battery, Pressure Testing, Checking the Grill

55GS1 specifications

The Electrolux 55GS1 is a modern refrigerator that combines cutting-edge technology with sleek design to offer users an optimal food storage solution. Designed for those who prioritize both style and performance, the 55GS1 stands out with its impressive range of features and functionalities.

One of the standout characteristics of the Electrolux 55GS1 is its Energy Efficiency. With an energy rating of A+++, this unit is designed to consume less energy, which not only helps in reducing utility bills but also contributes to a more sustainable lifestyle. This eco-friendly feature allows consumers to enjoy the benefits of a high-performing refrigerator while being mindful of their environmental impact.

Another key feature is the Adaptive Technology. The 55GS1 employs intelligent sensors that monitor internal conditions and adjust cooling levels accordingly. This ensures that food stays fresher for longer, maintaining optimal temperatures for various types of food. The precision cooling technology helps in preventing temperature fluctuations, enhancing food preservation capabilities.

The refrigerator also boasts a No Frost function, significantly reducing the need for manual defrosting. This feature makes maintenance easy, ensuring that frost buildup is minimized, and airflow is optimized throughout the fridge and freezer compartments. Users can enjoy hassle-free storage without worrying about ice accumulation interfering with their favorite foods.

Additionally, the spacious interior of the 55GS1 is designed for maximum storage efficiency. Adjustable shelves allow for customized organization, accommodating larger items with ease. There are designated compartments for fruits and vegetables, maintaining humidity levels to keep produce fresh and crisp longer. The multi-airflow system ensures uniform temperature and humidity throughout, preserving the quality of food stored in different zones.

The Electrolux 55GS1 also showcases a user-friendly digital display. This interface allows for easy adjustments to settings, including temperature controls, and provides real-time status updates about the appliance's performance.

Overall, the Electrolux 55GS1 exemplifies a perfect balance of modern design, advanced technology, and practical features, making it an ideal choice for anyone seeking a reliable and efficient refrigerator for their kitchen. Whether it’s for a large family or an individual, this model is adept at meeting varying storage needs while ensuring that food remains fresh and delicious.