CRP-22 CRP-26
Network Supported
Owner’s Manual
Classroom Projector
Features and Design
Table of Contents
To the Owner
Safety Precaution
RISK OF ELECTRIC SHOCK DO NOT OPEN
READ AND KEEP THIS OWNERS MANUAL FOR LATER USE
NOTE FOR CUSTOMERS IN THE US
Safety Instructions
Installing the Projector in Proper Position
Safety Instructions Air Circulation
Moving the Projector
CAUTION IN CARRYING OR TRANSPORTING THE PROJECTOR
Compliance
AC Power Cord Requirement
Federal Communications Commission Notice
WARNING THIS APPARATUS MUST BE EARTHED
Front
Part Names and Functions
Back
Bottom
Notes on using ELMO document cameras
Part Names and Functions Rear Terminal
① CONTROL PORT
② COMPUTER IN 1 /S-VIDEO IN / COMPONENT IN
② POINT VOLUME -/+ buttons
Part Names and Functions Top Control
③ AUTO SETUP button
⑤ POWER indicator
Remote Control
Part Names and Functions
Note
Remote Control Operating Range
Part Names and Functions Remote Control Battery Installation
Remote Control Code
Two AAA size batteries
Adjustable Foot
Installation
Positioning the Projector
300wide
Cables used for connection
Installation Connecting to a Computer
Note
Note
Note
Installation Connecting to Video Equipment
Installation Connecting to Component Video and RGB Scart Equipment
Note
Y, Pb/Cb, Pr/Cr
Connecting the AC Power Cord
Installation
Note
NOTE ON THE POWER CORD
Turning On the Projector
Basic Operation
Note
Note
Basic Operation
What is PIN code?
Enter a PIN code
Note
Basic Operation Turning Off the Projector
Power off? disappears after 4 seconds
Note
Remote Control
Basic Operation How to Operate the On-Screen Menu
Top Control
On-Screen Menu
For detailed functions of each menu, see “Menu Tree” on pages
Basic Operation Menu Bar
Auto Setup Function
Zoom and Focus Adjustment
Keystone Correction
Basic Operation
Direct Operation
Basic Operation Sound Adjustment
Menu Operation
Volume
Remote Control
Basic Operation Remote Control Operation
COMPUTER 1/2, VIDEO, S-VIDEO and COMPONENT
buttons
Basic Operation
P-TIMER button
NO SHOW button
IMAGE button
Input Source Selection RGB Computer 1/Computer
Computer Input
Direct Operation
Menu Operation
Selecting Computer System Manually
Computer Input Computer System Selection
To store adjustment parameters
Computer Input Auto PC Adjustment
Menu Operation
Auto PC adj
PC adjust Menu
Computer Input Manual PC Adjustment
Fine sync
Total dots
Reset
Computer Input
Mode free
Store
Direct Operation
Computer Input Image Mode Selection
Menu Operation
Dynamic
Reset
Image Adjustment
Computer Input
Contrast
Computer Input
Screen Size Adjustment
Store
Normal
Custom
Computer Input
Position H/V
For zooming in and out the images Digital zoom +
Input Source Selection Video, S-video
Video Input
Direct Operation
Menu Operation
Direct Operation
Video Input Input Source Selection Component, RGB Scart 21-pin
Menu Operation
Input Menu
COMPONENT VIDEO SIGNAL FORMAT
Video Input Video System Selection
Select Video , S-video or Computer 1Component
Auto
Image Mode Selection
Video Input
Direct Operation
Menu Operation
Contrast
Video Input Image Adjustment
Brightness
Color
Reset
Disabled
Video Input
Sharpness
Normal
Video Input Screen Size Adjustment
Wide
Custom
Setting
Setting
Language
Menu position
Auto setup
Setting
Input search
Auto PC adj
Power off? p.20
Setting
Keystone
Keystone
Logo Logo and Logo PIN code lock settings
Setting
When On is selected in the Logo PIN code lock function
Logo select
When Logo PIN code lock is set to On, capture cannot be selected
Setting
Capture
Note
Enter a Logo PIN code
Change the Logo PIN code lock setting
Logo PIN code change
Setting
Ceiling
Setting
Ceiling
Rear
Power management
Setting
Shut down
Note
Notes on using the document camera
Setting
Standby mode
Note
Setting
Lamp control
Lamp replacement icon
Remote control
Key lock PIN code lock
Setting
Security Key lock and PIN code lock
Key lock
Change the PIN code
Change the PIN code lock setting
Setting
Enter a PIN code
Lamp counter reset
Setting
Fan control
Note
Factory default
Setting
Filter counter
Note
Input Source Information Display
Information
Power management Off, Ready, Shut down or Timer is displayed Key lock
Remote control
WARNING indicator
Maintenance and Cleaning
Note
Then check the matters below
Maintenance and Cleaning Cleaning the Filters
Resetting the Filter Counter
RECOMMENDATION
Maintenance and Cleaning Attaching the Lens Cap
Cleaning the Projection Lens
Cleaning the Projector Cabinet
Lamp Replacement
Maintenance and Cleaning
Reset the lamp replacement counter
Note
ORDER REPLACEMENT LAMP
LAMP HANDLING PRECAUTIONS
Replacement Lamp Type No
Model No. of your projector
Appendix
Troubleshooting
Problem
No power
Auto PC adjustment function
Appendix
when 480p,575p.720p,480i,575i,1035i or 1080i is selected. See
The setting does not remain after turning off power
Indicator blinks or lights
The Remote Control does
Appendix
The image is distorted or runs off
Appendix
Computer Input/Video Input Input
Appendix Menu Tree
Sound
Computer Input
Video Input
Setting
AutoSetting
Image Adjust Screen
Appendix 
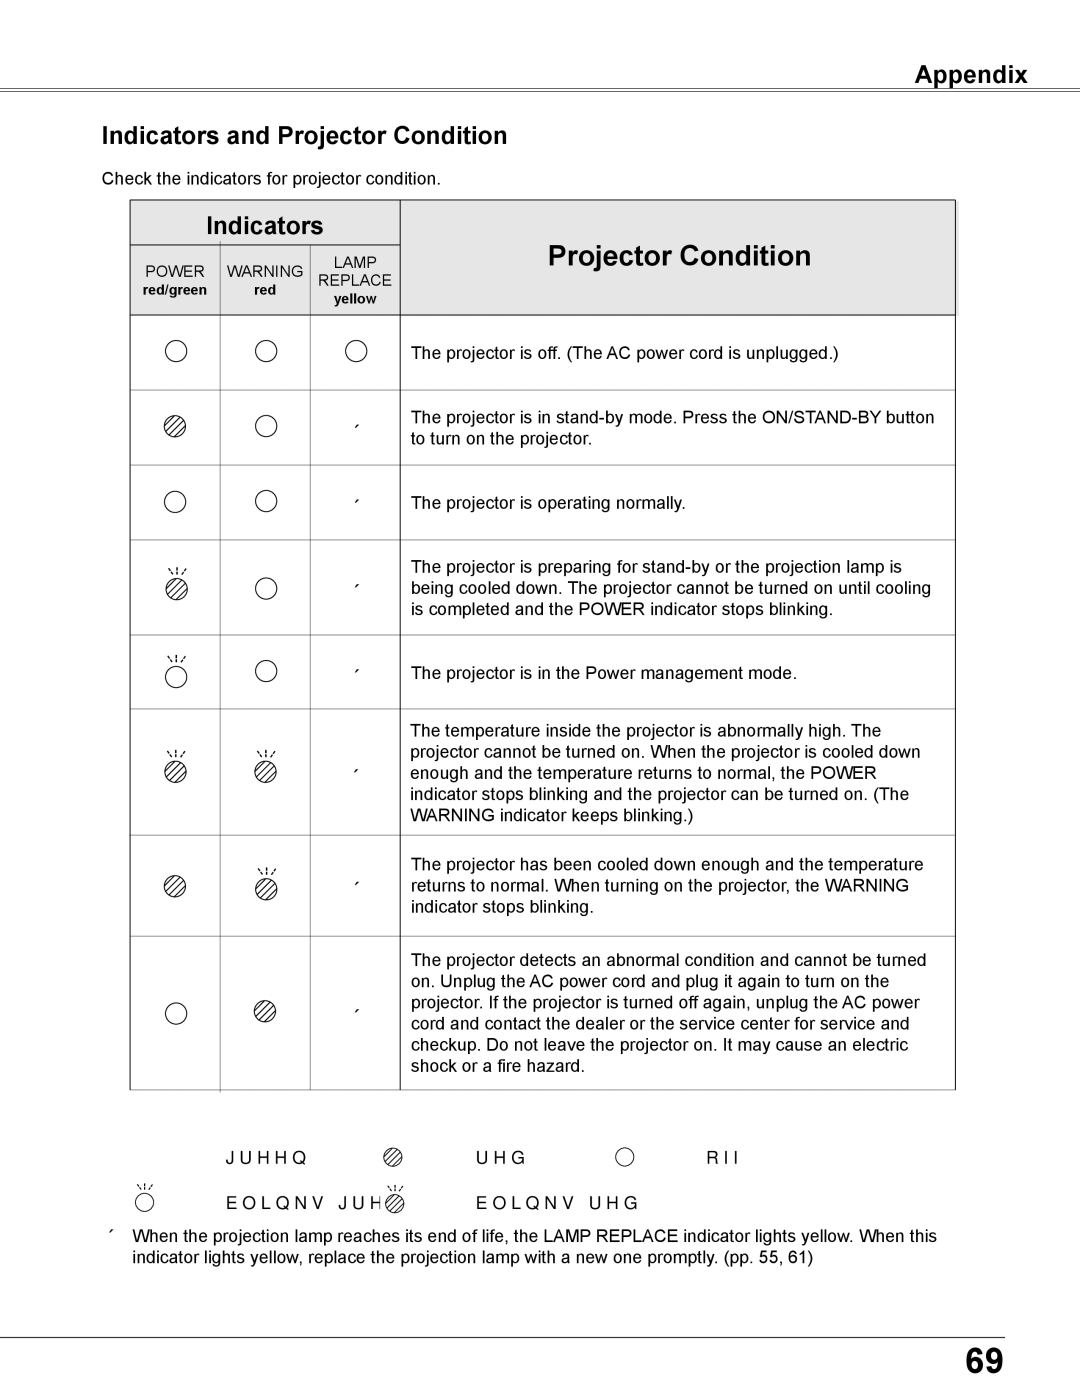
Indicators and Projector Condition
Indicators
Projector Condition
RESOLUTION
Appendix Compatible Computer Specifications
RESOLUTION
Note
Panel Resolution
Technical Specifications
Signal Compatibility
Power
Accessories
Optional Parts
Appendix
Model No
Appendix PJ Link Notice
CONTROL PORT CONNECTOR D-sub 9 pin
Appendix Configurations of Terminals
LAN TERMINAL
TX +
Appendix PIN Code Number Memo
PIN Code Lock No
Logo PIN Code Lock No
Appendix
Dimensions
Cypress Pointe Business Park 5676 Corporate Avenue
OVERSEAS SUBSIDIARY COMPANIES
Cypress, CA 90630, U.S.A Tel714 828-8457 Fax714
Neanderstr