How to Put Your Ceiling Fan Together

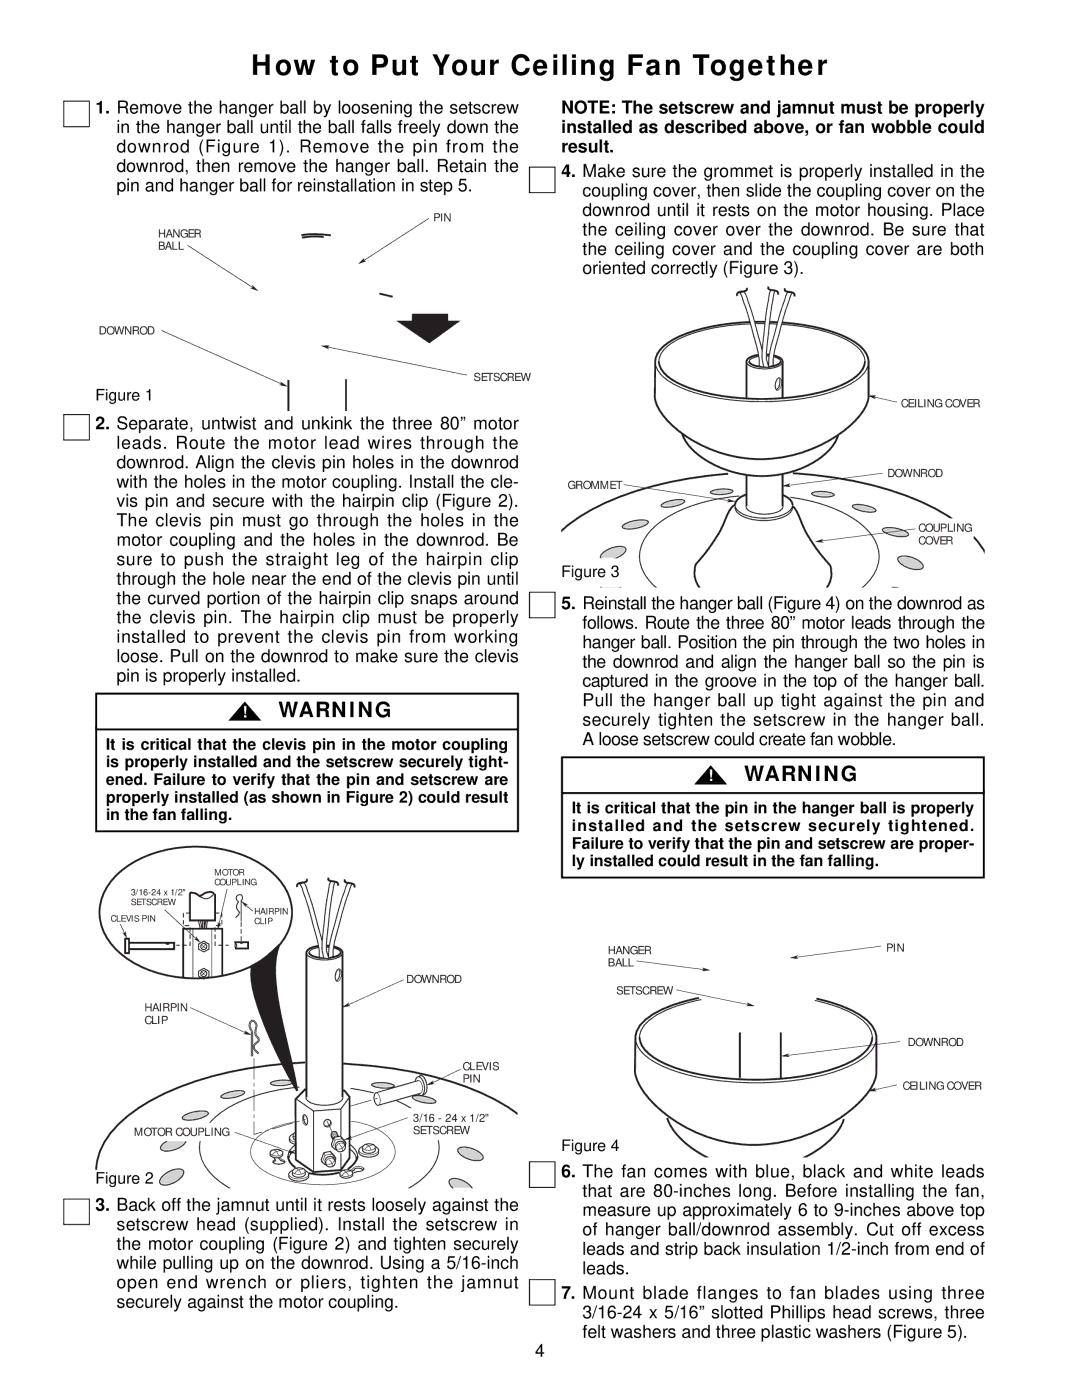
1.Remove the hanger ball by loosening the setscrew in the hanger ball until the ball falls freely down the downrod (Figure 1). Remove the pin from the downrod, then remove the hanger ball. Retain the pin and hanger ball for reinstallation in step 5.

PIN

HANGER

BALL

DOWNROD

SETSCREW

Figure 1

2.Separate, untwist and unkink the three 80” motor leads. Route the motor lead wires through the downrod. Align the clevis pin holes in the downrod with the holes in the motor coupling. Install the cle- vis pin and secure with the hairpin clip (Figure 2). The clevis pin must go through the holes in the motor coupling and the holes in the downrod. Be sure to push the straight leg of the hairpin clip through the hole near the end of the clevis pin until the curved portion of the hairpin clip snaps around the clevis pin. The hairpin clip must be properly installed to prevent the clevis pin from working loose. Pull on the downrod to make sure the clevis pin is properly installed.

!WARNING

It is critical that the clevis pin in the motor coupling is properly installed and the setscrew securely tight- ened. Failure to verify that the pin and setscrew are properly installed (as shown in Figure 2) could result in the fan falling.

NOTE: The setscrew and jamnut must be properly installed as described above, or fan wobble could result.

4.Make sure the grommet is properly installed in the coupling cover, then slide the coupling cover on the downrod until it rests on the motor housing. Place the ceiling cover over the downrod. Be sure that the ceiling cover and the coupling cover are both oriented correctly (Figure 3).

CEILING COVER

DOWNROD

GROMMET

COUPLING

COVER

Figure 3

5.Reinstall the hanger ball (Figure 4) on the downrod as follows. Route the three 80” motor leads through the hanger ball. Position the pin through the two holes in the downrod and align the hanger ball so the pin is captured in the groove in the top of the hanger ball. Pull the hanger ball up tight against the pin and securely tighten the setscrew in the hanger ball. A loose setscrew could create fan wobble.

!WARNING

It is critical that the pin in the hanger ball is properly installed and the setscrew securely tightened. Failure to verify that the pin and setscrew are proper- ly installed could result in the fan falling.

MOTOR COUPLING

3/16-24 x 1/2"

SETSCREW

CLEVIS PIN

HAIRPIN

CLIP

HAIRPIN

CLIP

MOTOR COUPLING

DOWNROD

CLEVIS

PIN

3/16 - 24 x 1/2"

SETSCREW

HANGER

PIN

BALL


SETSCREW

DOWNROD

CEILING COVER

Figure 4

Figure 2

3.Back off the jamnut until it rests loosely against the setscrew head (supplied). Install the setscrew in the motor coupling (Figure 2) and tighten securely while pulling up on the downrod. Using a 5/16-inch open end wrench or pliers, tighten the jamnut securely against the motor coupling.

6.The fan comes with blue, black and white leads that are 80-inches long. Before installing the fan, measure up approximately 6 to 9-inches above top of hanger ball/downrod assembly. Cut off excess leads and strip back insulation 1/2-inch from end of leads.

7.Mount blade flanges to fan blades using three 3/16-24 x 5/16” slotted Phillips head screws, three felt washers and three plastic washers (Figure 5).

4

Page 4
Image 4
Emerson CF942BS00, CF942OB00, CF942TG00, CF942SB00, CF942WB00, CF942HTW00 warranty How to Put Your Ceiling Fan Together

CF942TG00, CF942SB00, CF942OB00, CF942BS00, CF942HTW00 specifications

The Emerson CF942 series of ceiling fans consists of various models, including CF942WB00, CF942HTW00, CF942BS00, CF942OB00, and CF942SB00. These fans are renowned for their elegant designs, energy efficiency, and cutting-edge features, making them an ideal choice for enhancing the comfort and aesthetics of any living space.

One of the main features of the CF942 series is its innovative motor technology. The fans are equipped with powerful and efficient motors that ensure quiet operation while providing optimal airflow. This makes them suitable for bedrooms, living rooms, and even larger spaces where comfort is essential. The motors also contribute to extended durability, reducing the need for maintenance over time.

Another characteristic of the Emerson CF942 series is the variety of finish options available. Each model comes in distinct colors, including a sleek white (CF942HTW00), a rich bronze (CF942BS00), an elegant oil-rubbed bronze (CF942OB00), and a classic black (CF942SB00). This diverse range of finishes allows homeowners to select a fan that seamlessly blends into their decor, whether it be modern, traditional, or rustic.

In terms of size, the CF942 fans are designed to fit various room dimensions, making them versatile options for different applications. The streamlined design of the blades ensures maximum airflow efficiency while maintaining a stylish appearance. Additionally, the fans often come with a standard downrod for easy installation and can be mounted on flat or angled ceilings, providing flexibility.

The CF942 models also typically feature a convenient remote control, allowing users to adjust fan speed and lighting effortlessly from anywhere in the room. Some models may include integrated LED lighting, which further enhances their appeal by providing both illumination and energy savings.

Installation is straightforward, and the user-friendly design ensures that even those with minimal DIY skills can set up their new ceiling fan with ease. Overall, the Emerson CF942 series combines functionality, style, and technology to create ceiling fans that are perfect for enhancing the comfort of any home environment. With a focus on quality and efficiency, these fans are an investment that will provide lasting satisfaction for years to come.