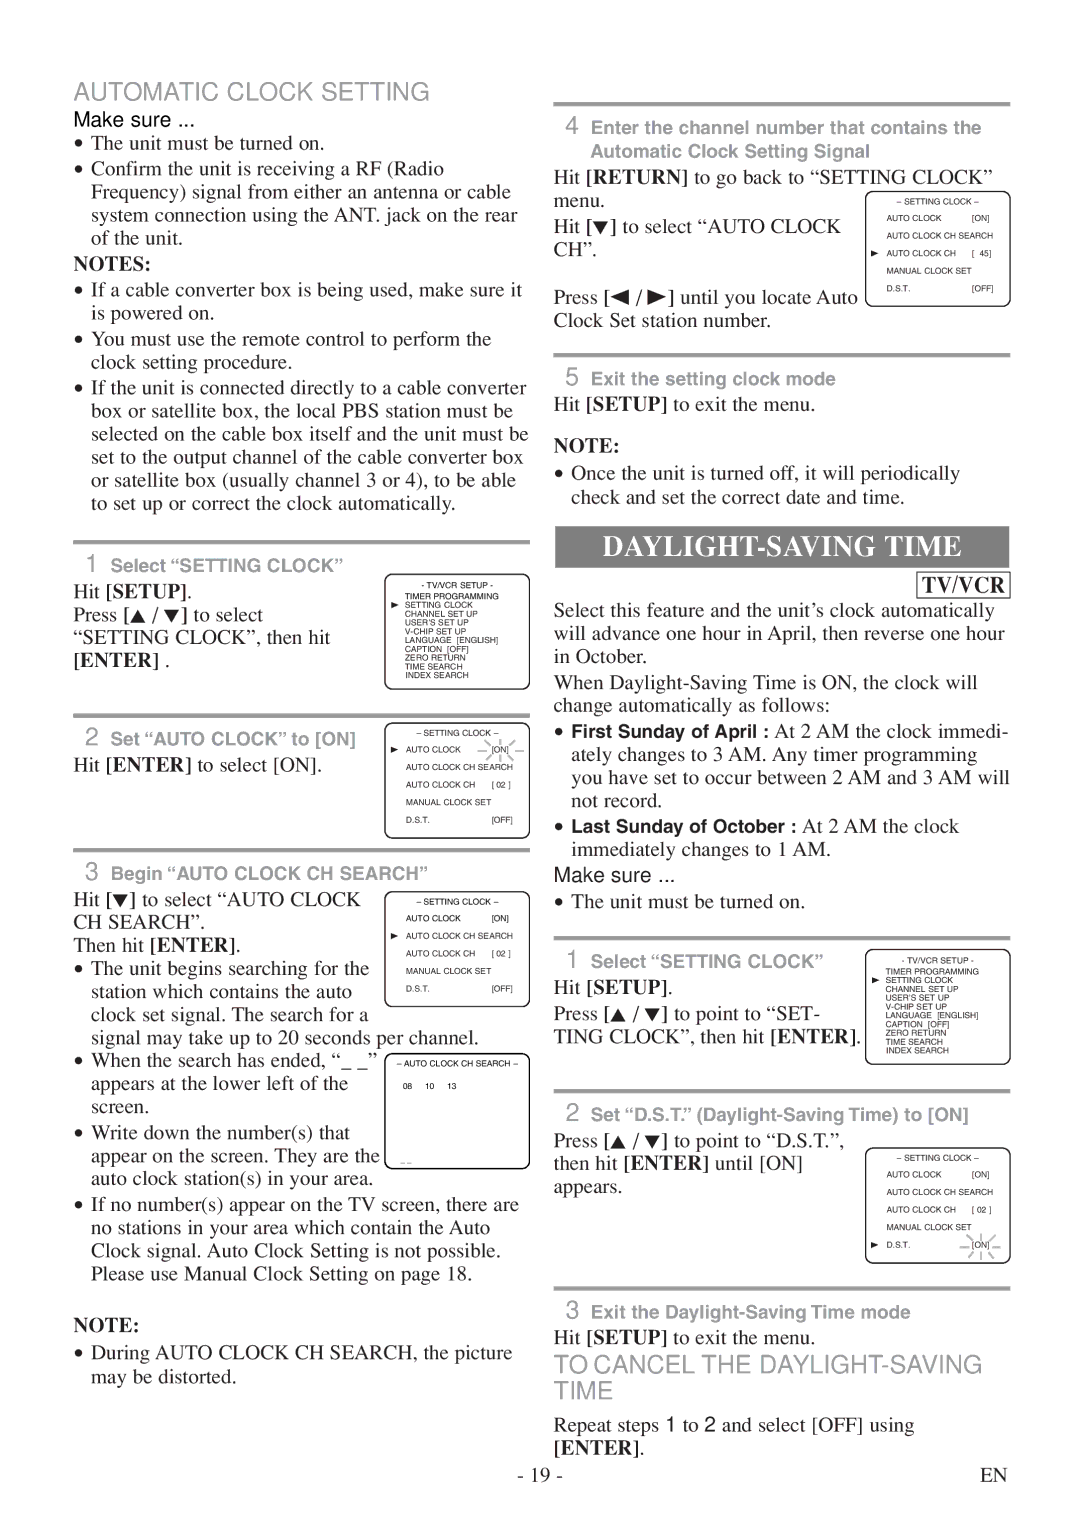
AUTOMATIC CLOCK SETTING
Make sure ...
•The unit must be turned on.
•Confirm the unit is receiving a RF (Radio Frequency) signal from either an antenna or cable system connection using the ANT. jack on the rear of the unit.
NOTES:
• If a cable converter box is being used, make sure it is powered on.
• You must use the remote control to perform the clock setting procedure.
• If the unit is connected directly to a cable converter box or satellite box, the local PBS station must be selected on the cable box itself and the unit must be set to the output channel of the cable converter box or satellite box (usually channel 3 or 4), to be able to set up or correct the clock automatically.
1 Select “SETTING CLOCK”
Hit [SETUP]. | - TV/VCR SETUP - | ||
TIMER PROGRAMMING | |||
Press [K / L] to select | B SETTING CLOCK |
| |
CHANNEL SET UP |
| ||
USER’S SET UP |
| ||
“SETTING CLOCK”, then hit |
| ||
LANGUAGE [ENGLISH] | |||
[ENTER] . | CAPTION [OFF] |
| |
ZERO RETURN |
| ||
TIME SEARCH |
| ||
| INDEX SEARCH |
| |
|
| ||
2 Set “AUTO CLOCK” to [ON] | – SETTING CLOCK – | ||
B AUTO CLOCK | [ON] | ||
Hit [ENTER] to select [ON]. | |||
AUTO CLOCK CH SEARCH | |||
| AUTO CLOCK CH | [ 02 ] | |
| MANUAL CLOCK SET |
| |
| D.S.T. | [OFF] | |
3Begin “AUTO CLOCK CH SEARCH”
Hit [L] to select “AUTO CLOCK | – SETTING CLOCK – | ||
CH SEARCH”. | AUTO CLOCK | [ON] | |
B AUTO CLOCK CH SEARCH | |||
Then hit [ENTER]. | |||
AUTO CLOCK CH | [ 02 ] | ||
• The unit begins searching for the | MANUAL CLOCK SET |
| |
|
| ||
station which contains the auto | D.S.T. | [OFF] | |
|
| ||
clock set signal. The search for a
signal may take up to 20 seconds per channel.
•When the search has ended, “_ _” – AUTO CLOCK CH SEARCH –
appears at the lower left of the screen.
•Write down the number(s) that
appear on the screen. They are the auto clock station(s) in your area.
•If no number(s) appear on the TV screen, there are no stations in your area which contain the Auto Clock signal. Auto Clock Setting is not possible. Please use Manual Clock Setting on page 18.
4Enter the channel number that contains the Automatic Clock Setting Signal
Hit [RETURN] to go back to “SETTING CLOCK” | |||
menu. | – SETTING CLOCK – | ||
Hit [L] to select “AUTO CLOCK | AUTO CLOCK | [ON] | |
AUTO CLOCK CH SEARCH | |||
CH”. | |||
B AUTO CLOCK CH | [ 45] | ||
| MANUAL CLOCK SET |
| |
Press [s / B] until you locate Auto | D.S.T. | [OFF] | |
|
| ||
Clock Set station number.
5 Exit the setting clock mode Hit [SETUP] to exit the menu.
NOTE:
•Once the unit is turned off, it will periodically check and set the correct date and time.
DAYLIGHT-SAVING TIME
TV/VCR
Select this feature and the unit’s clock automatically will advance one hour in April, then reverse one hour in October.
When
•First Sunday of April : At 2 AM the clock immedi- ately changes to 3 AM. Any timer programming you have set to occur between 2 AM and 3 AM will not record.
•Last Sunday of October : At 2 AM the clock immediately changes to 1 AM.
Make sure ...
• The unit must be turned on.
1 Select “SETTING CLOCK” | TIMER PROGRAMMING |
| - TV/VCR SETUP - |
Hit [SETUP]. | B SETTING CLOCK |
CHANNEL SET UP | |
Press [K / L] to point to “SET- | USER’S SET UP |
LANGUAGE [ENGLISH] | |
TING CLOCK”, then hit [ENTER]. | CAPTION [OFF] |
TIME SEARCH | |
| ZERO RETURN |
| INDEX SEARCH |
2Set “D.S.T.”
Press [K / L] to point to “D.S.T.”,
then hit [ENTER] until [ON] | – SETTING CLOCK – | |
AUTO CLOCK | [ON] | |
appears. | AUTO CLOCK CH SEARCH | |
| AUTO CLOCK CH | [ 02 ] |
| MANUAL CLOCK SET |
|
| B D.S.T. | [ON] |
NOTE:
•During AUTO CLOCK CH SEARCH, the picture may be distorted.
3Exit the
Hit [SETUP] to exit the menu.
TO CANCEL THE DAYLIGHT-SAVING TIME
Repeat steps 1 to 2 and select [OFF] using [ENTER].
- 19 - | EN |
