DIRECT IGNITION PROPANE/LP GAS CONVERSION

1.Turn off the gas supply.

2.Turn off the electrical supply to the appliance if so equipped.

3.Open or remove glass doors if applicable.

4.Remove top louver and lower bottom louver.

5.Remove logs from burner assembly.

VALVE CONVERSION

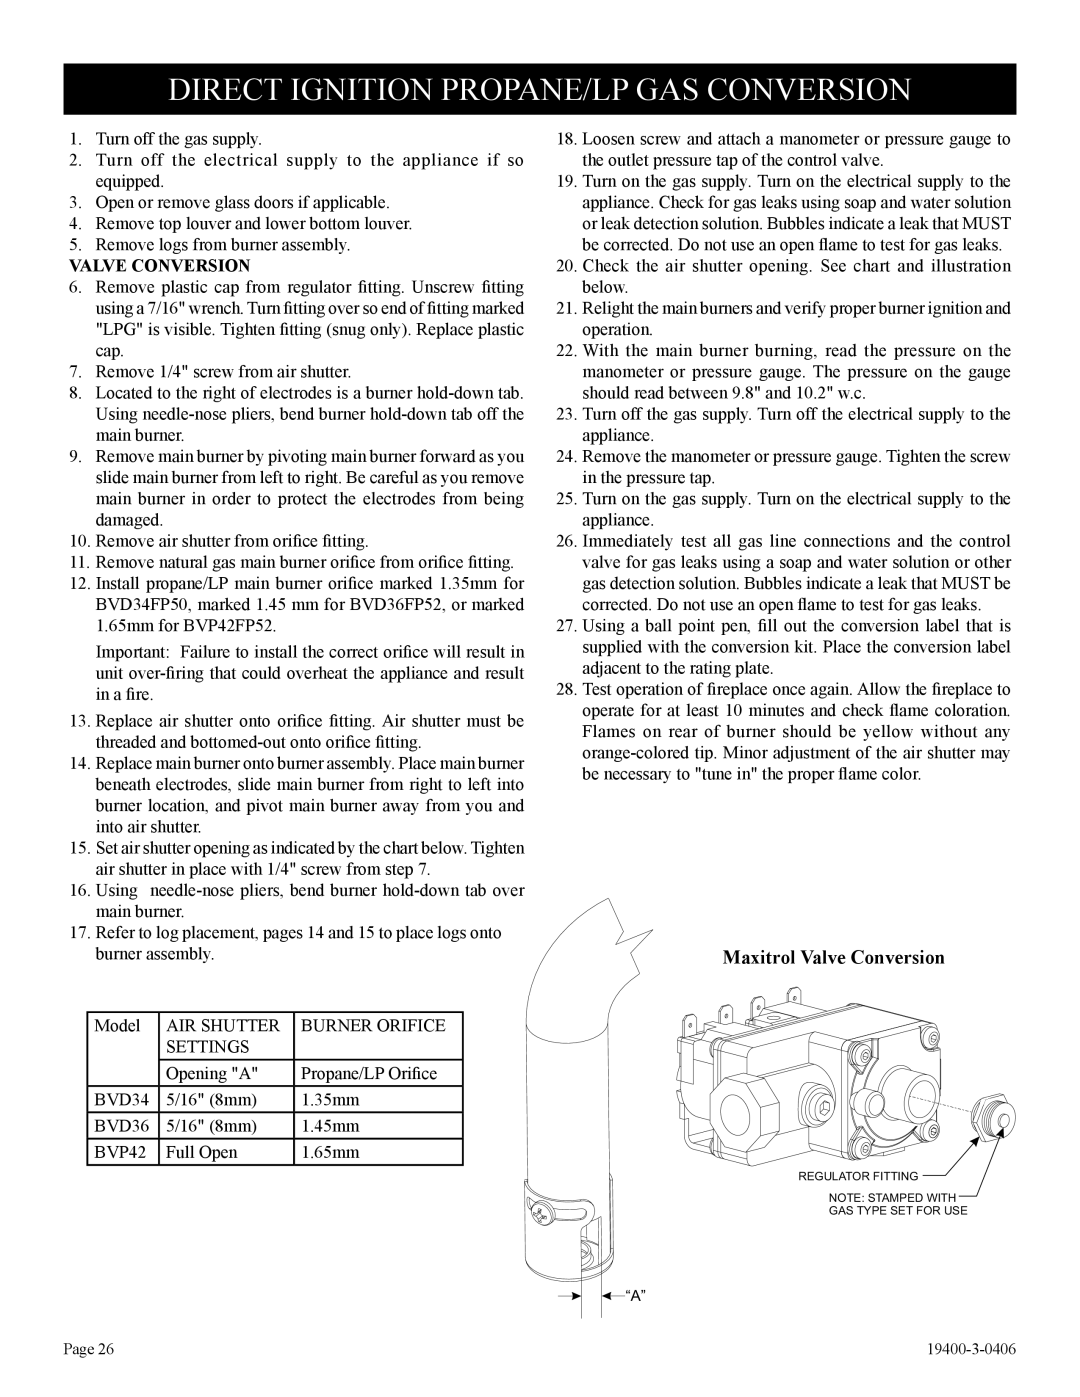
6.Remove plastic cap from regulator fitting. Unscrew fitting using a 7/16" wrench. Turn fitting over so end of fitting marked "LPG" is visible. Tighten fitting (snug only). Replace plastic cap.

7.Remove 1/4" screw from air shutter.

8.Located to the right of electrodes is a burner hold-down tab. Using needle-nose pliers, bend burner hold-down tab off the main burner.

9.Remove main burner by pivoting main burner forward as you slide main burner from left to right. Be careful as you remove main burner in order to protect the electrodes from being damaged.

10.Remove air shutter from orifice fitting.

11.Remove natural gas main burner orifice from orifice fitting.

12.Install propane/LP main burner orifice marked 1.35mm for BVD34FP50, marked 1.45 mm for BVD36FP52, or marked 1.65mm for BVP42FP52.

Important: Failure to install the correct orifice will result in unit over-firing that could overheat the appliance and result in a fire.

13.Replace air shutter onto orifice fitting. Air shutter must be threaded and bottomed-out onto orifice fitting.

14.Replace main burner onto burner assembly. Place main burner beneath electrodes, slide main burner from right to left into burner location, and pivot main burner away from you and into air shutter.

15.Set air shutter opening as indicated by the chart below. Tighten air shutter in place with 1/4" screw from step 7.

16.Using needle-nose pliers, bend burner hold-down tab over main burner.

17.Refer to log placement, pages 14 and 15 to place logs onto burner assembly.

Model

AIR SHUTTER

BURNER ORIFICE


SETTINGS


Opening "A"

Propane/LP Orifice

BVD34

5/16" (8mm)

1.35mm

BVD36

5/16" (8mm)

1.45mm

BVP42

Full Open

1.65mm

18.Loosen screw and attach a manometer or pressure gauge to the outlet pressure tap of the control valve.

19.Turn on the gas supply. Turn on the electrical supply to the appliance. Check for gas leaks using soap and water solution or leak detection solution. Bubbles indicate a leak that MUST be corrected. Do not use an open flame to test for gas leaks.

20.Check the air shutter opening. See chart and illustration below.

21.Relight the main burners and verify proper burner ignition and operation.

22.With the main burner burning, read the pressure on the manometer or pressure gauge. The pressure on the gauge should read between 9.8" and 10.2" w.c.

23.Turn off the gas supply. Turn off the electrical supply to the appliance.

24.Remove the manometer or pressure gauge. Tighten the screw in the pressure tap.

25.Turn on the gas supply. Turn on the electrical supply to the appliance.

26.Immediately test all gas line connections and the control valve for gas leaks using a soap and water solution or other gas detection solution. Bubbles indicate a leak that MUST be corrected. Do not use an open flame to test for gas leaks.

27.Using a ball point pen, fill out the conversion label that is supplied with the conversion kit. Place the conversion label adjacent to the rating plate.

28.Test operation of fireplace once again. Allow the fireplace to operate for at least 10 minutes and check flame coloration. Flames on rear of burner should be yellow without any orange-colored tip. Minor adjustment of the air shutter may be necessary to "tune in" the proper flame color.

Maxitrol Valve Conversion

REGULATOR FITTING

NOTE: STAMPED WITH

GAS TYPE SET FOR USE

“A”

Page 26

19400-3-0406

Page 26
Image 26
Empire Comfort Systems BVD36FP52, L)N-1, BVD34FP50, BVP42FP32, BVD34FP30, BVD36FP32, BVP42FP52 Maxitrol Valve Conversion

BVD34FP50, BVP42FP52, BVP42FP32, BVD34FP30, BVD36FP52 specifications

Empire Comfort Systems has carved a niche in the heating industry with its series of high-quality ventless gas fireplaces. Among their popular models are the BVD34FP50, BVD34FP30, BVD36FP52, BVP42FP52, and BVP42FP32. Each of these units combines sophisticated design with innovative technology, offering home comfort and style.

The BVD34FP50 and BVD34FP30 are known for their sleek appearance and efficient performance. These models feature a minimalist design that allows them to blend seamlessly into any room decor. The BVD34FP50 is equipped with a powerful 50,000 BTU output, making it ideal for larger areas. Conversely, the BVD34FP30, with its 30,000 BTU output, offers an energy-efficient heating solution for smaller spaces. Both models utilize Empire's advanced vent-free technology, which allows for easy installation without the need for traditional venting.

The BVD36FP52 stands out for its versatility in design and efficiency. With a 52,000 BTU capacity, it heats larger spaces effectively while maintaining a sleek and modern visible flame. This model also benefits from an adjustable flame feature, allowing users to customize the intensity to their liking. Its superior ceramic glass front provides excellent heat retention and delivers an unobstructed view of the mesmerizing flames, enhancing any living space.

Empire's BVP42FP52 and BVP42FP32 models further exemplify the brand’s commitment to innovation. The BVP42FP52 offers a robust heating capacity of 52,000 BTUs, while the BVP42FP32 delivers 32,000 BTUs, making both units adaptable for varying room sizes. These models are distinguished by their high-efficiency ceramic glass doors and programmable thermostats, allowing for precise temperature control.

All models are designed with user-friendly features such as remote control options, adjustable flame height, and safety shut-off mechanisms. Additionally, their contemporary aesthetics make them suitable for modern and traditional homes alike. Empire Comfort Systems ensures top-tier reliability and performance, making these fireplaces a worthy investment for all who seek warmth and elegance in their living spaces.