C.Use only your hand to push in or turn the gas control knob. Never use tools. If knob will not push in or turn by hand, don’t try to repair it; call a qualified service technician or gas supplier. Force or attempted repair may result in a fire or explosion.

D.Do not use this appliance if any part has been underwater. Immediately call a qualified service technician to inspect the appliance and to re- place any part of the control system which has been underwater.

LIGHTING INSTRUCTIONS

1.STOP! Read the all safety information included with and on the side of heater.

2.Check that gas supply to heater is on.

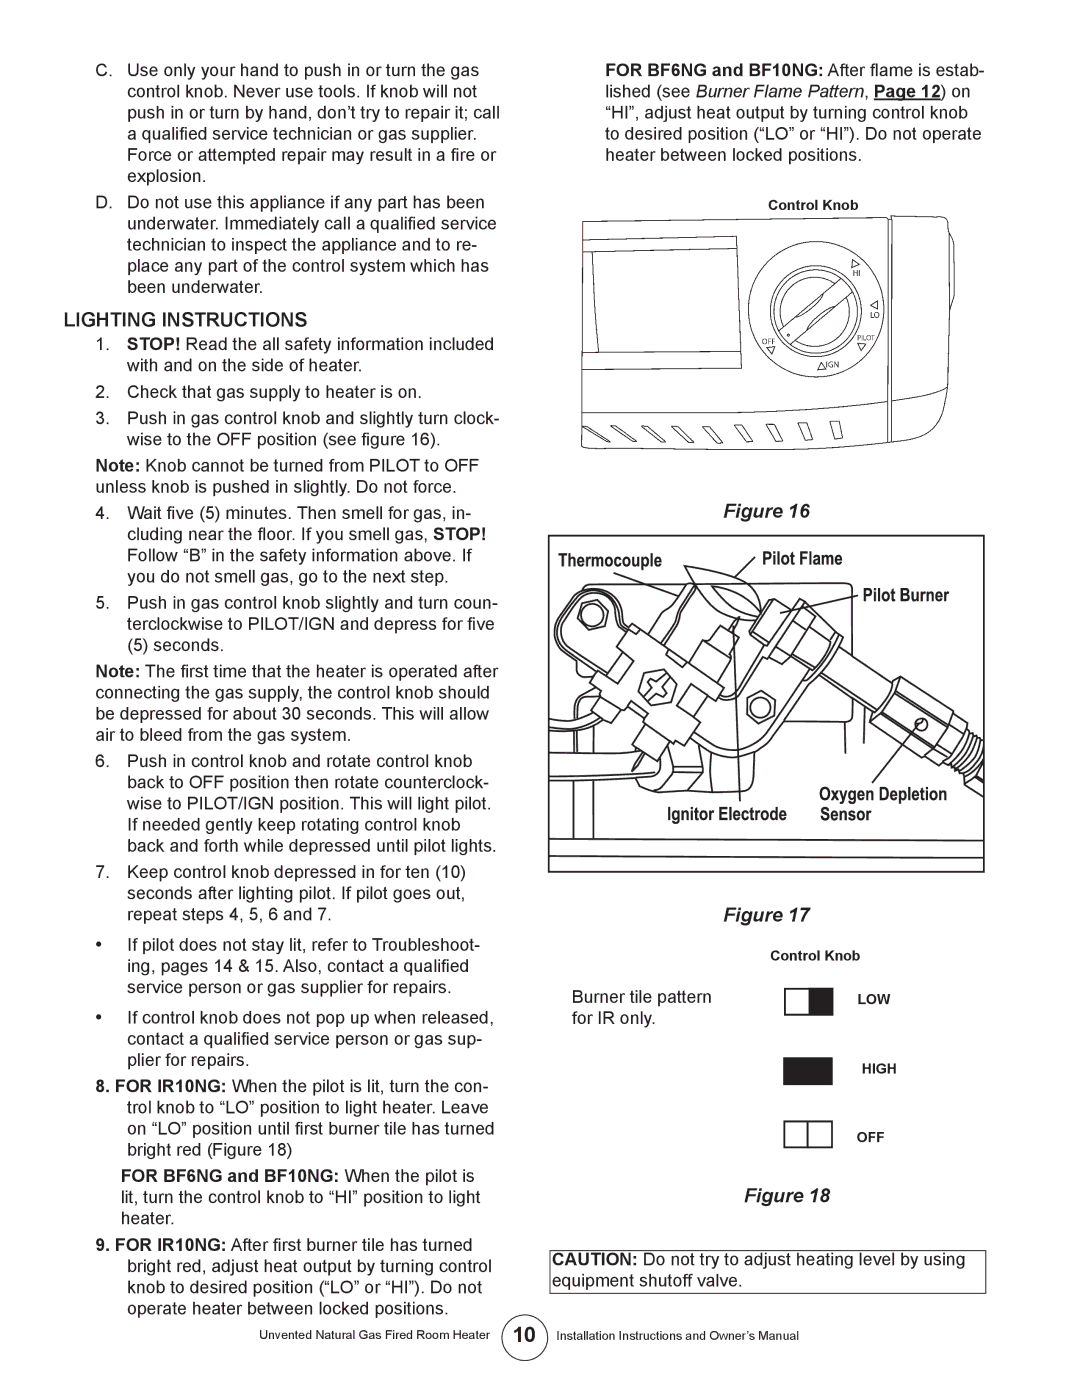
3.Push in gas control knob and slightly turn clock- wise to the OFF position (see figure 16).

Note: Knob cannot be turned from PILOT to OFF unless knob is pushed in slightly. Do not force.

4.Wait five (5) minutes. Then smell for gas, in- cluding near the floor. If you smell gas, STOP! Follow “B” in the safety information above. If you do not smell gas, go to the next step.

5.Push in gas control knob slightly and turn coun- terclockwise to PILOT/IGN and depress for five

(5) seconds.

Note: The first time that the heater is operated after connecting the gas supply, the control knob should be depressed for about 30 seconds. This will allow air to bleed from the gas system.

6.Push in control knob and rotate control knob back to OFF position then rotate counterclock- wise to PILOT/IGN position. This will light pilot. If needed gently keep rotating control knob back and forth while depressed until pilot lights.

7.Keep control knob depressed in for ten (10) seconds after lighting pilot. If pilot goes out, repeat steps 4, 5, 6 and 7.

If pilot does not stay lit, refer to Troubleshoot- ing, pages 14 & 15. Also, contact a qualified service person or gas supplier for repairs.

If control knob does not pop up when released, contact a qualified service person or gas sup- plier for repairs.

8.FOR IR10NG: When the pilot is lit, turn the con- trol knob to “LO” position to light heater. Leave on “LO” position until first burner tile has turned bright red (Figure 18)

FOR BF6NG and BF10NG: When the pilot is lit, turn the control knob to “HI” position to light heater.

9.FOR IR10NG: After first burner tile has turned bright red, adjust heat output by turning control knob to desired position (“LO” or “HI”). Do not operate heater between locked positions.

FOR BF6NG and BF10NG: After flame is estab- lished (see Burner Flame Pattern, Page 12) on “HI”, adjust heat output by turning control knob to desired position (“LO” or “HI”). Do not operate heater between locked positions.

Control Knob

Figure 16


Figure 17


Control Knob

Burner tile pattern


LOW


for IR only.


HIGH


OFF


Figure 18

CAUTION: Do not try to adjust heating level by using equipment shutoff valve.­

Unvented Natural Gas Fired Room Heater 10 Installation Instructions and Owner’s Manual

Page 10
Image 10
Enerco TSIR20NGT, TSBF10NG, MHBF6NG, MHIR20NGT, HSIR20NGT, HSIR10NG, MHBF10NG, HSBF10NG Lighting Instructions, For IR only

MHBF10NG, HSIR20NGT, HSBF10NG, MHIR10NG, MHIR20NGT specifications

The Enerco HSIR10NG, TSIR10NG, TSBF10NG, TSIR20NGT, and MHBF6NG are a line of innovative heating solutions designed to meet various heating needs in both residential and commercial applications. Each model is engineered with advanced technologies and features that prioritize efficiency, performance, and user convenience.

The HSIR10NG is a high-efficiency infrared heater that operates on natural gas. It provides powerful heating with minimal energy consumption, utilizing infrared technology to warm objects and people directly rather than just the surrounding air. This results in faster heating and lower energy costs, making it an ideal choice for garages, workshops, or outdoor spaces.

Following closely is the TSIR10NG, another natural gas infrared heater known for its compact design and efficiency. This model features a state-of-the-art burner design that maximizes heat output while ensuring low emissions. The TSIR10NG is particularly suited for smaller spaces, providing targeted heating where it is needed most. It can easily be mounted on walls or ceilings, offering versatility in installation options.

The TSBF10NG is a dual-fuel infrared heater, allowing users to switch between natural gas and propane as needed. This flexibility makes it suitable for various environments and user preferences. The heater's robust construction ensures durability, while its adjustable heating levels allow for customized comfort.

For larger areas, the TSIR20NGT offers an enhanced heating capacity with similar infrared technology. This model is ideal for industrial or commercial spaces requiring efficient heating. With its advanced thermostat controls, users can maintain a consistent temperature while benefiting from lower operational costs.

Lastly, the MHBF6NG is a portable heating solution designed for versatility and convenience. This compact model is perfect for temporary heating needs, featuring an easy-to-use design that allows for quick setup and relocation. Its propane compatibility makes it a popular choice for outdoor events, workshops, or emergency heating situations.

Each model is equipped with advanced safety features, including automatic shutoff mechanisms and durable heat-resistant materials, ensuring peace of mind during operation. The Enerco line is engineered not only for performance but also for ease of maintenance, making them reliable options for users seeking efficient heating solutions. Overall, Enerco's HSIR10NG, TSIR10NG, TSBF10NG, TSIR20NGT, and MHBF6NG provide a range of effective heating options tailored to diverse environments and user needs, combining innovation with practical functionality.