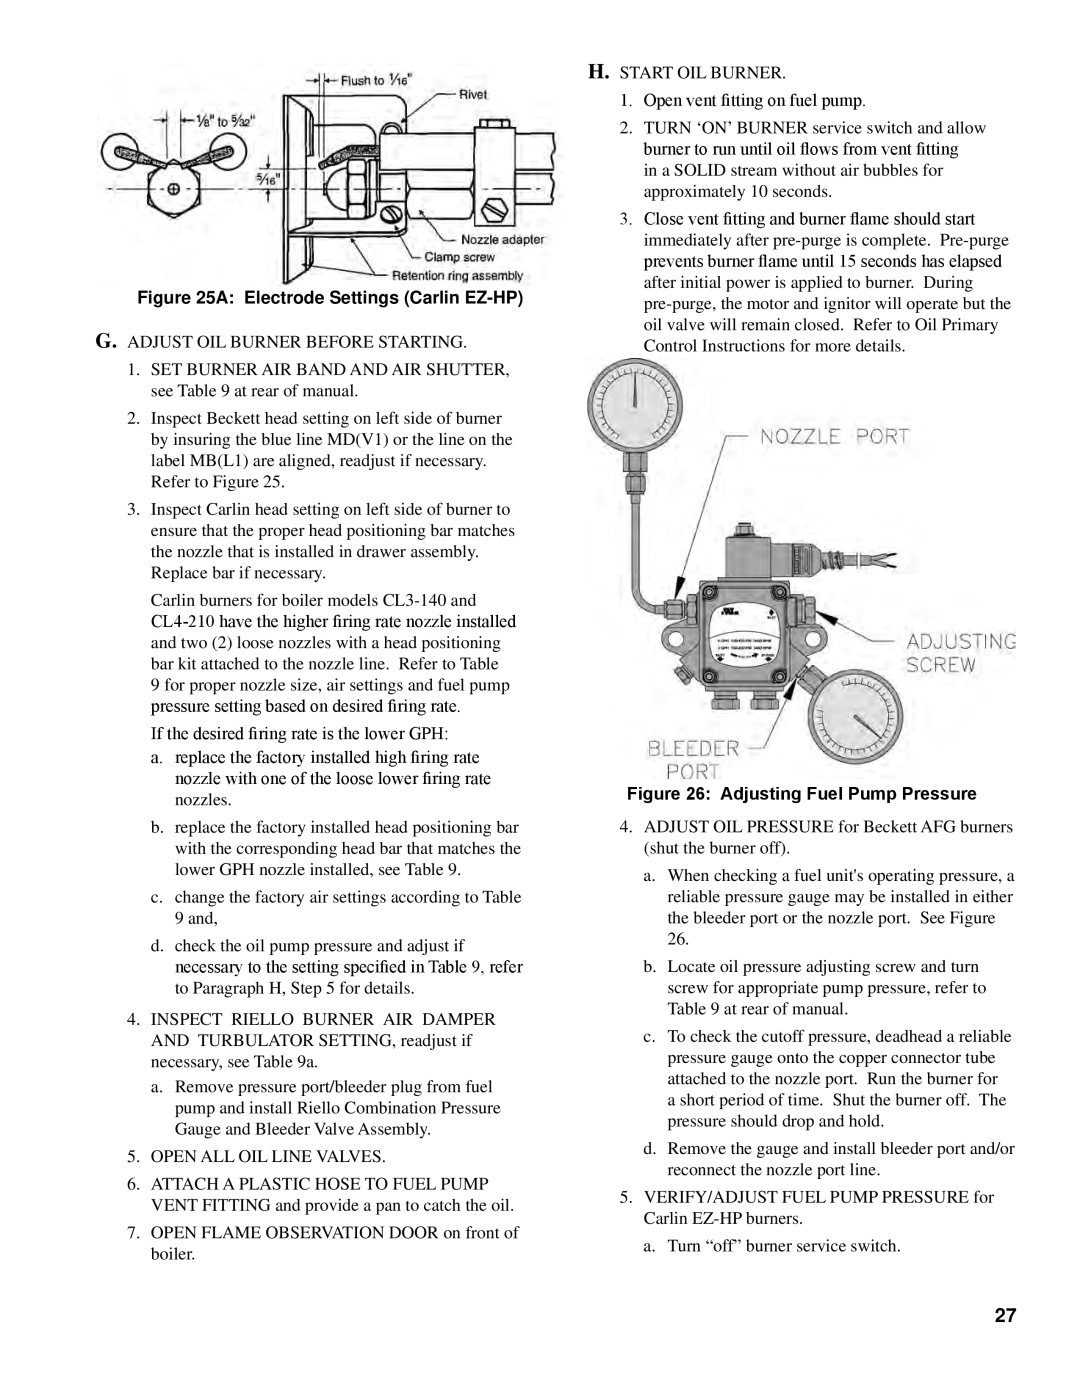
Figure 25A: Electrode Settings (Carlin EZ-HP)

G.ADJUST OIL BURNER BEFORE STARTING.

1.SET BURNER AIR BAND AND AIR SHUTTER, see Table 9 at rear of manual.

2.Inspect Beckett head setting on left side of burner by insuring the blue line MD(V1) or the line on the label MB(L1) are aligned, readjust if necessary. Refer to Figure 25.

3.Inspect Carlin head setting on left side of burner to ensure that the proper head positioning bar matches the nozzle that is installed in drawer assembly.

Replace bar if necessary.

Carlin burners for boiler models CL3-140 and

CL4-210 have the higher firing rate nozzle installed and two (2) loose nozzles with a head positioning bar kit attached to the nozzle line. Refer to Table

9 for proper nozzle size, air settings and fuel pump pressure setting based on desired firing rate.

If the desired firing rate is the lower GPH:

a.replace the factory installed high firing rate nozzle with one of the loose lower firing rate nozzles.

b.replace the factory installed head positioning bar with the corresponding head bar that matches the lower GPH nozzle installed, see Table 9.

c.change the factory air settings according to Table 9 and,

d.check the oil pump pressure and adjust if necessary to the setting specified in Table 9, refer to Paragraph H, Step 5 for details.

4.INSPECT RIELLO BURNER AIR DAMPER AND TURBULATOR SETTING, readjust if necessary, see Table 9a.

a.Remove pressure port/bleeder plug from fuel pump and install Riello Combination Pressure Gauge and Bleeder Valve Assembly.

5.OPEN ALL OIL LINE VALVES.

6.Attach a plastic hose to fuel pump vent fitting and provide a pan to catch the oil.

7.OPEN FLAME OBSERVATION DOOR on front of boiler.

H.START OIL BURNER.

1.Open vent fitting on fuel pump.

2.TURN ‘ON’ BURNER service switch and allow burner to run until oil flows from vent fitting in a SOLID stream without air bubbles for approximately 10 seconds.

3.Close vent fitting and burner flame should start immediately after pre-purge is complete. Pre-purge prevents burner flame until 15 seconds has elapsed after initial power is applied to burner. During pre-purge, the motor and ignitor will operate but the oil valve will remain closed. Refer to Oil Primary Control Instructions for more details.

Figure 26: Adjusting Fuel Pump Pressure

4.ADJUST OIL PRESSURE for Beckett AFG burners (shut the burner off).

a.When checking a fuel unit's operating pressure, a reliable pressure gauge may be installed in either the bleeder port or the nozzle port. See Figure 26.

b.Locate oil pressure adjusting screw and turn screw for appropriate pump pressure, refer to Table 9 at rear of manual.

c.To check the cutoff pressure, deadhead a reliable pressure gauge onto the copper connector tube attached to the nozzle port. Run the burner for a short period of time. Shut the burner off. The pressure should drop and hold.

d.Remove the gauge and install bleeder port and/or reconnect the nozzle port line.

5.VERIFY/ADJUST FUEL PUMP PRESSURE for Carlin EZ-HP burners.

a.Turn “off” burner service switch.

27

Page 27
Image 27
Energy Tech Laboratories F5, 40 Series, F3 Adjust OIL Burner Before Starting, Open ALL OIL Line Valves, Start OIL Burner

F3, F5, 40 Series, CL Series specifications

Energy Tech Laboratories has made significant strides in innovation and sustainability with its well-regarded CL Series, 40 Series, F5, and F3 product lines. Each series is designed to provide scalable energy solutions tailored to meet diverse industry demands while promoting efficiency and environmental responsibility.

The CL Series stands out for its compact design and modular construction. It is ideal for small to medium-sized enterprises looking to optimize energy consumption. One of the primary features of the CL Series is its advanced energy management system, which uses real-time data analytics to help users monitor and analyze their energy usage patterns. Additionally, it is equipped with a regenerative braking technology that captures and reuses energy, making it exceptionally efficient.

In contrast, the 40 Series is targeted towards larger industrial applications. This series boasts high-capacity energy storage solutions and integrates seamlessly with existing systems. One of its most remarkable features is its adaptive load management system, which intelligently distributes power based on real-time demand, ensuring maximum efficiency and minimal waste. The 40 Series is also built with robust safety protocols, including fire suppression systems and advanced fault detection technologies.

The F5 model is engineered for ultimate performance. It incorporates cutting-edge battery technology that enhances energy density, resulting in longer operational life and reduced maintenance costs. Its real-time monitoring capabilities offer users the ability to track performance metrics from anywhere, further enabling proactive decision-making. Additionally, the F5 features a modular battery design, allowing for easy upgrades and expansions as energy needs grow.

Finally, the F3 series exemplifies the future of energy technology with its innovative approach to renewable energy integration. The F3 is designed to work with solar and wind energy systems, leveraging advanced algorithms to maximize energy capture from these sources. Users benefit from its intelligent grid interface, which allows for efficient energy distribution within microgrid configurations.

In summary, Energy Tech Laboratories’ CL Series, 40 Series, F5, and F3 combine robust engineering and innovative technologies to address the varying energy needs of users. With features like real-time monitoring, adaptive load management, and renewable energy integration, these product lines not only enhance operational efficiency but also contribute to a sustainable energy future. As industries increasingly look towards improving energy practices, these series stand out as relevant, viable solutions in the evolving landscape of energy technology.