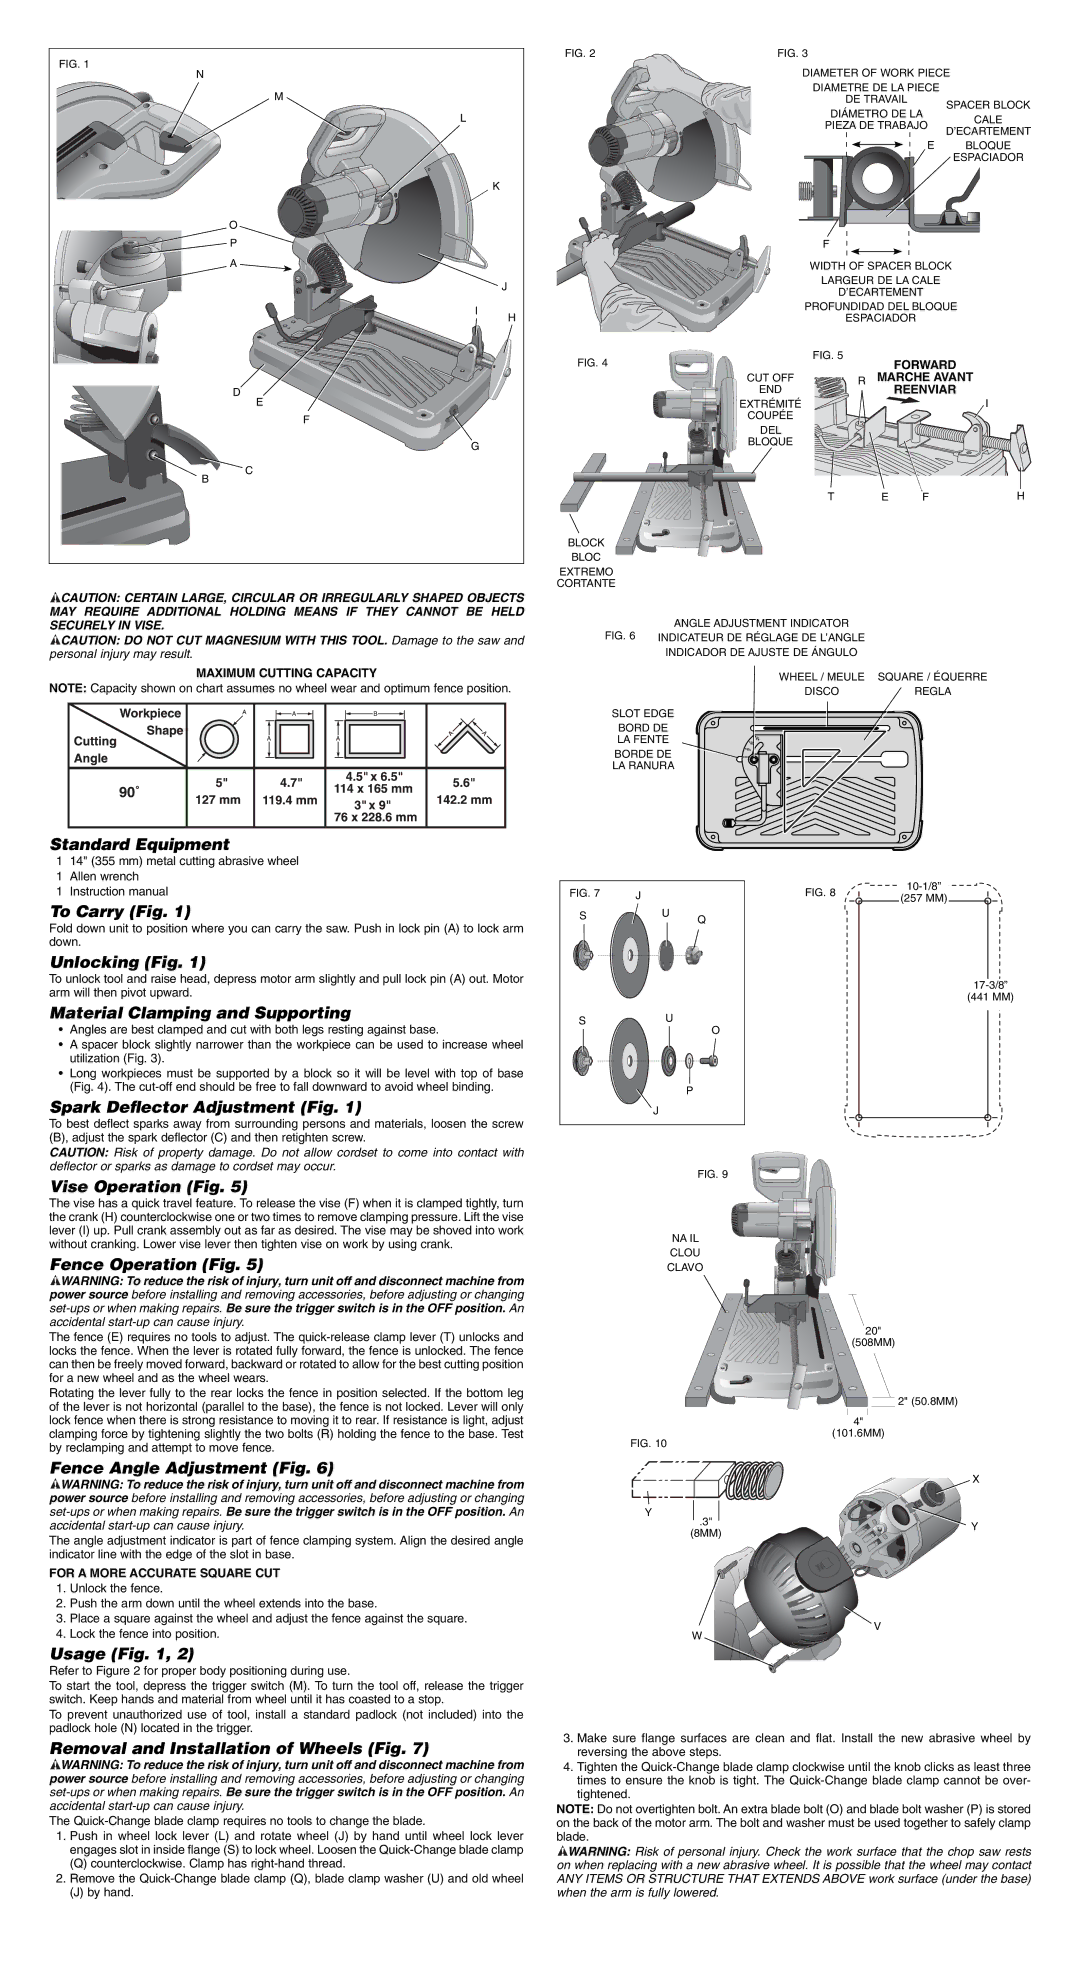
FIG. 1 |
|
N |
|
M |
|
L |
|
| K |
O |
|
P |
|
A |
|
| J |
I | H |
| |
D |
|
E |
|
F |
|
G |
|
C |
|
B |
|
![]() CAUTION: CERTAIN LARGE, CIRCULAR OR IRREGULARLY SHAPED OBJECTS MAY REQUIRE ADDITIONAL HOLDING MEANS IF THEY CANNOT BE HELD SECURELY IN VISE.
CAUTION: CERTAIN LARGE, CIRCULAR OR IRREGULARLY SHAPED OBJECTS MAY REQUIRE ADDITIONAL HOLDING MEANS IF THEY CANNOT BE HELD SECURELY IN VISE.
![]() CAUTION: DO NOT CUT MAGNESIUM WITH THIS TOOL. Damage to the saw and
CAUTION: DO NOT CUT MAGNESIUM WITH THIS TOOL. Damage to the saw and
personal injury may result.
MAXIMUM CUTTING CAPACITY
NOTE: Capacity shown on chart assumes no wheel wear and optimum fence position.
Standard Equipment
FIG. 2 | FIG. 3 |
|
| DIAMETER OF WORK PIECE | |
| DIAMETRE DE LA PIECE |
|
| DE TRAVAIL | SPACER BLOCK |
| DIÁMETRO DE LA | |
| CALE | |
| PIEZA DE TRABAJO | |
| D’ECARTEMENT | |
|
| |
| E | BLOQUE |
|
| ESPACIADOR |
F
WIDTH OF SPACER BLOCK |
| ||
LARGEUR DE LA CALE |
| ||
| D’ECARTEMENT |
| |
PROFUNDIDAD DEL BLOQUE |
| ||
| ESPACIADOR |
| |
FIG. 5 | FORWARD |
| |
FIG. 4 |
|
| |
CUT OFF | R MARCHE AVANT |
| |
END |
| REENVIAR |
|
EXTRÉMITÉ |
|
| I |
COUPÉE |
|
|
|
DEL |
|
|
|
BLOQUE |
|
|
|
T | E | F | H |
BLOCK
BLOC
EXTREMO
CORTANTE
ANGLE ADJUSTMENT INDICATOR
FIG. 6 INDICATEUR DE RÉGLAGE DE L’ANGLE
INDICADOR DE AJUSTE DE ÁNGULO
WHEEL / MEULE SQUARE / ÉQUERRE
DISCOREGLA
SLOT EDGE
BORD DE
LA FENTE
BORDE DE
LA RANURA
114" (355 mm) metal cutting abrasive wheel
1Allen wrench
1Instruction manual
To Carry (Fig. 1)
Fold down unit to position where you can carry the saw. Push in lock pin (A) to lock arm down.
Unlocking (Fig. 1)
To unlock tool and raise head, depress motor arm slightly and pull lock pin (A) out. Motor arm will then pivot upward.
Material Clamping and Supporting
•Angles are best clamped and cut with both legs resting against base.
•A spacer block slightly narrower than the workpiece can be used to increase wheel utilization (Fig. 3).
•Long workpieces must be supported by a block so it will be level with top of base (Fig. 4). The
Spark Deflector Adjustment (Fig. 1)
To best deflect sparks away from surrounding persons and materials, loosen the screw (B), adjust the spark deflector (C) and then retighten screw.
CAUTION: Risk of property damage. Do not allow cordset to come into contact with deflector or sparks as damage to cordset may occur.
Vise Operation (Fig. 5)
The vise has a quick travel feature. To release the vise (F) when it is clamped tightly, turn the crank (H) counterclockwise one or two times to remove clamping pressure. Lift the vise lever (I) up. Pull crank assembly out as far as desired. The vise may be shoved into work without cranking. Lower vise lever then tighten vise on work by using crank.
Fence Operation (Fig. 5)
![]() WARNING: To reduce the risk of injury, turn unit off and disconnect machine from power source before installing and removing accessories, before adjusting or changing
WARNING: To reduce the risk of injury, turn unit off and disconnect machine from power source before installing and removing accessories, before adjusting or changing
The fence (E) requires no tools to adjust. The
Rotating the lever fully to the rear locks the fence in position selected. If the bottom leg of the lever is not horizontal (parallel to the base), the fence is not locked. Lever will only lock fence when there is strong resistance to moving it to rear. If resistance is light, adjust clamping force by tightening slightly the two bolts (R) holding the fence to the base. Test by reclamping and attempt to move fence.
Fence Angle Adjustment (Fig. 6)
![]() WARNING: To reduce the risk of injury, turn unit off and disconnect machine from power source before installing and removing accessories, before adjusting or changing
WARNING: To reduce the risk of injury, turn unit off and disconnect machine from power source before installing and removing accessories, before adjusting or changing
The angle adjustment indicator is part of fence clamping system. Align the desired angle indicator line with the edge of the slot in base.
FOR A MORE ACCURATE SQUARE CUT
1.Unlock the fence.
2.Push the arm down until the wheel extends into the base.
3.Place a square against the wheel and adjust the fence against the square.
4.Lock the fence into position.
Usage (Fig. 1, 2)
Refer to Figure 2 for proper body positioning during use.
To start the tool, depress the trigger switch (M). To turn the tool off, release the trigger switch. Keep hands and material from wheel until it has coasted to a stop.
To prevent unauthorized use of tool, install a standard padlock (not included) into the padlock hole (N) located in the trigger.
FIG. 7 | J |
|
S | U | Q |
|
| |
S | U | O |
|
| |
|
| P |
| J |
|
FIG. 9
NA IL
CLOU
CLAVO
FIG. 10
Y
.3"
(8MM)
W
FIG. 8 | ||
(257 MM) | ||
|
(441 MM)
20"
(508MM)
2" (50.8MM)
4"
(101.6MM)
X
Y
V
Removal and Installation of Wheels (Fig. 7)
![]() WARNING: To reduce the risk of injury, turn unit off and disconnect machine from power source before installing and removing accessories, before adjusting or changing
WARNING: To reduce the risk of injury, turn unit off and disconnect machine from power source before installing and removing accessories, before adjusting or changing
The
1.Push in wheel lock lever (L) and rotate wheel (J) by hand until wheel lock lever engages slot in inside flange (S) to lock wheel. Loosen the
(Q)counterclockwise. Clamp has
2.Remove the
(J)by hand.
3.Make sure flange surfaces are clean and flat. Install the new abrasive wheel by reversing the above steps.
4.Tighten the
NOTE: Do not overtighten bolt. An extra blade bolt (O) and blade bolt washer (P) is stored on the back of the motor arm. The bolt and washer must be used together to safely clamp blade.
![]() WARNING: Risk of personal injury. Check the work surface that the chop saw rests on when replacing with a new abrasive wheel. It is possible that the wheel may contact ANY ITEMS OR STRUCTURE THAT EXTENDS ABOVE work surface (under the base) when the arm is fully lowered.
WARNING: Risk of personal injury. Check the work surface that the chop saw rests on when replacing with a new abrasive wheel. It is possible that the wheel may contact ANY ITEMS OR STRUCTURE THAT EXTENDS ABOVE work surface (under the base) when the arm is fully lowered.