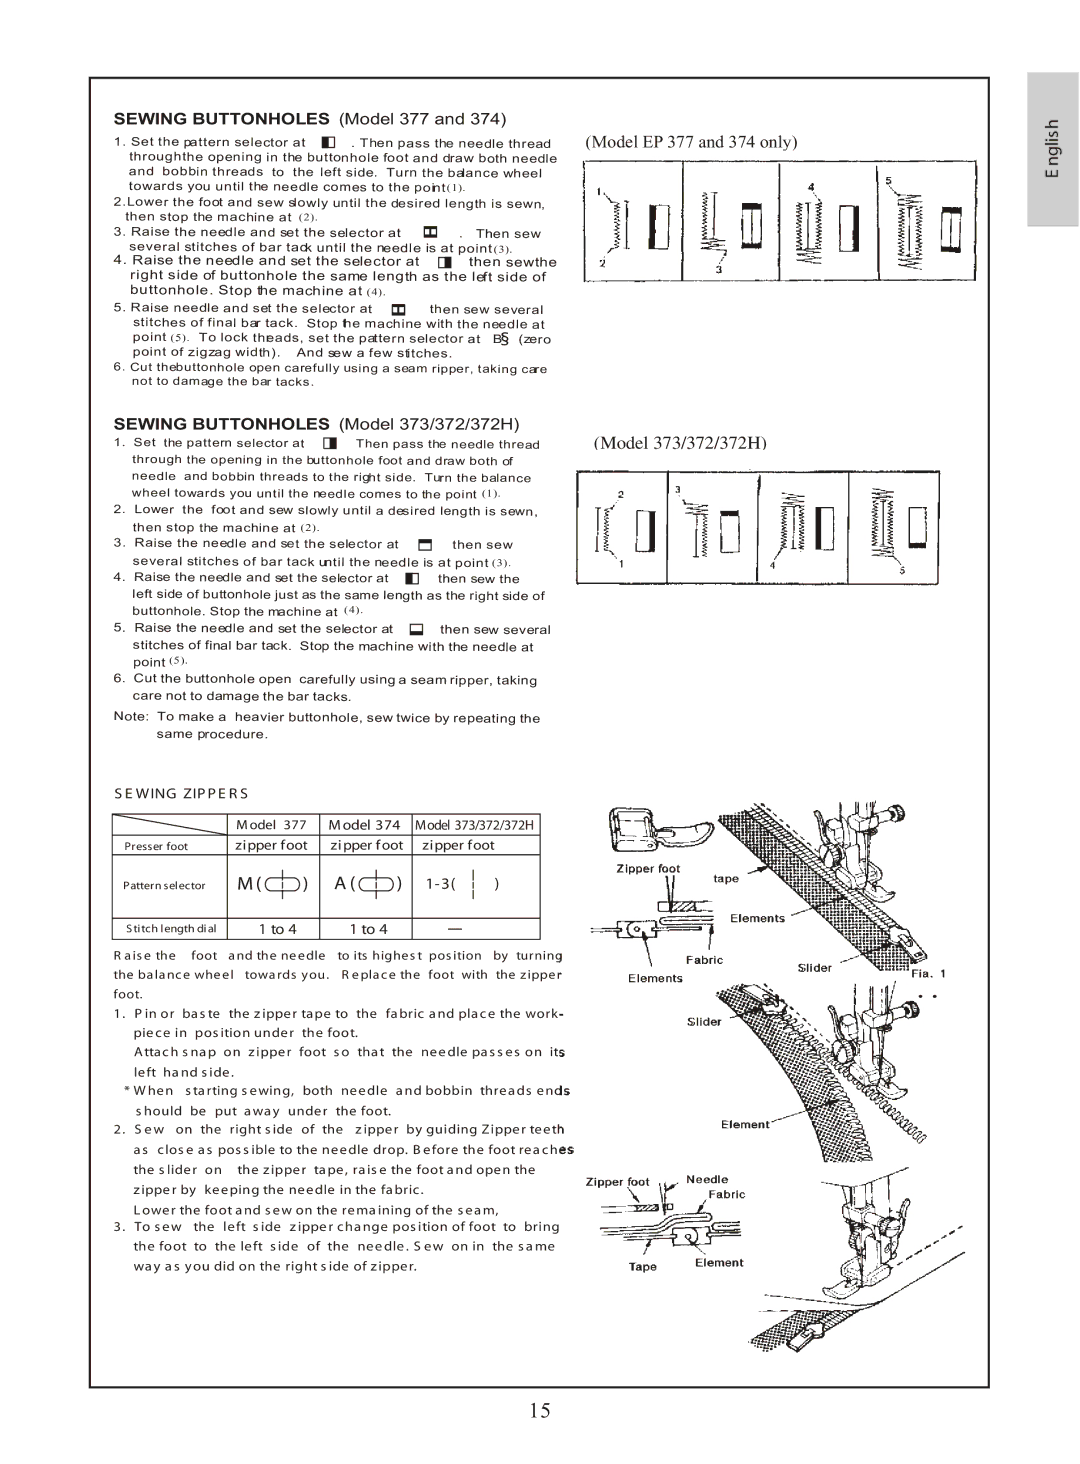
SEWING BUTTONHOLES (Model 377 and 374)

1. Set the pattern selector at¡°¡±

. Then pass the needle thread

throughthe opening in the buttonhole foot and draw both needle

and bobbin threads to

the left side. Turn the balance wheel

towards you until the needle comes to the point (1).


2.Lower the foot and sew slowly until the desired length is sewn,

then stop the machine at

(2).

±¡°


.

Then sew

3. Raise the needle and set the selector at

several stitches of bar tack until the needle is at point (3).


4. Raise the needle and set the selector at


then sewthe


±¡°


right side of buttonhole the same length as the left side of

buttonhole. Stop the machine at (4).


¡°±

then sew several

5. Raise needle and set the selector at

stitches of final bar tack. Stop the machine with the needle at


°¡

§

point (5). . To lock threads, set the pattern selector at

B

(zero

point of zigzag width).

And sew a few stitches.


6.Cut thebuttonhole open carefully using a seam ripper, taking care not to damage the bar tacks.

(Model EP 377 and 374 only)

E nglish

SEWING BUTTONHOLES (Model 373/372/372H)

1.

¡°¡±

Then pass the needle thread

Set the pattern selector at


through the opening in the buttonhole foot and draw both of


needle and bobbin threads to the right side. Turn the balance

2.

wheel towards you until the needle comes to the point (1).

Lower the foot and sew slowly until a desired length is sewn,

3.

then stop the machine at (2).

¡°¡±


then sew

Raise the needle and set the selector at

4.

several stitches of bar tack until the needle is at point (3).


¡°¡±

then sew the

Raise the needle and set the selector at


left side of buttonhole just as the same length as the right side of

5.

buttonhole. Stop the machine at

(4).


¡°¡±

then sew several

Raise the needle and set the selector at


stitches of final bar tack. Stop the machine with the needle at


point (5).


6.Cut the buttonhole open carefully using a seam ripper, taking care not to damage the bar tacks.

Note: To make a heavier buttonhole, sew twice by repeating the same procedure.

(Model 373/372/372H)

S E WING ZIP P E R S


M odel 377

M odel 374


Model 373/372/372H


Presser foot


zipper foot


zipper foot


zipper foot


A (


)


Pattern selector


M (


)


1-3(


)


S titch length dial


1 to 4


1 to 4


R a is e the

foot


a nd the ne e dle

to its highe s t pos ition

by turning

the ba la nc e whe e l towa rds you.

R e pla c e the foot with

the z ippe r

foot.


1 . P in or

ba s te


the z ippe r ta pe to

the fa bric a nd pla c e the work -

pie c e in pos ition unde r

the foot.


A tta c h s na p

on z ippe r

foot s o

tha t the ne e dle pa s s e s on its

le ft ha nd s ide .


* W he n

s ta rting s e wing,

both ne e dle a nd bobbin thre a ds e nds

s hould be put a wa y unde r

the foot.


2 . S e w

on the


right s ide

of

the

z ippe r

by guiding Z ippe r te e th

a s c los e a s pos s ible to the ne e dle drop. B e fore the foot re a c he s

the s lide r

on

the z ippe r ta pe , ra is e the foot a nd ope n the

z ippe r by

ke e ping the ne e dle in the fa bric .

L owe r the foot a nd s e w on the re ma ining of the s e a m,

3 . To s e w the

le ft s ide z ippe r c ha nge pos ition of foot to bring

the foot to the le ft s ide of the ne e dle . S e w on in the s a me wa y a s you did on the right s ide of z ippe r.

Z ippe r foot


ta pe


E le me nts


F a bric

S lide r


E le me nts


F ia . 1


S lide r


E le me nt

Z ippe r foot

N e e dle


F a bric

Ta pe

E le me nt


15

Page 17
Image 17
Euro-Pro instruction manual Nglish, ± ¡, Sewing Buttonholes Model 373/372/372H, ¡¡±

372H specifications

The Euro-Pro 372H is an innovative home appliance designed to enhance the cooking experience while delivering top-notch performance and convenience. This versatile device combines the functions of multiple kitchen appliances into one, making it an ideal addition to any modern kitchen.

One of the standout features of the Euro-Pro 372H is its multifunctionality. The appliance serves as a slow cooker, rice cooker, steamer, and even a sauté pan, providing an all-in-one solution for various cooking needs. The ability to prepare multiple dishes with one device reduces the clutter of kitchen gadgets and simplifies meal preparation for busy households.

The Euro-Pro 372H is equipped with advanced technology that ensures precise cooking results. Its intelligent temperature control system allows users to set the cooking temperature and time, ensuring that meals are prepared to perfection every time. The programmable features offer flexibility, enabling users to set delayed cooking times, which is perfect for those who want to come home to a ready meal.

In terms of capacity, the Euro-Pro 372H is designed to cater to families of all sizes. Its large bowl capacity allows for cooking hefty portions, making it suitable for gatherings or meal prepping for the week. The non-stick inner pot ensures that food doesn't stick, making for easy cleaning and reducing the need for excess oil during cooking.

Safety is also a priority with the Euro-Pro 372H. The appliance incorporates several safety features, including an automatic shut-off function that activates once the cooking cycle is complete. This prevents overcooking and ensures that food remains at optimum quality without supervision.

Furthermore, the sleek and modern design of the Euro-Pro 372H fits seamlessly into contemporary kitchens. Its user-friendly interface features easy-to-read buttons and a clear display, allowing even novice cooks to operate it without difficulty. The compact design makes it easy to store when not in use, contributing to a tidy kitchen space.

In summary, the Euro-Pro 372H stands out for its multifunctionality, advanced cooking technologies, and user-friendly features. It simplifies meal preparation while ensuring delicious results, making it a valuable addition to any kitchen. The combination of convenience, safety, and performance makes the Euro-Pro 372H an excellent choice for home cooks looking to enhance their culinary experiences.