TIPS ON HOW TO USE YOUR STEAM CLEANER
OPERATING INSTRUCTIONS
ALWAYS FINISH CLEANING BY WIPING DOWN THE CLEANED SURFACE
WITH A TOWEL
Assembling the Casters
The casters for the steam cleaner are packed and shipped unassembled. To
NOTE: Some force may be required to push the connector plug into the connection port.
Refrigerator - Use the concentrator to blow away dirt in the ice machine and on door seals. The vapor will not dry out or crack the seals as chemicals often do. Can openers and other kitchen equipment can be easily cleaned with the bristle brush to get into all the nooks and crannies. Mold stains around door gaskets can be removed with the bristle brush.
To clean microwaves or other small appliances use the nylon bristle brush for small areas.
NOTE: When cleaning small electrical appliances always unplug them from outlet before cleaning. Do not direct steam into any openings of the appliances or onto electrical connections.
To clean counter tops, use the bristle brush first in order to loosen the debris, then wipe with a terry cloth towel to finish.
Hints
The steam cleaner has many uses that have not been mentioned. This was meant only to give you a general idea of what can be achieved with the unit. However, the ways in which to use the attachments and brushes are in most cases universal. It is most helpful to always have a terry cloth towel or paper towel ready to use for removal of moisture and residue. 100% white cotton towels work best.
You can clean the brushes with your steam cleaner. When cleaning the bristle brushes, use a pair of pliers to hold and blow dirt as above or place in the basket of your dishwasher.
NOTE: Wipe with a towel immediately before the cleaned area dries. When cleaning the oven, use the bristle brush to clean around the elements and drip trays. Use the bristle brush for cracks, crevices, and hard to reach areas.
assemble the casters to the unit, simply insert the casters onto one of the four (4) stems in the base and push downward with the palm of your hand. (Fig. 1) Repeat for the next three (3) casters.
Fig. 1
Power On/Off - Steam Ready Light
Power “On” Light (red): This light will illuminate when the unit is plugged into the 120V. wall outlet. The “green” light will come on when the steam is ready and the “red” light will go out.
Operating and Filling Your Steam Cleaner
CAUTION: Read the instructions for “Operating and Filling Your Steam Cleaner” before opening the Safety Cap.
CAUTION: Always unplug before
filling. ALLOW UNIT TO COOL
FOR FIFTEEN (15) MINUTES BEFORE REFILLING.
IMPORTANT: Do NOT add cleaning solutions, scented perfumes, oils or any other chemicals to the boiler in this appliance. Use tap water or distilled/ purified water if the tap water in your area is very hard.
These instructions are ONLY for a cold unit. If the unit is hot or has water in it, see “Refilling Your Steam Cleaner”.
IMPORTANT: Never attempt to fill this unit under a water tap, always use the filling funnel provided.
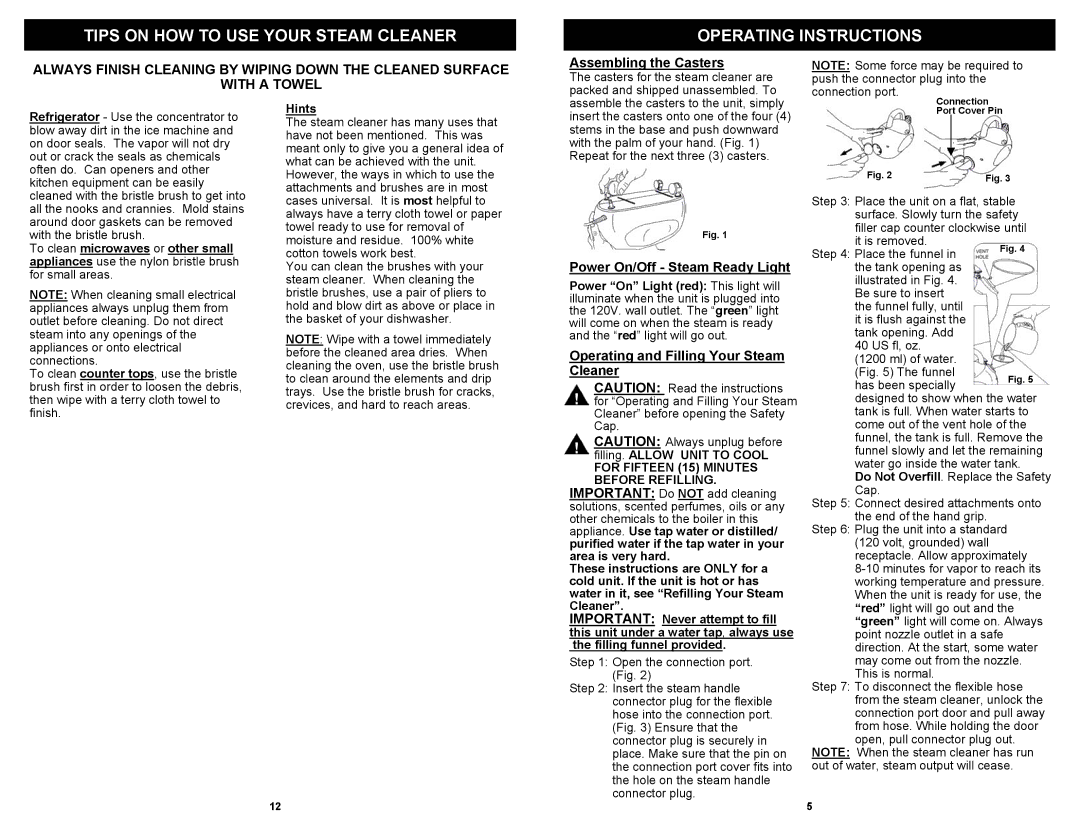
Step 1: Open the connection port. (Fig. 2)
Step 2: Insert the steam handle connector plug for the flexible hose into the connection port. (Fig. 3) Ensure that the connector plug is securely in place. Make sure that the pin on the connection port cover fits into the hole on the steam handle connector plug.
Connection
Port Cover Pin
Fig. 2 | Fig. 3 |
Step 3: Place the unit on a flat, stable surface. Slowly turn the safety filler cap counter clockwise until it is removed.
Step 4: Place the funnel in the tank opening as illustrated in Fig. 4. Be sure to insert the funnel fully, until it is flush against the tank opening. Add 40 US fl, oz.
(1200 ml) of water. (Fig. 5) The funnel has been specially
designed to show when the water tank is full. When water starts to come out of the vent hole of the funnel, the tank is full. Remove the funnel slowly and let the remaining water go inside the water tank.
Do Not Overfill. Replace the Safety Cap.
Step 5: Connect desired attachments onto the end of the hand grip.
Step 6: Plug the unit into a standard (120 volt, grounded) wall receptacle. Allow approximately
Step 7: To disconnect the flexible hose from the steam cleaner, unlock the connection port door and pull away from hose. While holding the door open, pull connector plug out.
NOTE: When the steam cleaner has run out of water, steam output will cease.
12
5