Maintenance

to be held down and the park brake must be

clockwise about 1/4 turn at a time, stopping

disengaged whenever speed control levers are

to move the speed control forward and back

moved out of the neutral position.

to neutral. Recheck the drive wheel rotation

Note: The neutral lock latches should be

to see if further adjustment is necessary.

4. The spring that keeps tension on the knob

“unlocked” and in the forward position.

2. Loosen the front nut on left hydro control

should normally not need adjustment.

However, if adjustment is needed, adjust to

linkage as shown in Figure 18. Turn the rear

where length of spring is about 1 inch (2.5 cm)

control linkage adjusting nut counterclockwise

between the washers. Adjust spring length by

until wheel rotates forward. Turn the rear nut

turning nut at front of spring.

of left control linkage clockwise 1/4 of a turn

Drive Lever Linkage Adjustment:

at a time, stopping to move the speed control

forward and back to neutral, until left wheel

1. With rear of machine still on jack stands and

stops rotating forward.

engine running at full throttle, disengage

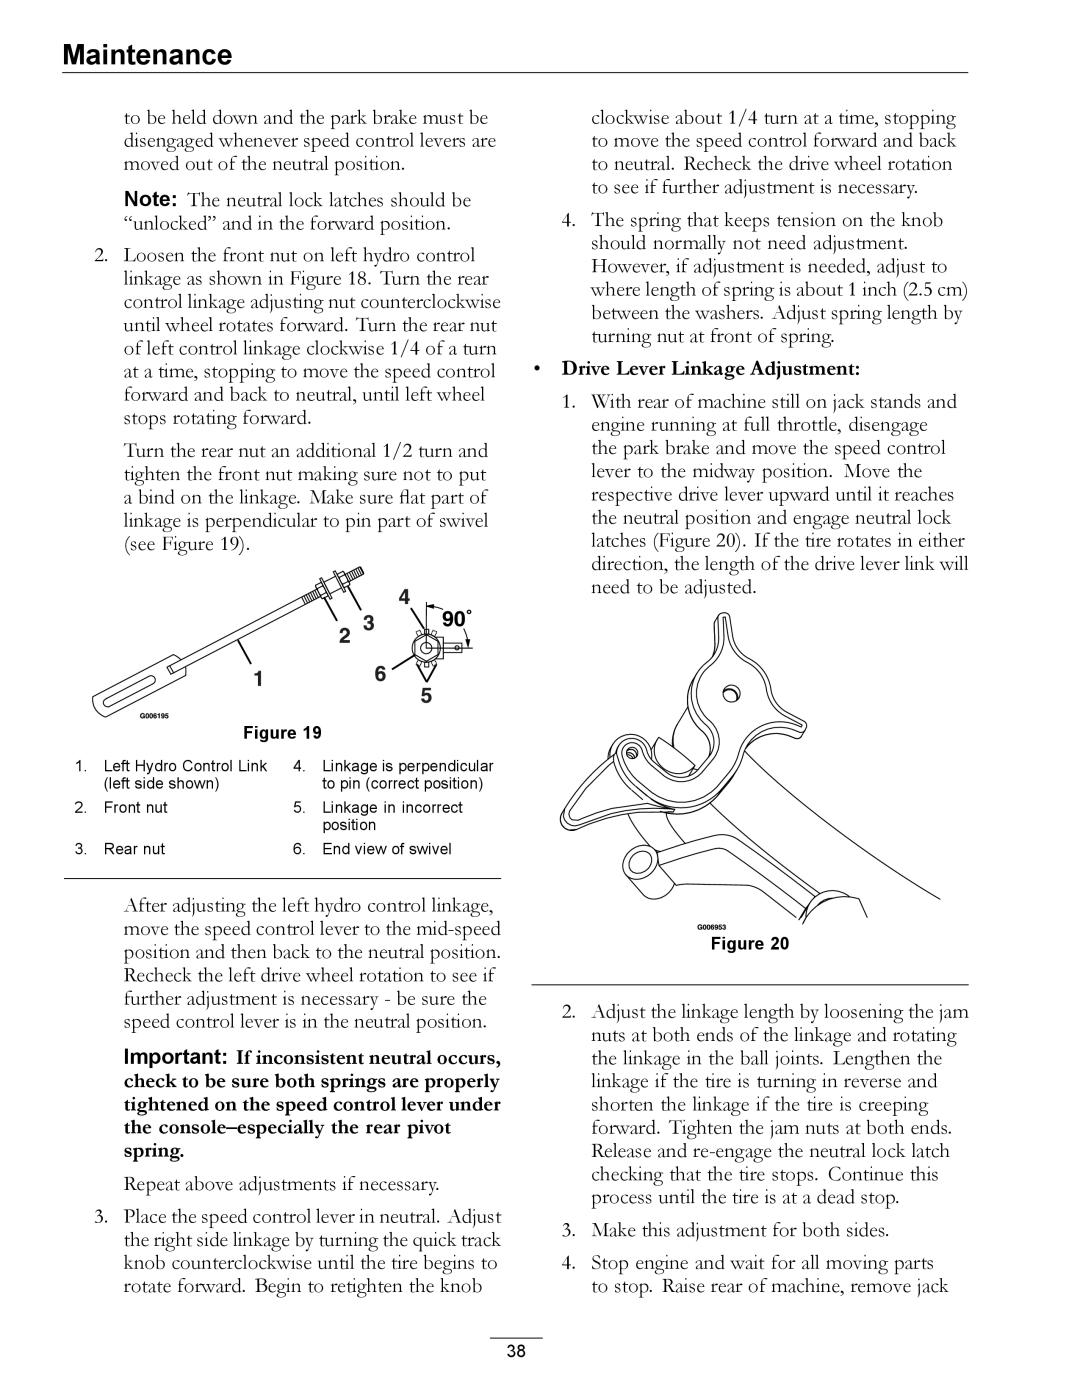
Turn the rear nut an additional 1/2 turn and

the park brake and move the speed control

tighten the front nut making sure not to put

lever to the midway position. Move the

a bind on the linkage. Make sure flat part of

respective drive lever upward until it reaches

linkage is perpendicular to pin part of swivel

the neutral position and engage neutral lock

(see Figure 19).

latches (Figure 20). If the tire rotates in either


direction, the length of the drive lever link will


need to be adjusted.


Figure 19

1.

Left Hydro Control Link

4.

Linkage is perpendicular


(left side shown)


to pin (correct position)

2.

Front nut

5.

Linkage in incorrect


position

3.

Rear nut

6.

End view of swivel

After adjusting the left hydro control linkage, move the speed control lever to the mid-speed position and then back to the neutral position. Recheck the left drive wheel rotation to see if further adjustment is necessary - be sure the speed control lever is in the neutral position.

Important: If inconsistent neutral occurs, check to be sure both springs are properly tightened on the speed control lever under the console–especially the rear pivot spring.

Repeat above adjustments if necessary.

3.Place the speed control lever in neutral. Adjust the right side linkage by turning the quick track knob counterclockwise until the tire begins to rotate forward. Begin to retighten the knob

Figure 20

2.Adjust the linkage length by loosening the jam nuts at both ends of the linkage and rotating the linkage in the ball joints. Lengthen the linkage if the tire is turning in reverse and shorten the linkage if the tire is creeping forward. Tighten the jam nuts at both ends. Release and re-engage the neutral lock latch checking that the tire stops. Continue this process until the tire is at a dead stop.

3.Make this adjustment for both sides.

4.Stop engine and wait for all moving parts to stop. Raise rear of machine, remove jack

38

Page 38
Image 38
Exmark 000 & higher, 312 manual Drive Lever Linkage Adjustment, Need to be adjusted

0, 312, 000 & higher specifications

Exmark has long been synonymous with excellence in the world of lawn care and landscaping, and their 000 & higher, 0,312 series is no exception. Engineered for both professional landscapers and passionate homeowners, this series brings together innovative technology with robust design to deliver unparalleled performance and durability.

One standout feature of this series is its powerful engine options, which ensure efficient cutting and grass handling capabilities. The engines are designed to provide consistent power and reliability, even in tough conditions. This reliability is complemented by high-quality cutting decks that deliver precision cuts and exceptional mulching abilities, ensuring that your lawn stays healthy and vibrant.

The cutting height adjustment system allows users to easily modify the height to suit various types of grass and landscaping needs. This adaptability ensures that your grass is always maintained at the optimal length for health and aesthetics. The ergonomic design of the handles incorporates comfort grips, reducing fatigue during prolonged use while providing excellent control over the machine.

Another significant aspect of the 000 & higher, 0,312 series is its advanced technology integration. Many models in this series come equipped with efficient fuel systems that enhance performance while minimizing fuel consumption. Furthermore, the inclusion of intelligent controls and monitoring systems enables users to make informed adjustments, ensuring that the equipment operates at peak performance.

The robust construction of the chassis and frame means that these machines can withstand the rigors of everyday use in various landscapes. The high-quality materials used in the manufacturing process enhance the longevity of the equipment, making it a worthy investment for those serious about maintaining their lawns.

In addition, Exmark places a strong emphasis on safety features. The series includes protective shields and easy-to-access controls that prioritize user safety without compromising on functionality. Maintenance is made simple through user-friendly designs, allowing for quick access to essential components.

In conclusion, the Exmark 000 & higher, 0,312 series presents a perfect blend of power, innovation, and user-focused features. With its reliable performance, flexible adjustment options, and sturdy design, this series continues to set the standard for excellence in lawn care equipment. Whether you’re a professional or a homeowner, the Exmark 000 & higher, 0,312 series stands ready to meet all your landscaping needs.