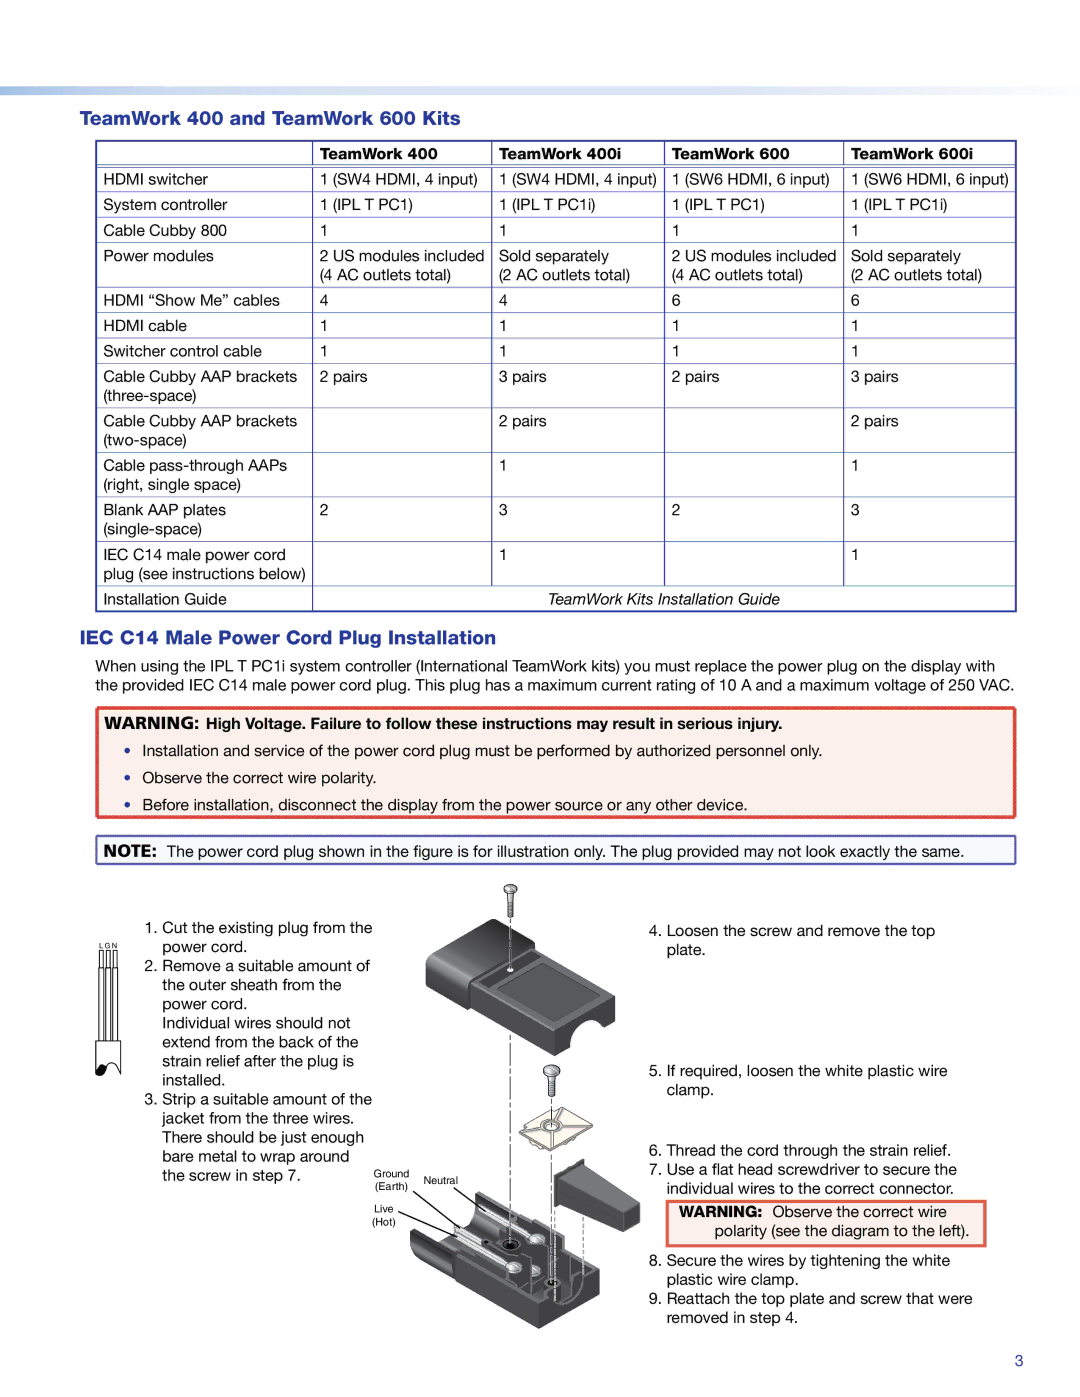
TeamWork 400 and TeamWork 600 Kits


TeamWork 400

TeamWork 400i

TeamWork 600

TeamWork 600i


HDMI switcher

1

(SW4 HDMI, 4 input)

1

(SW4 HDMI, 4 input)

1

(SW6 HDMI, 6 input)

1

(SW6 HDMI, 6 input)


System controller

1

(IPL T PC1)

1

(IPL T PC1i)

1

(IPL T PC1)

1

(IPL T PC1i)


Cable Cubby 800

1


1


1


1


Power modules

2 US modules included

Sold separately

2 US modules included

Sold separately


(4 AC outlets total)

(2 AC outlets total)

(4 AC outlets total)

(2 AC outlets total)


HDMI “Show Me” cables

4


4


6


6


HDMI cable

1


1


1


1


Switcher control cable

1


1


1


1


Cable Cubby AAP brackets

2 pairs

3 pairs

2 pairs

3 pairs

(three-space)


Cable Cubby AAP brackets


2 pairs


2 pairs

(two-space)


Cable pass-through AAPs


1


1


(right, single space)


Blank AAP plates

2


3


2


3


(single-space)


IEC C14 male power cord


1


1


plug (see instructions below)


Installation Guide


TeamWork Kits Installation Guide


IEC C14 Male Power Cord Plug Installation

When using the IPL T PC1i system controller (International TeamWork kits) you must replace the power plug on the display with the provided IEC C14 male power cord plug. This plug has a maximum current rating of 10 A and a maximum voltage of 250 VAC.

WARNING: High Voltage. Failure to follow these instructions may result in serious injury.

Installation and service of the power cord plug must be performed by authorized personnel only.

Observe the correct wire polarity.

Before installation, disconnect the display from the power source or any other device.

NOTE: The power cord plug shown in the figure is for illustration only. The plug provided may not look exactly the same.

1. Cut the existing plug from the

L G N

power cord.

2.Remove a suitable amount of the outer sheath from the power cord.

Individual wires should not extend from the back of the strain relief after the plug is installed.

3.Strip a suitable amount of the jacket from the three wires. There should be just enough bare metal to wrap around

the screw in step 7.

Ground

Neutral


(Earth)


Live


(Hot)


4.Loosen the screw and remove the top plate.

5.If required, loosen the white plastic wire clamp.

6.Thread the cord through the strain relief.

7.Use a ƒat head screwdriver to secure the individual wires to the correct connector.

WARNING: Observe the correct wire polarity (see the diagram to the left).

8.Secure the wires by tightening the white plastic wire clamp.

9.Reattach the top plate and screw that were removed in step 4.

3

Page 3
Image 3
Extron electronic manual TeamWork 400 and TeamWork 600 Kits, IEC C14 Male Power Cord Plug Installation

600 specifications

Extron Electronics is a well-respected name in the audiovisual industry, providing a range of sophisticated solutions to meet the needs of various installations. Among its notable offerings is the Extron 600 series, a line of products designed to elevate the performance and functionality of AV systems.

The Extron 600 series includes various devices primarily focused on video processing and scaling. One of the standout features of this series is its ability to handle multiple video formats. It supports high-definition resolutions, ensuring compatibility with a wide range of source devices and displays. This flexibility allows users to connect various equipment without worrying about format discrepancies.

Another prominent characteristic of the Extron 600 is its advanced scaling technology. The products in this series feature powerful DEEP COLOR support and exceptional image quality, providing sharp, vibrant outputs that enhance the overall viewing experience. The intelligent scaling algorithms automatically adjust content, maintaining visual integrity across different resolutions, which is crucial for professional presentations and high-stakes environments.

Connectivity options are abundant in the Extron 600 series. The devices often include HDMI, DisplayPort, and analog inputs, enabling seamless integration with diverse AV setups and ensuring that users can connect their preferred devices without hassle. Additionally, many units are equipped with built-in audio features, allowing for streamlined AV distribution while reducing the need for extra hardware.

The Extron 600 also boasts user-friendly controls. With intuitive interfaces and programmable presets, setup and operation are simplified, making it easy for users to manage their AV environments effectively. Remote management capabilities are often included as well, allowing for easy monitoring and adjustments through a centralized system.

Durability is a key characteristic of the Extron 600 series, built with high-quality components that withstand the rigors of continual use in commercial environments. Extron backs its products with robust support and warranty options, assuring users of reliable performance.

Overall, the Extron 600 series exemplifies cutting-edge technology, exceptional versatility, and user-centric design, making it an excellent choice for any professional AV application. With its combination of advanced features and reliable operation, it stands out as a significant contribution to modern audiovisual systems.