Media Presentation Switchers
MPS 112 and MPS 112CS
68-706-01 Rev. H
Sicherheitsanleitungen Deutsch
Precautions
Safety Instructions English
Consignes de Sécurité Français
Quick Start - MPS Series
RS-232 remote connector
Connecting the MPS switcher
RS-232 remote connector pinout table
Setting the microphone talk-over threshold
Quick Start - MPS Series, cont’d
Optimizing the audio
Chapter 1 Introduction
Table of Contents
MPS Series Table of Contents
MPS Series Features
ii MPS Series Table of Contents
Table of Contents, cont’d
MPS Series
About the MPS Series MPS Series Features
Chapter1One
Introduction
1-2 MPS Series Introduction
MPS Series Features
Introduction
About the MPS Series
Chapter2Two
Installation
Mounting the Switcher Rear Panel Connectors
Connecting the MPS Switcher
2-2 MPS Series Installation
Installation
Mounting the Switcher
Figure 2-1 - Mounting the MPS switcher
MPS Series Installation
Table or wall mounting
Through-desk mounting
Figure 2-2 - Rear panel of MPS
Installation, cont’d
Rear Panel Connectors
2-4 MPS Series Installation
MPS Series Installation
Connecting the MPS Switcher
2-6 MPS Series Installation
Figure 2-4 - MPS 112 installation example
Connecting the RCA audio connectors
Figure 2-5 - RCA audio connector
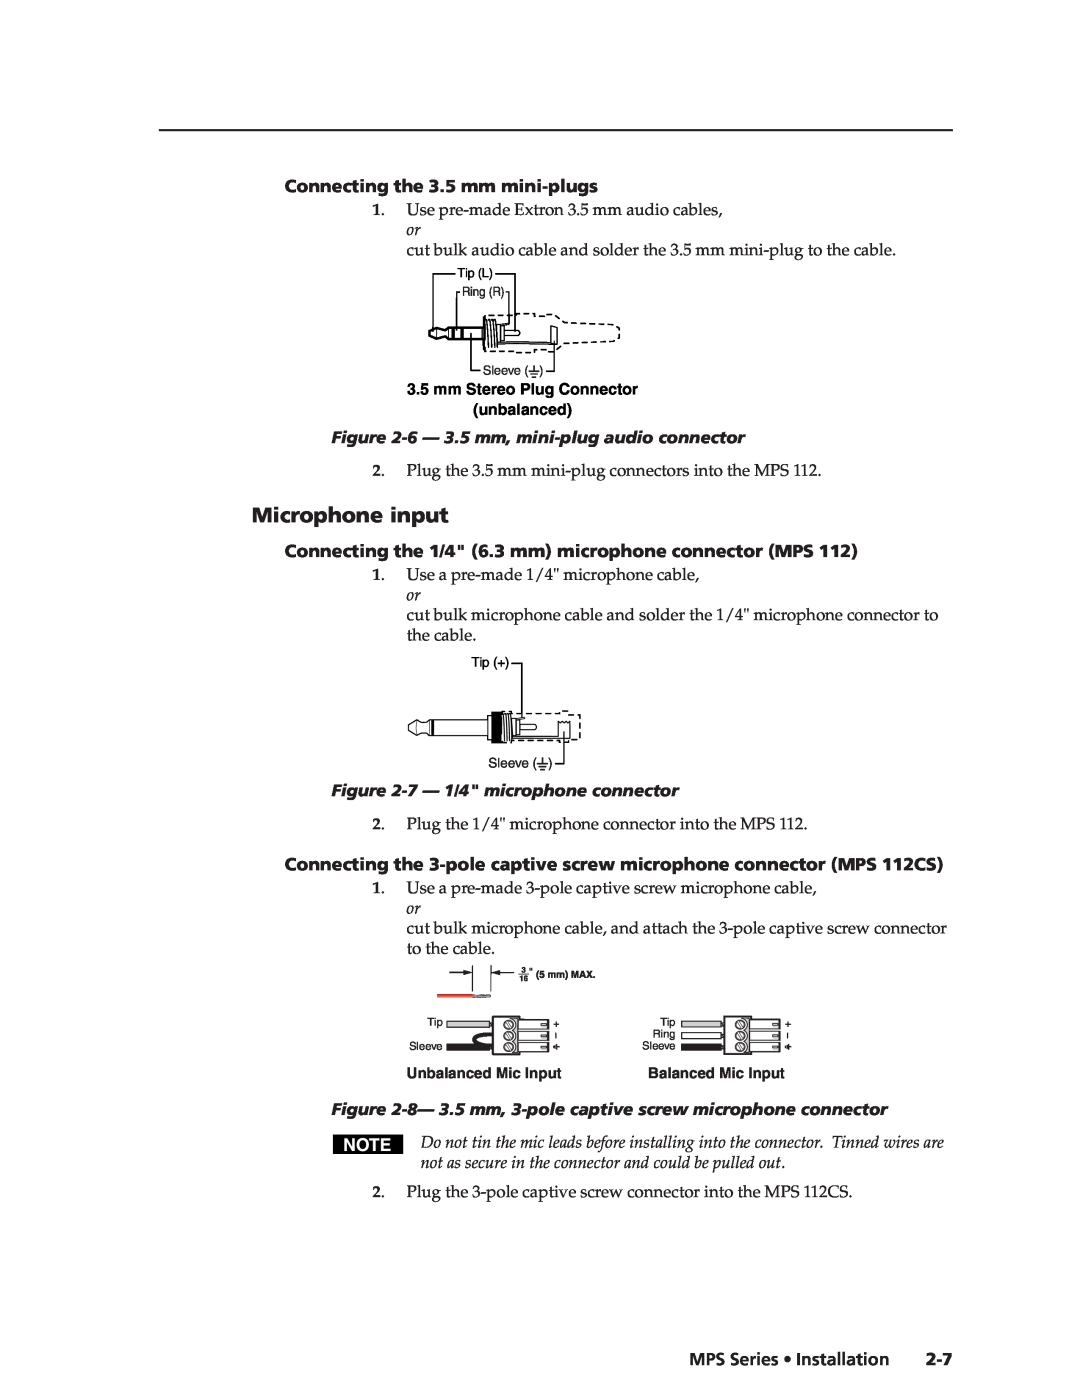
Figure 2-7 - 1/4 microphone connector
Connecting the 3.5 mm mini-plugs
Figure 2-6 - 3.5 mm, mini-plug audio connector
Connecting the 1/4 6.3 mm microphone connector MPS
Remote connection
Figure 2-9 - 3.5 mm, 5-pole captive screw audio connectors
2-8 MPS Series Installation
Program audio output MPS 112CS
MPS 112 Series
Front Panel Features Front Panel Operation
Chapter3Three
Operation
Video/audio group buttons
Front Panel Features
Figure 3-1 - Front panel details of the MPS switcher MPS 112 shown
Operation
Figure 3-2 - MPS switcher front panel
Input selection in Single Switcher mode
Input selection in Separate Switcher mode
Switcher Mode controls
Operation, cont’d
View mode
Determining and selecting the switcher mode
Figure 3-3 - Front panel button/LED functions during View mode
Program audio
Front panel security lockout Executive mode
Single Switcher mode
Separate Switcher mode
For units with firmware version 1.10 and above
Program audio volume
Reset program audio volume
Program audio breakaway
Setting mic “talk-over” threshold
Turn mic or phantom power on/off
Mic volume
Reset mic volume
Operation, cont’d
3-8 MPS 112 Series Operation
Windows-based Control Program
Installing the Windows-based Control Software Using the Software
Uploading Firmware Updates
Chapter4Four
Figure 4-1 - MPS Control Program main screen
Installing the Windows-based Control Software
Using the Software
Windows-based Control Program
MPS Series Windows-based Control Program
Uploading Firmware Updates
Figure 4-2 - MPS Control Program File menu
Figure 4-3 - Firmware Loader window
4-4 MPS Series Windows-based Control Program
Figure 4-4 - Firmware update confirmation window
Figure 4-5 - Firmware update completed window
Windows-based Control Program, cont’d
Programmer’s Guide
Remote Control Port RS-232 Host-to-MPS Communications
Command/Response Tables
Chapter5Five
Programmer’s Guide
Remote Control Port RS-232
MPS switcher-initiated messages
Boot-up messages
Symbol definitions
Command/Response Table
MPS switcher error responses
Using the command/response table
Programmer’s Guide, cont’d
Command/response table for SIS commands
Command
ASCII Command
Front panel security lockout executive mode
Description
Command
ASCII Command
ASCII Command
Special functions
5-6 MPS Series Programmer’s Guide
Command
MPS Series Programmer’s Guide
Uploading firmware to the MPS via an SIS command
Programmer’s Guide, cont’d
5. Click Transfer Send text file
6. Select All files *.* from the Files of type drop-down box
5-8 MPS Series Programmer’s Guide
MPS Series
Specifications Part Numbers
AAppendix A
Reference Information
Video input
Specifications
Reference Information
Video
0 dBu = 0.775 Vrms, 0 dBV = 1 Vrms, 0 dBV 2 dBu
Sync
Audio - individual audio groups VGA, S-video, composite video
Audio input - individual audio groups VGA, S-video, composite video
Audio output - program audio
Reference Information, cont’d
Audio output - individual audio groups VGA, S-video, composite video
Audio - program audio
General
Control/remote - switcher
Specifications are subject to change without notice
Microphone input
Included parts
Optional accessories
Replacement
Part Numbers
Solder connectors qty. =
Cables and connectors
Assorted connectors
Crimp connectors qty. =
S-video M-M cable
Pre-cut cables
VGA M-M with audio cable
VGA M to BNC M cable
Europe, Africa, and the Middle East
Extron’s Warranty
FCC Class A Notice
USA, Canada, South America
Extron Electronics, Europe Beeldschermweg 6C