Installation and Operation
Installation Overview
CAUTION Installation and service must be performed by authorized personnel only. UL Listed electrical boxes are
Interface Details
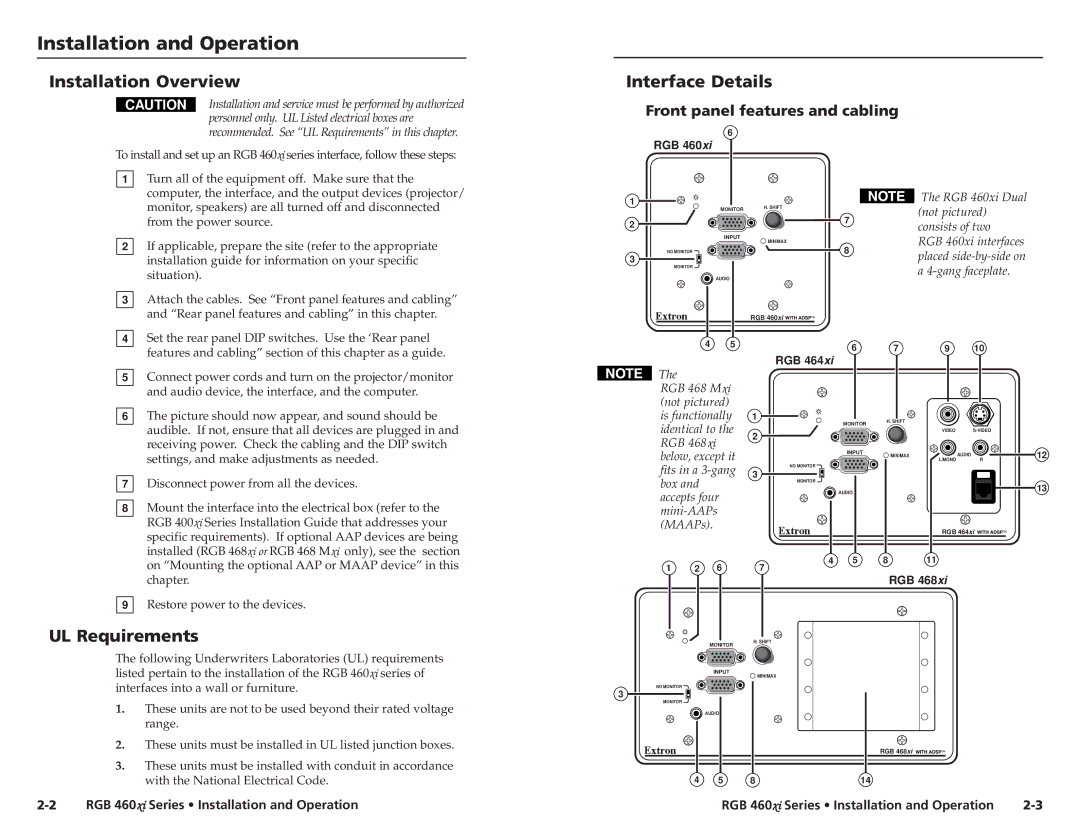
Front panel features and cabling
recommended. See “UL Requirements” in this chapter.
To install and set up an RGB 460xi series interface, follow these steps:
1 | Turn all of the equipment off. Make sure that the |
| computer, the interface, and the output devices (projector/ |
| monitor, speakers) are all turned off and disconnected |
| from the power source. |
| If applicable, prepare the site (refer to the appropriate |
2 | |
| installation guide for information on your specific |
| |
| situation). |
| Attach the cables. See “Front panel features and cabling” |
3 | |
| and “Rear panel features and cabling” in this chapter. |
6
RGB 460xi
1
| MONITOR | H. SHIFT |
|
| |
2 |
| 7 |
|
| |
| INPUT | MIN/MAX |
|
| |
NO MONITOR |
| 8 |
3 |
|
|
MONITOR |
|
|
| AUDIO |
|
![]()
![]()
![]()
![]()
![]() The RGB 460xi Dual (not pictured) consists of two RGB 460xi interfaces placed
The RGB 460xi Dual (not pictured) consists of two RGB 460xi interfaces placed
4 | Set the rear panel DIP switches. Use the ‘Rear panel |
| features and cabling” section of this chapter as a guide. |
RGB 460xi![]()
![]()
![]()
![]()
4 | 5 | 6 | 7 | 9 | 10 |
|
|
RGB 464xi
5 | Connect power cords and turn on the projector/monitor |
| and audio device, the interface, and the computer. |
6 | The picture should now appear, and sound should be |
| audible. If not, ensure that all devices are plugged in and |
| receiving power. Check the cabling and the DIP switch |
| settings, and make adjustments as needed. |
7 | Disconnect power from all the devices. |
8 | Mount the interface into the electrical box (refer to the |
| RGB 400xi Series Installation Guide that addresses your |
| specific requirements). If optional AAP devices are being |
| installed (RGB 468xi or RGB 468 Mxi only), see the section |
The
RGB 468 Mxi (not pictured) is functionally identical to the RGB 468xi below, except it fits in a
1
MONITOR
2
INPUT
NO MONITOR
3
MONITOR
AUDIO
H. SHIFT |
|
|
|
| VIDEO |
| |
MIN/MAX | AUDIO | R | 12 |
| L/MONO |
|
13
RGB 464xi ![]()
![]()
![]()
![]()
on “Mounting the optional AAP or MAAP device” in this |
4 | 5 | 8 | 11 |
1 | 2 | 6 | 7 |
chapter. |
9 Restore power to the devices. |
UL Requirements
The following Underwriters Laboratories (UL) requirements listed pertain to the installation of the RGB 460xi series of interfaces into a wall or furniture.
1. | These units are not to be used beyond their rated voltage |
| range. |
2. | These units must be installed in UL listed junction boxes. |
3. | These units must be installed with conduit in accordance |
MONITOR
INPUT
NO MONITOR
3
MONITOR
AUDIO
RGB 468xi
H. SHIFT
MIN/MAX
RGB 468xi ![]()
![]()
![]()
![]()
![]()
with the National Electrical Code. |
4 | 5 | 8 | 14 |
RGB 460xi Series • Installation and Operation | RGB 460xi Series • Installation and Operation |