Installation and Operation, cont’d
1Faceplate screws — These screws secure the faceplate to the rest of the interface.
Do not remove these faceplate screws while the interface is attached to the wall or the detached interface may fall down inside the wall.
2Power/signal LED — This LED lights
•yellow to indicate that the interface is receiving power.
•green to indicate that an active sync signal is present at the input and the interface is receiving power.
If the input signal has sync on green, the LED will not change from yellow to green
3No Monitor/Monitor switch (video input termination) — Set this switch to select the video input impedance that provides the best picture:
•No Monitor (75 ohms) if no local monitor is connected or if the picture is too bright or blooming (unterminated).
•Monitor (high impedance) if a local monitor is connected, a laptop breakout cable is used, or if the picture is too dark.
4Audio input connector — Plug a 3.5 mm stereo plug into this jack for unbalanced audio input. Wire the male plug as shown below.
Tip (L) | Sleeve (GND) |
Ring (R)
Tip (L)
Sleeve (GND)
Audio input wiring
5Computer input connector — Attach a cable from the computer to the interface via this female
6Buffered local monitor output connector — Attach a cable from a local monitor to this female
7Horizontal shift control knob (H. Shift) — While viewing the displayed image, rotate this control to move the image to the right or left on the screen. The Min/Max LED ( 8 ) will flash red whenever the minimum or maximum limit of this control is reached.
DDSP disables the horizontal shifting control.
8Min/Max LED — This LED blinks red momentarily whenever the minimum or maximum limits of the horizontal shift control ( 7 ) have been reached. Continually turning the horizontal shift control knob in the same direction after the limit has been reached will cause the LED to continually blink.
9Composite video connector (RGB 464xi) — This female RCA-
10
1112 RCA audio connectors (RGB 464xi) — Connect the left audio signal cable to the white RCA connector (L/
Mono), and the right audio signal cable to the red RCA connector (R) for unbalanced stereo audio
When a mono audio signal is applied to the L/Mono input, the same signal will be output to both left and right audio outputs.
13Network connector (RGB 464xi) — Connect a computer to this
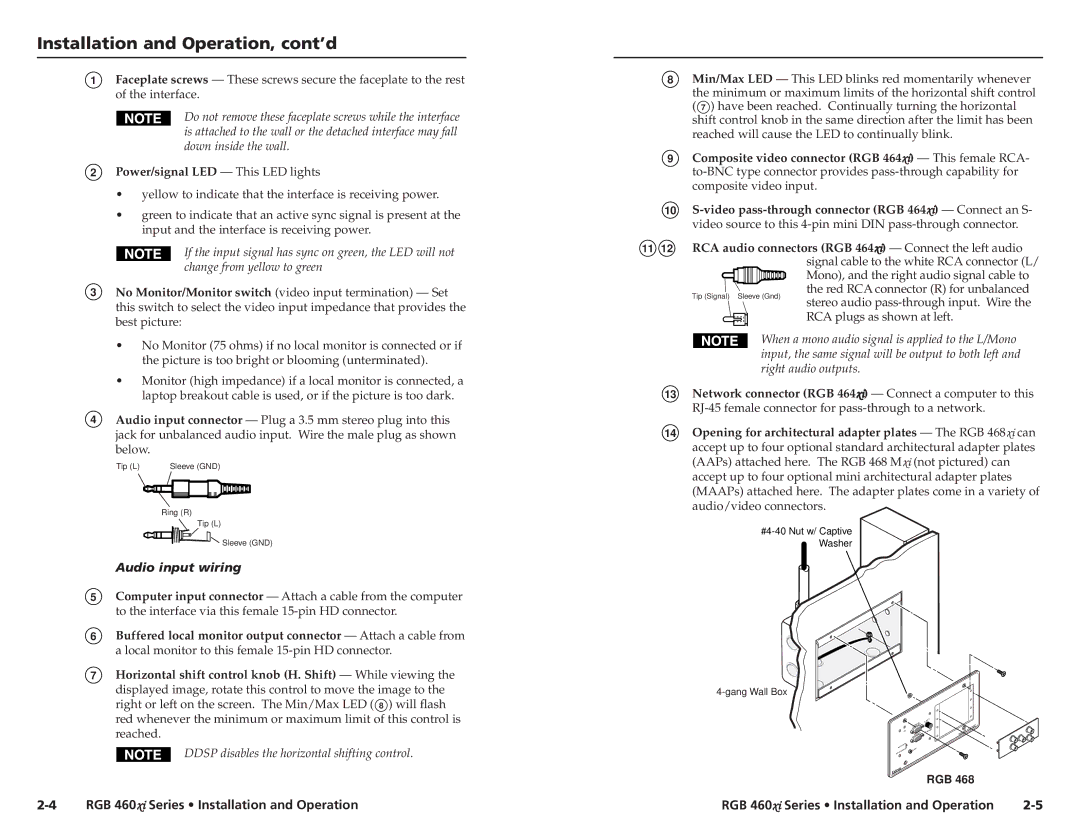
14Opening for architectural adapter plates — The RGB 468xi can accept up to four optional standard architectural adapter plates (AAPs) attached here. The RGB 468 Mxi (not pictured) can accept up to four optional mini architectural adapter plates (MAAPs) attached here. The adapter plates come in a variety of audio/video connectors.
MO | NITOR |
|
|
|
|
| ADSP | |
|
|
|
|
|
| ITH | ||
|
|
|
|
| 8 | W |
| |
|
|
|
| B 46 |
|
| ||
INPU | T | RG |
|
|
|
| ||
|
|
|
|
|
| |||
RGB 468
RGB 460xi Series • Installation and Operation | RGB 460xi Series • Installation and Operation |