TOOLS NEEDED FOR INSTALLATION

Saber Saw or Jig Saw

Drill

1 1/4" Wood Drill Bit

Pliers

Phillips Screwdriver

Wire Stripper or Utility Knife

Metal Snips

Measuring Tape or Ruler

Level

Pencil

Caulking Gun

Duct Tape

PARTS SUPPLIED FOR INSTALLATION

1 Backdraft Damper

1 Vent Grate (for recirculating installations only)

1 Literature Package

PARTS NEEDED FOR INSTALLATION

2 Conduit Connectors

Power Supply Cable

1 Wall or Roof Cap

All Metal Ductwork

OPTIONAL ACCESSORIES AVAILABLE

• Charcoal Filters

For recirculating installations only, replace charcoal filters as needed part # 6093034

PLAN YOUR DUCTWORK

The Inca HC requires 6" round ductwork. To ensure that the blower performs to its highest possible capac- ity, ductwork should be as short and straight as possilbe.

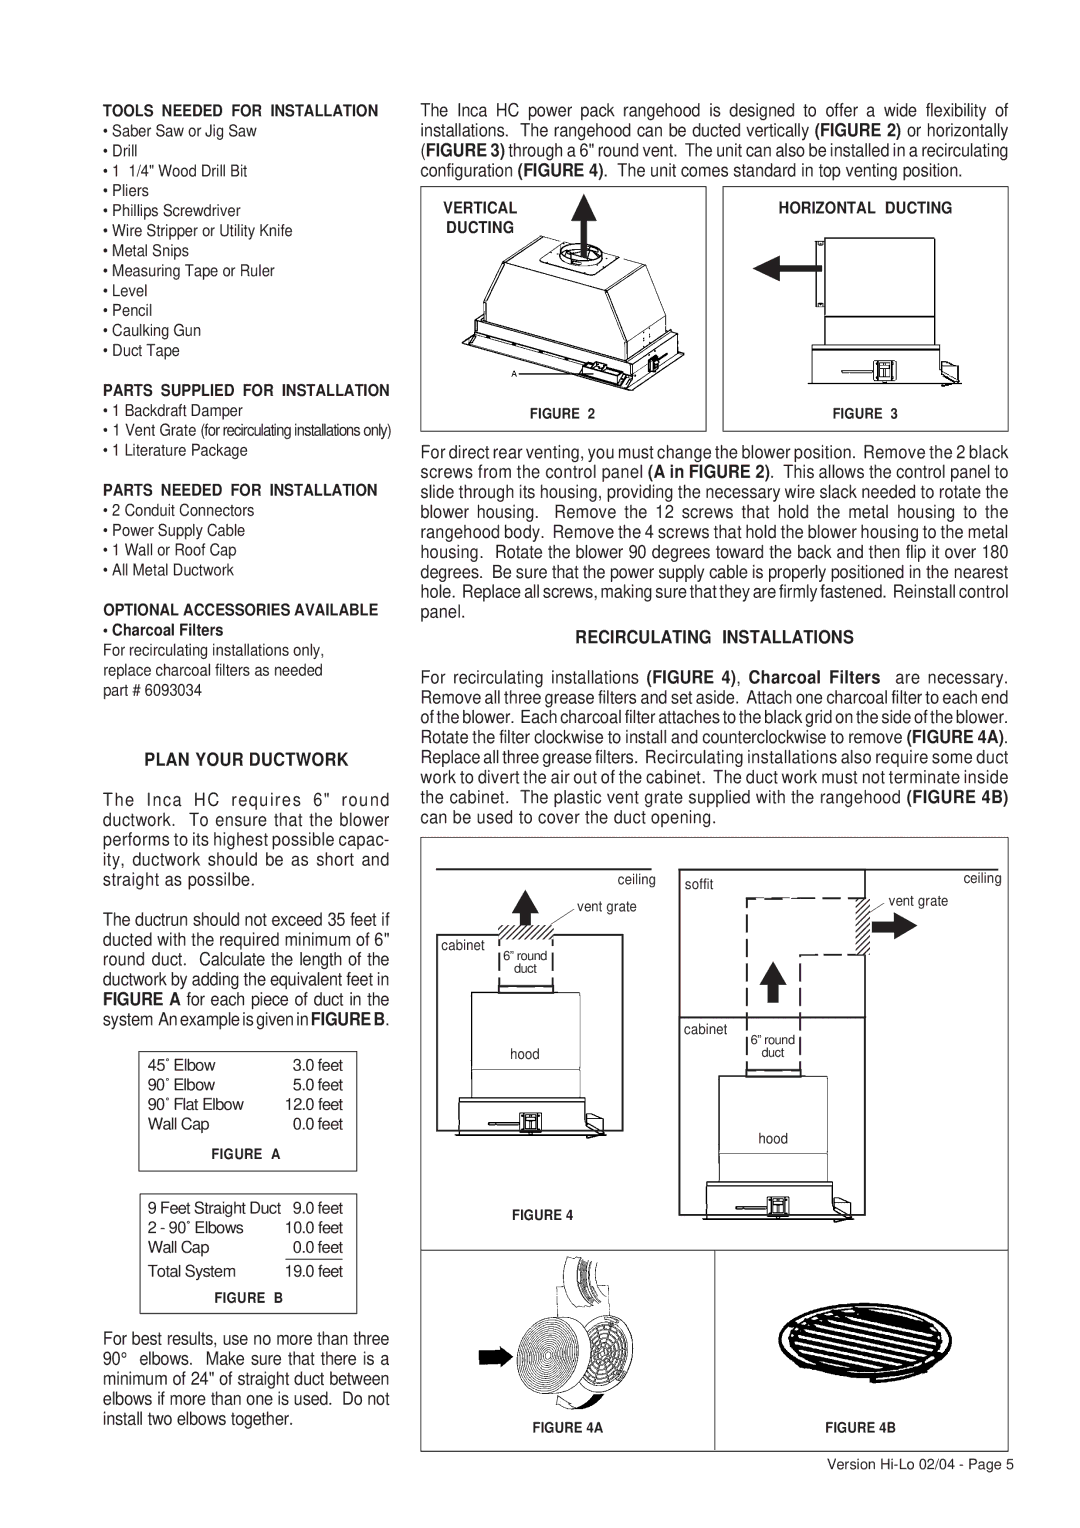
The ductrun should not exceed 35 feet if ducted with the required minimum of 6" round duct. Calculate the length of the ductwork by adding the equivalent feet in FIGURE A for each piece of duct in the system An example is given in FIGURE B.

45˚ Elbow

3.0 feet

90˚ Elbow

5.0 feet

90˚ Flat Elbow

12.0 feet

Wall Cap

0.0 feet

FIGURE A


9 Feet Straight Duct

9.0 feet

2 - 90˚ Elbows

10.0 feet

Wall Cap

0.0 feet


Total System

19.0 feet

FIGURE B


For best results, use no more than three 90° elbows. Make sure that there is a minimum of 24" of straight duct between elbows if more than one is used. Do not install two elbows together.

The Inca HC power pack rangehood is designed to offer a wide flexibility of installations. The rangehood can be ducted vertically (FIGURE 2) or horizontally (FIGURE 3) through a 6" round vent. The unit can also be installed in a recirculating configuration (FIGURE 4). The unit comes standard in top venting position.

VERTICAL


HORIZONTAL DUCTING


DUCTING


FIGURE 2

FIGURE 3

For direct rear venting, you must change the blower position. Remove the 2 black screws from the control panel (A in FIGURE 2). This allows the control panel to slide through its housing, providing the necessary wire slack needed to rotate the blower housing. Remove the 12 screws that hold the metal housing to the rangehood body. Remove the 4 screws that hold the blower housing to the metal housing. Rotate the blower 90 degrees toward the back and then flip it over 180 degrees. Be sure that the power supply cable is properly positioned in the nearest hole. Replace all screws, making sure that they are firmly fastened. Reinstall control panel.

RECIRCULATING INSTALLATIONS

For recirculating installations (FIGURE 4), Charcoal Filters are necessary. Remove all three grease filters and set aside. Attach one charcoal filter to each end of the blower. Each charcoal filter attaches to the black grid on the side of the blower. Rotate the filter clockwise to install and counterclockwise to remove (FIGURE 4A). Replace all three grease filters. Recirculating installations also require some duct work to divert the air out of the cabinet. The duct work must not terminate inside the cabinet. The plastic vent grate supplied with the rangehood (FIGURE 4B) can be used to cover the duct opening.

ceiling

soffit

ceiling


vent grate


vent grate


cabinet


6” round


duct


cabinet

6” round


hood


duct


hood

FIGURE 4


23456789FIGURE 4A


FIGURE 4B

Version Hi-Lo 02/04 - Page 5

Page 5
Image 5
Faber 6048624 installation instructions Plan Your Ductwork, Recirculating Installations

6048624 specifications

The Faber 6048624 is a highly acclaimed range hood designed to enhance kitchen functionality while complementing modern décor. Known for its efficiency and cutting-edge features, the Faber 6048624 exemplifies the perfect blend of style and performance, making it a preferred choice for homeowners and professional chefs alike.

One of the standout features of the Faber 6048624 is its powerful extraction capacity. It utilizes a robust motor to efficiently remove smoke, grease, and odors from the kitchen, ensuring clean air circulation. With adjustable air flow settings, users can tailor ventilation according to their cooking needs, providing versatility for everything from simmering sauces to frying meats.

The design of the Faber 6048624 is both sleek and functional, available in various finishes to suit different kitchen styles. Its minimalist aesthetic allows it to seamlessly integrate into any kitchen environment, whether it be contemporary or transitional. Furthermore, its space-saving design can be mounted under cabinets or as a standalone unit, maximizing kitchen space.

In considerations of technology, this range hood boasts advanced noise reduction features. Many users appreciate the quiet operation of the Faber 6048624, which allows kitchen conversations to flow uninterrupted while maintaining efficient ventilation. This low-noise technology is a significant benefit for open-concept living spaces.

Additionally, the Faber 6048624 includes innovative LED lighting that illuminates the cooking surface, enhancing visibility and safety while preparing meals. This feature not only improves the cooking experience but also adds an aesthetic touch to the kitchen.

Maintenance is also a crucial aspect of the Faber 6048624. It is equipped with easy-to-clean filters that can be removed and washed, promoting hygiene and ensuring optimal performance over time. The filter indicators provide reminders for when the filters need to be cleaned or replaced, taking the guesswork out of maintenance.

Overall, the Faber 6048624 stands out due to its effective design, impressive extraction capabilities, modern aesthetics, and user-friendly features. It is perfect for those looking to invest in a quality range hood that combines style with functionality, making kitchen chores easier and more efficient. Whether you are an amateur cook or a culinary expert, the Faber 6048624 is sure to enhance your cooking experience.