PREPARE THE WALL

1.Disconnect and move freestanding range from cabinet open- ing to provide easier access to rear wall. Put a thick, protective covering over cooktop, set-in range or countertop to protect from damage or dirt.

2.Determine and clearly mark with a pencil the center line on the wall where the rangehood will be installed.

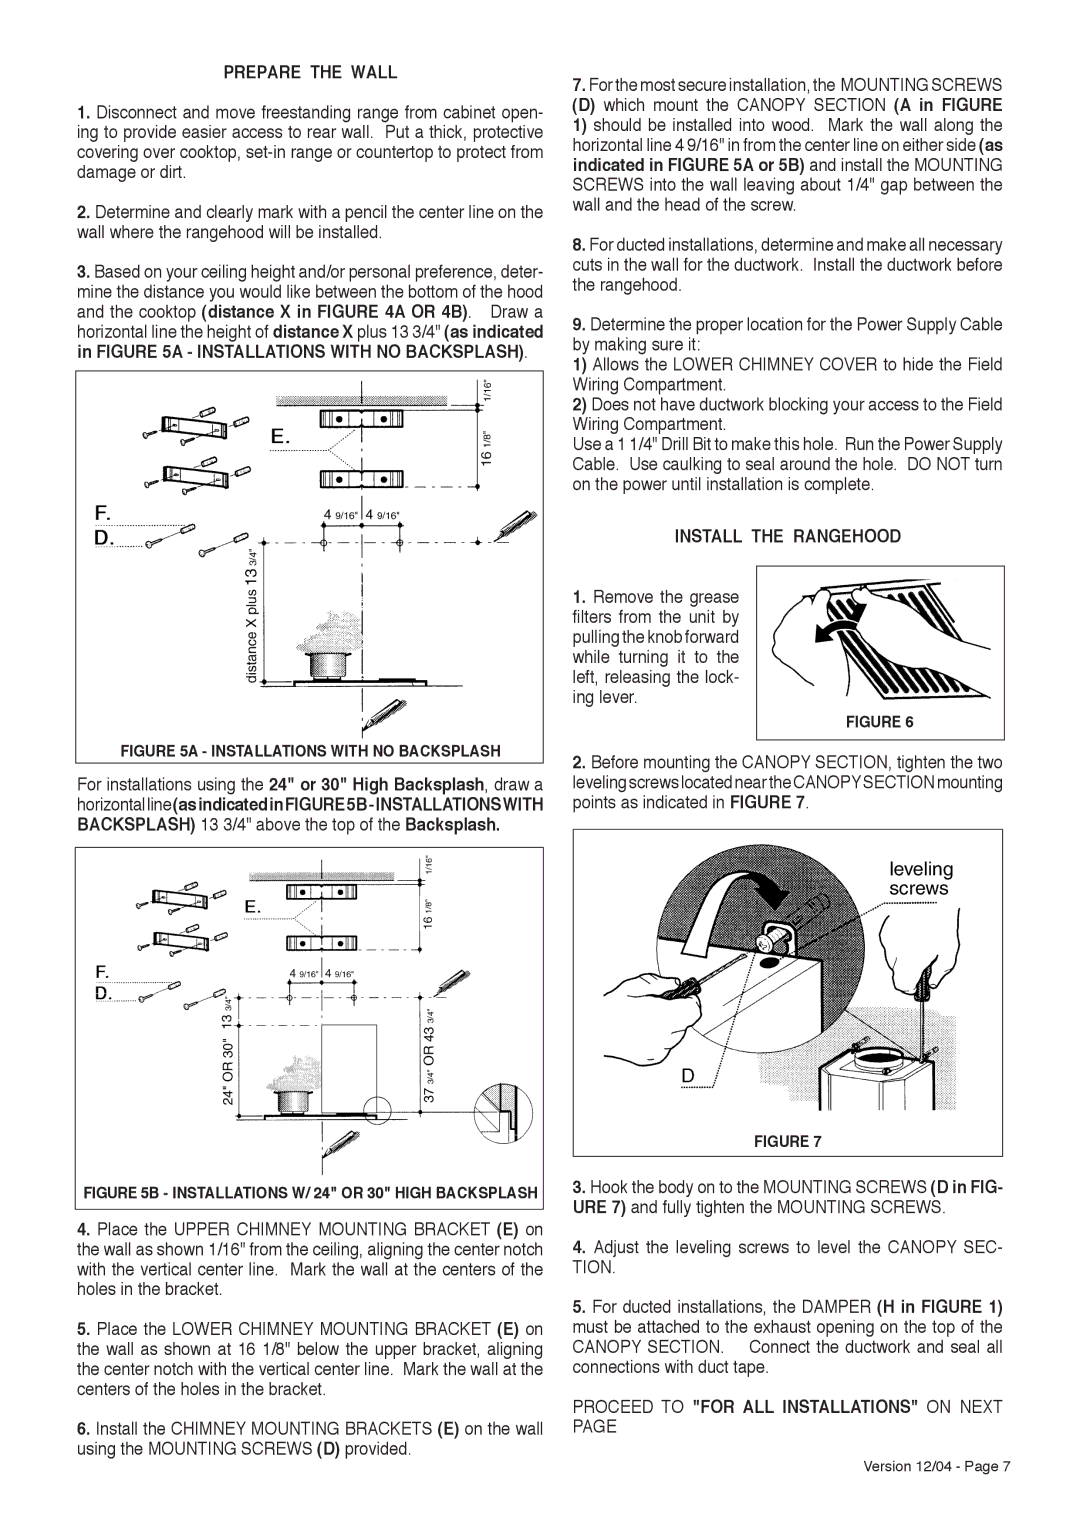
3.Based on your ceiling height and/or personal preference, deter- mine the distance you would like between the bottom of the hood and the cooktop (distance X in FIGURE 4A OR 4B). Draw a horizontal line the height of distance X plus 13 3/4" (as indicated in FIGURE 5A - INSTALLATIONS WITH NO BACKSPLASH).

FIGURE 5A - INSTALLATIONS WITH NO BACKSPLASH

For installations using the 24" or 30" High Backsplash, draw a horizontalline(asindicatedinFIGURE5B-INSTALLATIONSWITH BACKSPLASH) 13 3/4" above the top of the Backsplash.

FIGURE 5B - INSTALLATIONS W/ 24" OR 30" HIGH BACKSPLASH

4.Place the UPPER CHIMNEY MOUNTING BRACKET (E) on the wall as shown 1/16" from the ceiling, aligning the center notch with the vertical center line. Mark the wall at the centers of the holes in the bracket.

5.Place the LOWER CHIMNEY MOUNTING BRACKET (E) on the wall as shown at 16 1/8" below the upper bracket, aligning the center notch with the vertical center line. Mark the wall at the centers of the holes in the bracket.

6.Install the CHIMNEY MOUNTING BRACKETS (E) on the wall using the MOUNTING SCREWS (D) provided.

7.For the most secure installation, the MOUNTING SCREWS

(D) which mount the CANOPY SECTION (A in FIGURE 1) should be installed into wood. Mark the wall along the horizontal line 4 9/16" in from the center line on either side (as indicated in FIGURE 5A or 5B) and install the MOUNTING SCREWS into the wall leaving about 1/4" gap between the wall and the head of the screw.

8.For ducted installations, determine and make all necessary cuts in the wall for the ductwork. Install the ductwork before the rangehood.

9.Determine the proper location for the Power Supply Cable by making sure it:

1) Allows the LOWER CHIMNEY COVER to hide the Field Wiring Compartment.

2) Does not have ductwork blocking your access to the Field Wiring Compartment.

Use a 1 1/4" Drill Bit to make this hole. Run the Power Supply Cable. Use caulking to seal around the hole. DO NOT turn on the power until installation is complete.

INSTALL THE RANGEHOOD

1.Remove the grease filters from the unit by pulling the knob forward while turning it to the left, releasing the lock- ing lever.

FIGURE 6

2.Before mounting the CANOPY SECTION, tighten the two leveling screws located near the CANOPYSECTION mounting points as indicated in FIGURE 7.

FIGURE 7

3.Hook the body on to the MOUNTING SCREWS (D in FIG- URE 7) and fully tighten the MOUNTING SCREWS.

4.Adjust the leveling screws to level the CANOPY SEC- TION.

5.For ducted installations, the DAMPER (H in FIGURE 1) must be attached to the exhaust opening on the top of the CANOPY SECTION. Connect the ductwork and seal all connections with duct tape.

PROCEED TO "FOR ALL INSTALLATIONS" ON NEXT PAGE

Version 12/04 - Page 7

Page 7
Image 7
Faber Diamante installation instructions Prepare the Wall, Install the Rangehood, Proceed to for ALL Installations on Next

Diamante specifications

Faber Diamante is a standout product in the realm of premium kitchen ventilation solutions, combining advanced technology with exquisite design. This range hood is renowned for its powerful performance and aesthetic appeal, making it a perfect addition to modern kitchens.

At the heart of the Faber Diamante is its innovative suction technology. The hood features a high-efficiency blower system that ensures optimal air extraction. With a high extraction rate, it effectively removes smoke, steam, and odors, keeping the kitchen fresh and pleasant. The powerful fan operates quietly, ensuring that cooking is not interrupted by unnecessary noise, creating a serene culinary environment.

One of the significant features of the Faber Diamante is its sleek, minimalist design. It is available in various finishes, including stainless steel and glass, allowing it to complement various kitchen styles. The low-profile design adds sophistication without overwhelming the kitchen space, enhancing its overall aesthetic.

A standout characteristic of the Faber Diamante is its user-friendly control system. The hood is equipped with push-button controls or modern touch controls, enabling users to easily operate the fan speed and lighting arrangements. This intuitive interface is designed for convenience, allowing for quick adjustments while cooking.

In terms of lighting, the Faber Diamante incorporates integrated LED lights, which provide excellent illumination over the cooking surface. The energy-efficient lighting not only enhances visibility but also contributes to a contemporary aesthetic, making cooking more enjoyable.

Maintenance is also a priority with the Faber Diamante. The hood features easy-to-clean, removable filters that ensure longevity and performance. These filters capture grease and impurities effectively and can be washed in a dishwasher, making upkeep a breeze.

The Faber Diamante embodies a commitment to sustainability with energy-efficient components that adhere to modern environmental standards. This focus on energy conservation allows homeowners to enjoy high-performance ventilation without a significant energy bill.

Overall, the Faber Diamante is a fusion of functionality and style. Its powerful performance, quiet operation, sleek design, intuitive controls, and easy maintenance make it an ideal choice for homeowners seeking a premium kitchen ventilation solution that doesn't compromise on aesthetics or efficiency. Whether you're a passionate home cook or an occasional chef, the Faber Diamante is engineered to elevate your cooking experience.