10

Milling cutters

Do not exceed the maximum speed specified on the tool and/or keep to the speed range. Cracked or distorted cutters must not be used.

You can turn the machine upside down when changing the tool.

Inserting the tool

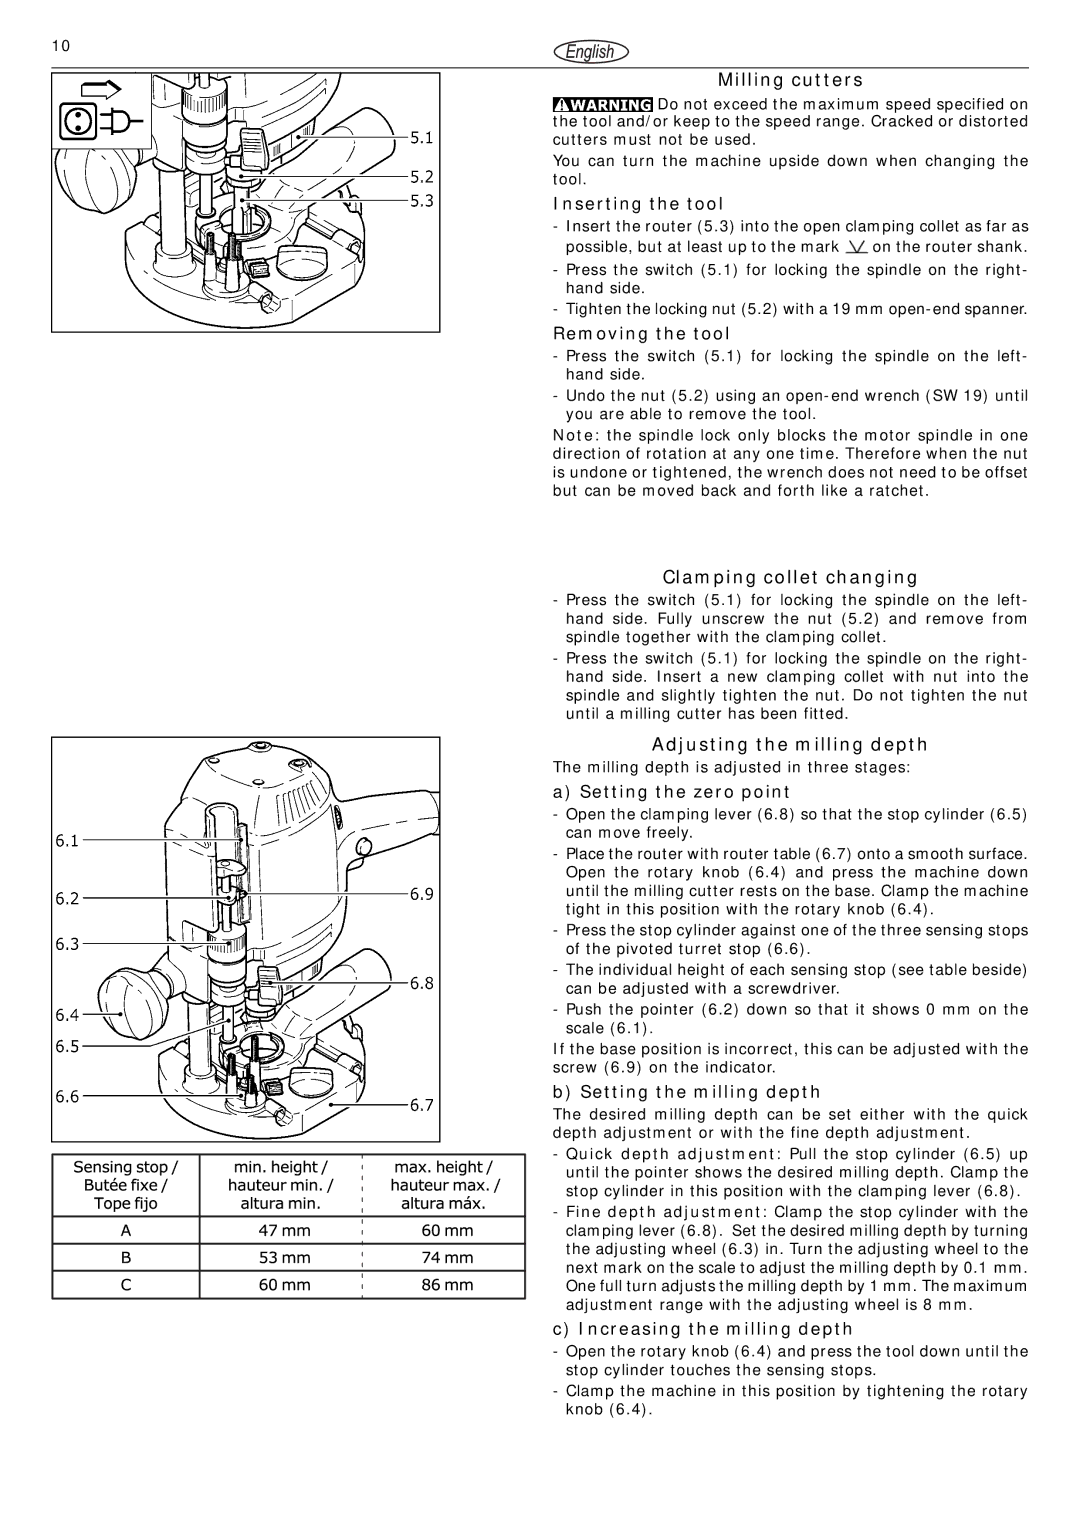
- Insert the router (5.3) into the open clamping collet as far as possible, but at least up to the mark on the router shank.

- Press the switch (5.1) for locking the spindle on the right- hand side.

- Tighten the locking nut (5.2) with a 19 mm open-end spanner.

Removing the tool

- Press the switch (5.1) for locking the spindle on the left- hand side.

- Undo the nut (5.2) using an open-end wrench (SW 19) until you are able to remove the tool.

Note: the spindle lock only blocks the motor spindle in one direction of rotation at any one time. Therefore when the nut is undone or tightened, the wrench does not need to be offset but can be moved back and forth like a ratchet.

Clamping collet changing

- Press the switch (5.1) for locking the spindle on the left- hand side. Fully unscrew the nut (5.2) and remove from spindle together with the clamping collet.

- Press the switch (5.1) for locking the spindle on the right- hand side. Insert a new clamping collet with nut into the spindle and slightly tighten the nut. Do not tighten the nut until a milling cutter has been fitted.

Adjusting the milling depth

The milling depth is adjusted in three stages:

a) Setting the zero point

- Open the clamping lever (6.8) so that the stop cylinder (6.5) can move freely.

- Place the router with router table (6.7) onto a smooth surface. Open the rotary knob (6.4) and press the machine down until the milling cutter rests on the base. Clamp the machine tight in this position with the rotary knob (6.4).

- Press the stop cylinder against one of the three sensing stops of the pivoted turret stop (6.6).

- The individual height of each sensing stop (see table beside) can be adjusted with a screwdriver.

- Push the pointer (6.2) down so that it shows 0 mm on the scale (6.1).

If the base position is incorrect, this can be adjusted with the screw (6.9) on the indicator.

b) Setting the milling depth

The desired milling depth can be set either with the quick depth adjustment or with the fine depth adjustment.

- Quick depth adjustment: Pull the stop cylinder (6.5) up until the pointer shows the desired milling depth. Clamp the stop cylinder in this position with the clamping lever (6.8).

- Fine depth adjustment: Clamp the stop cylinder with the clamping lever (6.8). Set the desired milling depth by turning the adjusting wheel (6.3) in. Turn the adjusting wheel to the next mark on the scale to adjust the milling depth by 0.1 mm. One full turn adjusts the milling depth by 1 mm. The maximum adjustment range with the adjusting wheel is 8 mm.

c) Increasing the milling depth

- Open the rotary knob (6.4) and press the tool down until the stop cylinder touches the sensing stops.

- Clamp the machine in this position by tightening the rotary knob (6.4).

Page 10
Image 10
Festool 1400 EQ Milling cutters, Inserting the tool, Removing the tool, Clamping collet changing, Setting the zero point

1400 EQ specifications

The Festool 1400 EQ is a premium plunge router designed for a wide range of woodworking tasks, blending precision, power, and user-friendly features. This machine stands out among its peers thanks to its advanced engineering and innovative technologies, making it an essential tool for both professionals and woodworking enthusiasts.

One of the primary features of the Festool 1400 EQ is its robust motor, delivering 1400 watts of power. This powerful motor enables the router to handle a variety of materials, including hardwoods, softwoods, and composite materials. The variable speed control allows users to adjust the RPM from 10,000 to 24,000, providing optimal performance for different applications. Whether you are making intricate cuts or performing edge shaping, the speed control ensures precision and efficiency.

The design of the 1400 EQ is user-oriented, featuring an ergonomic handle that provides excellent grip and comfort during operation. The plunge depth can be easily adjusted with a single dial, allowing for precise routing depths without any tools. This feature is particularly beneficial for users who frequently switch between tasks, as it saves time and enhances productivity.

Festool's unique FastFix system further elevates the versatility of the 1400 EQ. This technology enables quick and easy bit changes without the need for additional tools, ensuring that users can swiftly adapt to various routing tasks. The large base and the option to attach a guide rail ensure stability and accuracy, making it easier to achieve clean, smooth cuts.

Another standout characteristic is the integrated dust extraction system. With the ability to connect to a Festool dust extractor, the 1400 EQ effectively minimizes dust and debris in the workspace, creating a cleaner and safer environment. This feature not only enhances visibility during work but also helps in maintaining a healthier atmosphere.

Durability and reliability are core attributes that Festool products are known for, and the 1400 EQ is no exception. Constructed with high-quality materials, this router is designed to withstand the rigors of heavy use, ensuring it remains a reliable tool for years to come.

In summary, the Festool 1400 EQ combines power, precision, and user-friendly features, making it a top choice for anyone serious about woodworking. Its advanced technologies and thoughtful design cater to a range of routing tasks, ensuring that users can achieve their desired results with ease and efficiency.