rails, and bandsaw away the waste from their front faces. Use a
The hidden parts, the seat rails and the seat frame components, are made from an 8' board of ¾" x 2½" second- ary hardwood. Since the angle to be cut for the miters is 67.5°, you will need to make a supplementary 22.5° jig to achieve the correct angle (see sidebar).
Cutting the miters
Make the 22.5° jig for cutting the miters on the feet, legs, and the front end of the seat side rails. Before start- ing the cut, ensure that the broader (19/16" ) face of the workpiece is flat on the saw’s table (Fig. 1). Set aside the 22.5° offcuts for later use as wedges to facilitate clamping at the glueup stage. The 49° miters for the back stiles are cut without the jig by setting the miter gauge to 41° and clamping the rear face of the back stiles and the bottom face of the seat side rail against the miter gauge fence.
Marking out and milling the mortises
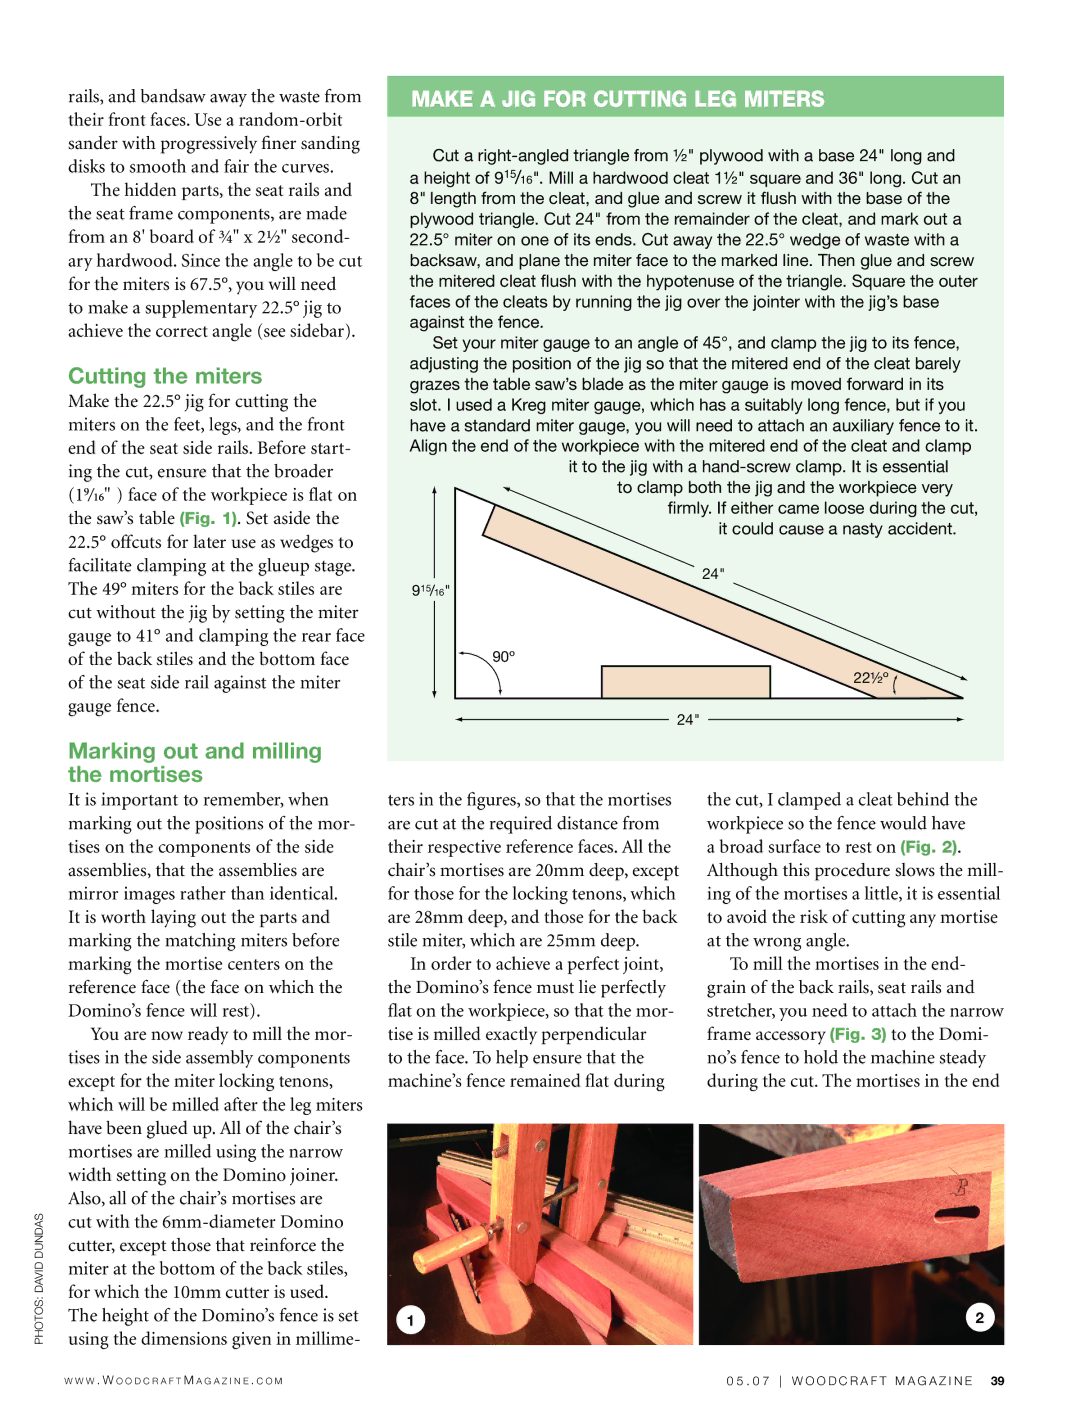
make a jig for cutting leg miters
Cut a
Set your miter gauge to an angle of 45°, and clamp the jig to its fence, adjusting the position of the jig so that the mitered end of the cleat barely grazes the table saw’s blade as the miter gauge is moved forward in its slot. I used a Kreg miter gauge, which has a suitably long fence, but if you have a standard miter gauge, you will need to attach an auxiliary fence to it. Align the end of the workpiece with the mitered end of the cleat and clamp
it to the jig with a
firmly. If either came loose during the cut, it could cause a nasty accident.
24"
915/16"
90º
22½º ![]()
24"
It is important to remember, when marking out the positions of the mor- tises on the components of the side assemblies, that the assemblies are mirror images rather than identical. It is worth laying out the parts and marking the matching miters before marking the mortise centers on the reference face (the face on which the Domino’s fence will rest).
You are now ready to mill the mor- tises in the side assembly components except for the miter locking tenons, which will be milled after the leg miters have been glued up. All of the chair’s mortises are milled using the narrow width setting on the Domino joiner. Also, all of the chair’s mortises are
ters in the figures, so that the mortises are cut at the required distance from their respective reference faces. All the chair’s mortises are 20mm deep, except for those for the locking tenons, which are 28mm deep, and those for the back stile miter, which are 25mm deep.
In order to achieve a perfect joint, the Domino’s fence must lie perfectly flat on the workpiece, so that the mor- tise is milled exactly perpendicular to the face. To help ensure that the machine’s fence remained flat during
the cut, I clamped a cleat behind the workpiece so the fence would have a broad surface to rest on (Fig. 2). Although this procedure slows the mill- ing of the mortises a little, it is essential to avoid the risk of cutting any mortise at the wrong angle.
To mill the mortises in the end- grain of the back rails, seat rails and stretcher, you need to attach the narrow frame accessory (Fig. 3) to the Domi- no’s fence to hold the machine steady during the cut. The mortises in the end
photos: david dundas
cut with the
The height of the Domino’s fence is set using the dimensions given in millime-
1 | 2 |
w w w . W o o d c r a f t M a g a z i n e . c o m | 0 5 . 0 7 w o o d c r a f t m a g a z i n e 39 |
