WEEKLY TESTING
•NEVER use an open flame of any kind to test this unit. You might accidentally damage or set fire to the unit or to your home. The built- in test switch accurately tests the unit’s operation as required by Underwriters Laboratories, Inc. (UL).
•If the Alarm ever fails to test properly, replace it immediately. Products under warranty may be returned to the manufacturer for replacement. See “Limited Warranty” at the end of this manual.
•DO NOT stand close to the Alarm when the horn is sounding. Exposure at close range may be harmful to your hearing. When testing, step away when horn starts sounding.
It is important to test this unit every week to make sure it is working properly. Press and hold the test button until the alarm sends a test command acknowledge “chirp” just before it sounds continuously (the unit will continue to alarm for a few seconds after you release the button). If it does not alarm, make sure it is receiving power and has a fresh battery, and test it again.
If it still does not alarm, it should be replaced immediately.
When testing one unit, all interconnected alarms will sound. If they don’t, check the connection with power to the units turned off, restore power and try again. Test all units in a series, not just one. Using the test button is the ONLY correct way to test the Heat Alarm.
USING THE REMOTE CONTROL WEEKLY
TEST/SILENCE FEATURE
Using the VOLUME or CHANNEL buttons on most remote controls, you can test or silence this Alarm from up to 12 feet (3.7 meters) away.
To Test (or Silence) the Alarm:
1.Make sure you have a clear path between you and the alarm, free of any obstructions.
2.Point the remote at the front of the Alarm.
3.Press the VOLUME or CHANNEL button for at least 2 seconds. You will hear a brief acknowledge “chirp” when the Alarm receives the test (or silence) command.
If the Alarm does not respond to your remote control:
•You may be standing too far away.
•Your remote may not be compatible.
•You did not hold the button on your remote for at least 2 seconds.
REGULAR MAINTENANCE
This unit has been designed to be as maintenance-free as possible, but there are a few simple things you must do to keep it working properly.
Use only the replacement batteries listed below. The unit may not operate properly with other batteries. Never use rechargeable batteries since they may not provide a constant charge.
•Test it at least once a week.
•Clean the Heat Alarm at least once a month; gently vacuum the outside of the Heat Alarm using your household vacuum’s soft brush attachment. Test the Heat Alarm. Never use water, cleaners or solvents since they may damage the unit.
•If the Heat Alarm becomes contaminated by excessive dirt, dust and/or grime, and cannot be cleaned to avoid unwanted alarms, replace the unit immediately.
•Relocate the unit if it sounds frequent unwanted alarms. See “Locations to Avoid for Heat Alarms” for details.
•When the battery becomes weak, the Heat Alarm unit will “chirp” about once a minute (the low battery warning). You should replace the battery immediately to continue your protection.
Choosing a replacement battery:
Your Heat Alarm’s battery back-up requires one standard 9V battery. The following batteries are acceptable as replacements. This list supplements the list on the Heat Alarm battery door: Eveready #522 (Energizer); Duracell #MN1604, MX1604 (Ultra). You may also use a Lithium battery like the Ultralife U9VL-J for longer service life between battery changes. These batteries are available at many local retail stores.
Actual service life depends on the Heat Alarm and the environment in which it is installed. Constant exposures to high or low temperatures or high humidity may reduce battery life. All the batteries specified above are acceptable replacement batteries for this unit. Use of a different battery may have a detrimental effect on Alarm operation. Regardless of the manufacturer’s suggested battery life, you MUST replace the battery immediately once the unit starts “chirping” (the “low battery warning”).
IF YOU SUSPECT A PROBLEM
Heat Alarms may not operate properly because of dead, missing or weak batteries, a build-up of dirt, dust or grease on the Heat Alarm cover, or installation in an improper location. Clean the Heat Alarm as described in “Regular Maintenance,” and install a fresh battery, then test the Heat Alarm again. If it fails to test properly when you use the test button, or if the problem persists, replace the Heat Alarm immediately.
•If you hear a “chirp” once a minute, replace the battery.
•If you experience frequent non-emergency alarms try relocating the Heat Alarm.
•If the alarm sounds when no smoke is visible, try cleaning or relocating the Heat Alarm. The cover may be dirty.
•If the alarm does not sound during testing, make sure it is receiving AC power from the household current.
Always discharge the branch circuit before servicing an AC or AC/DC Heat Alarm. First, turn off the AC power at the circuit breaker or fuse box. Next, remove the battery from Heat Alarms with battery back-up. Finally, press the test button to discharge the branch circuit.
Do not try fixing the alarm yourself – this will void your warranty!
If the Heat Alarm is still not operating properly, and it is still under warranty, please see “How to Obtain Warranty Service” in the Limited Warranty.
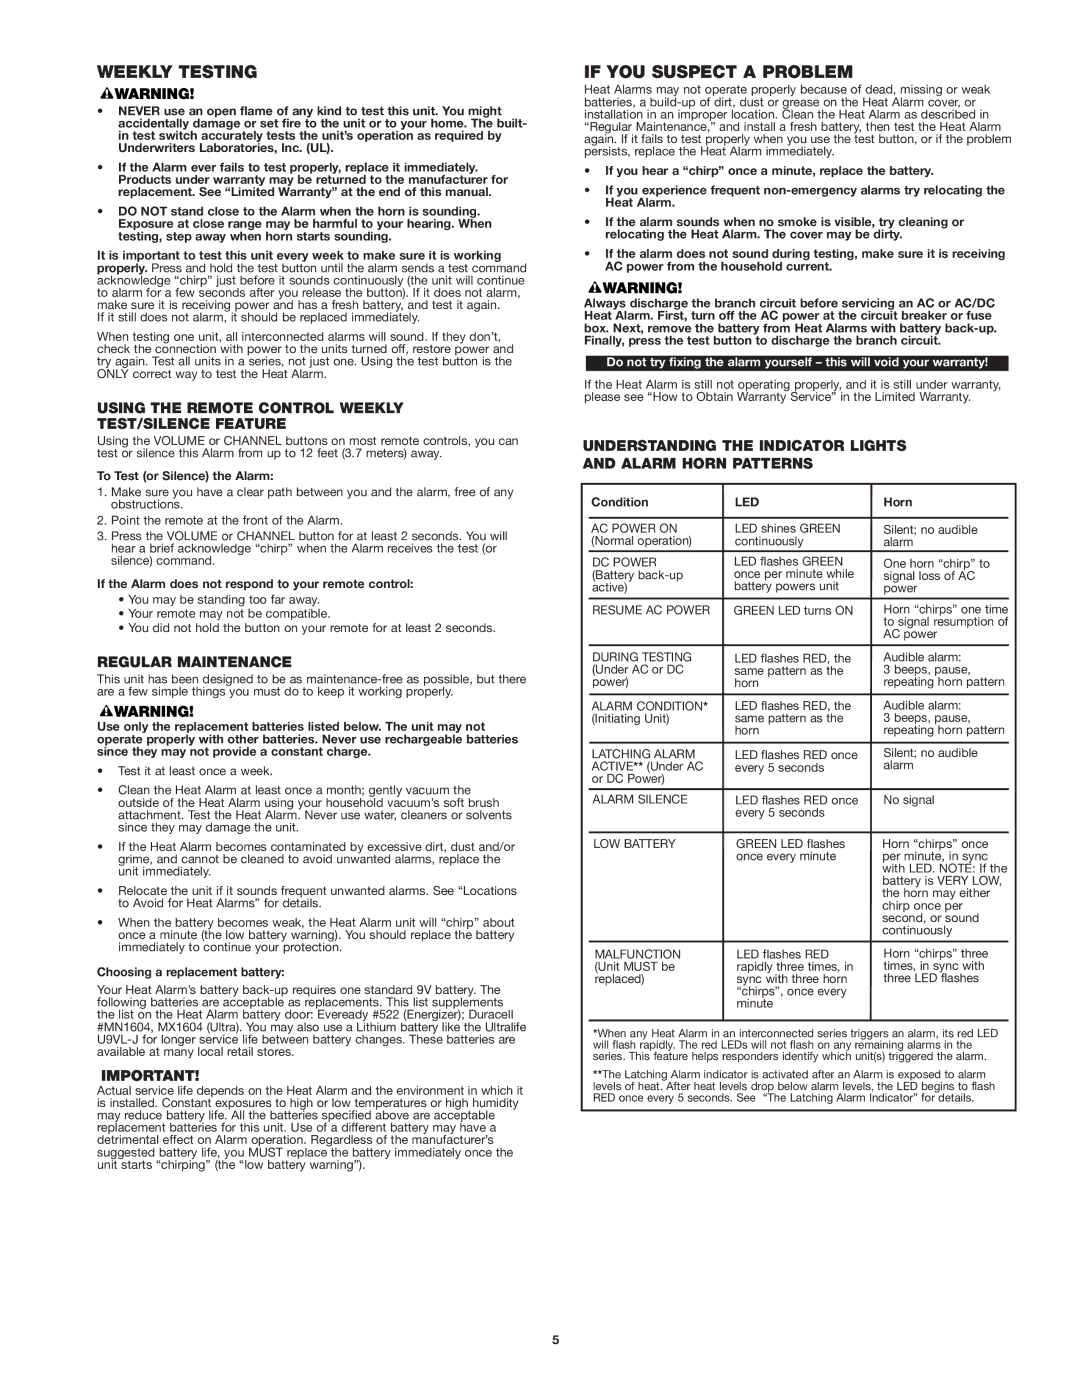
UNDERSTANDING THE INDICATOR LIGHTS AND ALARM HORN PATTERNS
Condition | LED | Horn |
| | |
AC POWER ON | LED shines GREEN | Silent; no audible |
(Normal operation) | continuously | alarm |
DC POWER | LED flashes GREEN | One horn “chirp” to |
(Battery back-up | once per minute while | signal loss of AC |
active) | battery powers unit | power |
| | |
RESUME AC POWER | GREEN LED turns ON | Horn “chirps” one time |
| | to signal resumption of |
| | AC power |
| | |
DURING TESTING | LED flashes RED, the | Audible alarm: |
(Under AC or DC | same pattern as the | 3 beeps, pause, |
power) | horn | repeating horn pattern |
| | |
ALARM CONDITION* | LED flashes RED, the | Audible alarm: |
(Initiating Unit) | same pattern as the | 3 beeps, pause, |
| horn | repeating horn pattern |
| | |
LATCHING ALARM | LED flashes RED once | Silent; no audible |
ACTIVE** (Under AC | every 5 seconds | alarm |
or DC Power) | | |
ALARM SILENCE | LED flashes RED once | No signal |
| every 5 seconds | |
| | |
LOW BATTERY | GREEN LED flashes | Horn “chirps” once |
| once every minute | per minute, in sync |
| | with LED. NOTE: If the |
| | battery is VERY LOW, |
| | the horn may either |
| | chirp once per |
| | second, or sound |
| | continuously |
| | |
MALFUNCTION | LED flashes RED | Horn “chirps” three |
(Unit MUST be | rapidly three times, in | times, in sync with |
replaced) | sync with three horn | three LED flashes |
| “chirps”, once every | |
| minute | |
*When any Heat Alarm in an interconnected series triggers an alarm, its red LED will flash rapidly. The red LEDs will not flash on any remaining alarms in the series. This feature helps responders identify which unit(s) triggered the alarm.
**The Latching Alarm indicator is activated after an Alarm is exposed to alarm levels of heat. After heat levels drop below alarm levels, the LED begins to flash RED once every 5 seconds. See “The Latching Alarm Indicator” for details.