Manuals
/
Fisher & Paykel
/
Kitchen Appliance
/
Beverage Dispenser
Fisher & Paykel
RF24T, RF24R
manual
Assemble And Connect Parts, Installation
Models:
RF24R
RF24T
1
12
56
56
Download
56 pages
41.3 Kb
9
10
11
12
13
14
15
16
Troubleshooting
Install
Alarms
Warranty
Maintenance
Common Draft Problem
Tapping Procedures
Cleaning
Weight
How to
Page 12
Image 12
Page 11
Page 13
Page 12
Image 12
Page 11
Page 13
Contents
Use and Care and Installation Guide
MODELS
RF24R RF24T
OUTDOOR REFRIGERATOR AND BEER DISPENSER
Page
A MESSAGE TO OUR CUSTOMERS
PLEASE RETAIN THIS MANUAL FOR FUTURE REFERENCE
TABLE OF CONTENTS
SAFETY PRACTICES & PRECAUTIONS
POWER FAILURE - FOOD SAFETY
CLEANING
DANGER
INSTALLATION - ESSENTIAL REQUIREMENTS
POWER
LOCATION
STABILITY
INSTALLATION
HOW TO INSTALL YOUR OUTDOOR REFRIGERATOR/BEER DISPENSER
POWER REQUIREMENTS
ELECTRICAL CONNECTION
SIDE TRIM INSTALLATION
SELECT LOCATION
CABINET CLEARANCE
24” Outdoor Beer Dispenser
ISLAND BEER DISPENSER INSTALLATION
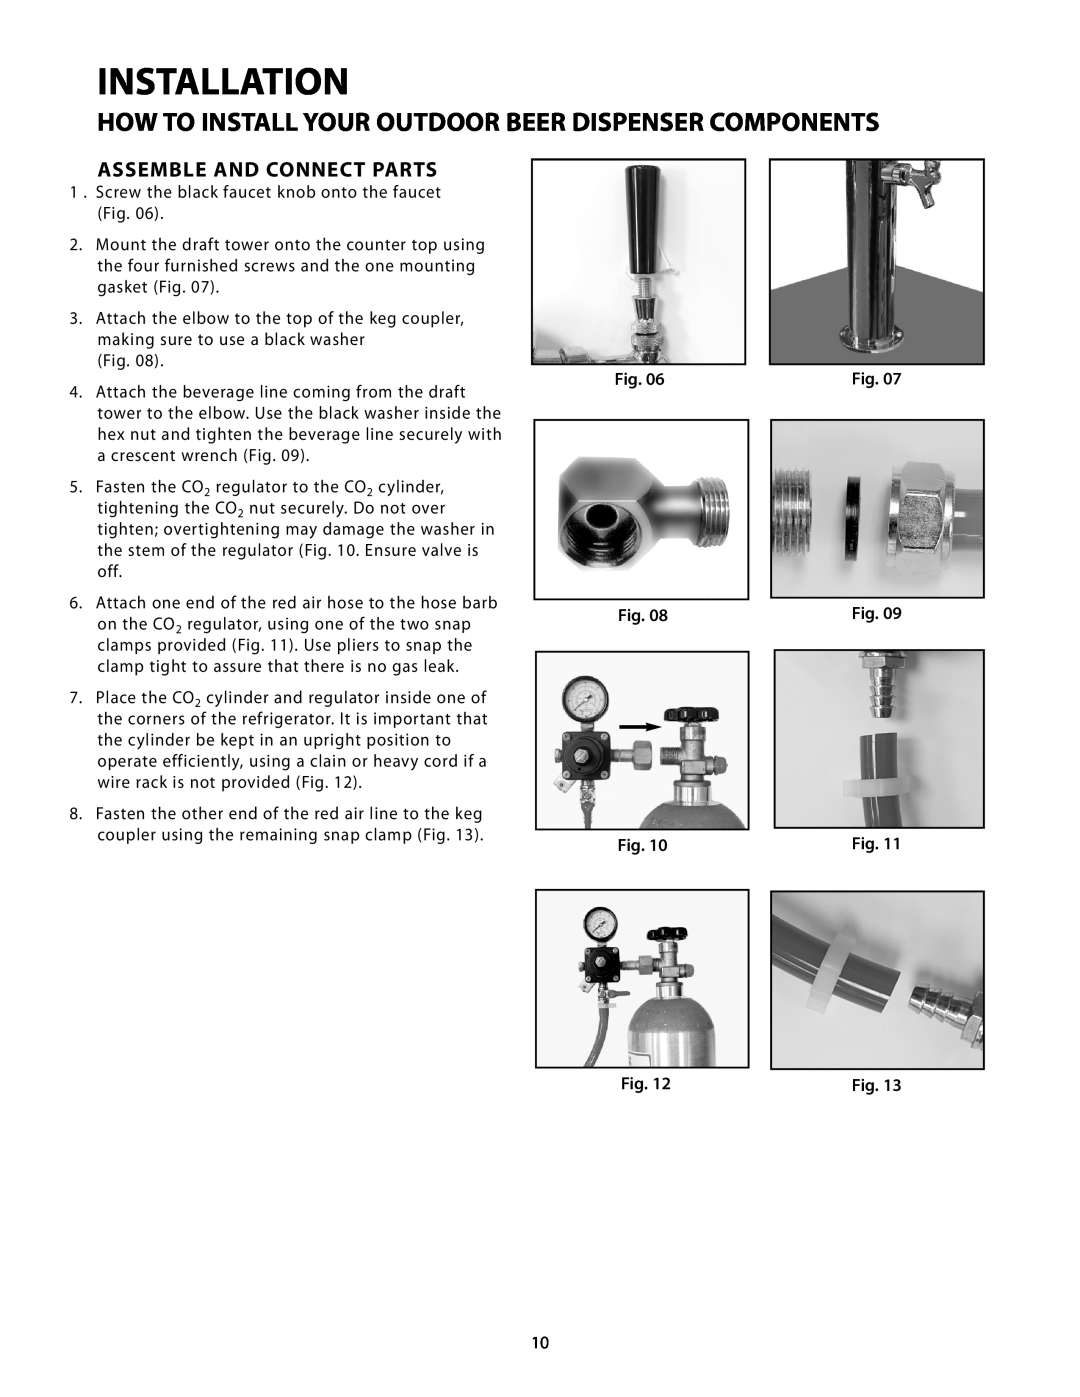
HOW TO INSTALL YOUR OUTDOOR BEER DISPENSER COMPONENTS
Contents of Kit
Weight
Tools needed
CO2 can be dangerous
ASSEMBLE AND CONNECT PARTS
HOW TO REPLACE AN EMPTY CO2 CYLINDER
Empty Weight
PARTS OF A CO2 REGULATOR
CO2 CYLINDERS It is recommended to have an extra cylinder on hand
TAPPING PROCEDURES
LEVER TYPE KEG COUPLER
OPTIONAL WING TYPE KEG COUPLER
USING THE BEER DISPENSER
TEMPERATURE CONTROL
DEFROSTING INSTRUCTIONS IF NEEDED
HELP PREVENT TRAGEDIES
USING THE REFRIGERATOR CONTROL
Alarms
High and Low Temperature Alarm If your
Condenser Needs Cleaning
ADDITIONAL REFRIGERATOR CONTROL FEATURES
Keypad Lockout Feature Loc This feature
Information Menu
Current Interior Temperature tI Press and
USING THE REFRIGERATOR/BEER DISPENSER
DRAW A GLASS OF BEER
CARE AND MAINTENANCE
HOW TO CLEAN AND MAINTAIN YOUR UNIT
Important Note
Condenser
REPLACE INTERIOR LIGHT BULB
THINGS TO REMEMBER
ENERGY SAVING TIPS
MOVING OR STORING YOUR REFRIGERATOR
MOVING YOUR REFRIGERATOR OR BEER DISPENSER
STORING YOUR REFRIGERATOR OR BEER DISPENSER
VACATION TIME
TROUBLESHOOTING
PROBLEM
POSSIBLE CAUSE/SOLUTIONS
COMMON DRAFT PROBLEM
DESCRIPTION
CAUSES
SERVICE
HOW TO OBTAIN SERVICE
BEFORE YOU CALL FOR SERVICE
WARRANTY
LIMITED WARRANTY
THIS WARRANTY DOES NOT COVER
FISHER &PAYKEL UNDERTAKES TO
HOW TO GET SERVICE
COMMERCIAL USE
NO OTHER WARRANTIES
Manuel dinstallation, dutilisation et dentretiene
MODÈLE
RÉFRIGÉRATEUR/DISTRIBUTEUR DE BIÈRE EXTÉRIEUR
À LINTENTION DE NOS CLIENTS
VEUILLEZ CONSERVER CE MANUEL À TITRE DE RÉFÉRENCE
TABLE DES MATIÈRES
MESURES DE SÉCURITÉ ET DE PRÉCAUTION
AVERTISSEMENT
CARACTÉRISTIQUES ÉLECTRIQUES
ENTREPOSAGE
INSTALLATION - CONFIGURATION ESSENTIELLE
EMPLACEMENT
ALIMENTATION
STABILITÉ
INSTALLATION DU RÉFRIGÉRATEUR/DISTRIBUTEUR DE BIÈRE EXTÉRIEUR
CONNEXION ÉLECTRIQUE
MÉTHODE DE MISE À LA TERRE
BESOINS EN ALIMENTATION
Page
INSTALLATION DU RÉFRIGÉRATEUR/DE LA TIREUSE DE BIÈRE DEXTÉRIEUR
INSTALLATION DE LA TIREUSE DE BIÈRE EN ÎLOT
REMARQUE
INSTALLATION DES COMPOSANTS DE LA TIREUSE DE BIÈRE DEXTÉRIEUR
Contenu du kit
Outillage requis
Q. QUELLE TAILLE DE FÛT RENTRERA DANS LE RÉFRIGÉRATEUR ?
Le CO2 peut être dangereux
ASSEMBLER ET CONNECTER LES PIÈCES
REMPLACEMENT DUNE BOUTEILLE VIDE DE CO2
COMPOSANTS DUN DÉTENDEUR DE CO2
Bouteille
Poids vide
PROCÉDURES DE BRANCHEMENT
COUPLEUR DE FÛT DE TYPE À LEVIER
COUPLEUR DE FÛT DE TYPE À OREILLES EN OPTION
UTILISATION DU DISTRIBUTEUR DE BIÈRE
CONTRÔLE DE TEMPÉRATURE
INSTRUCTIONS DE DÉCONGÉLATIONle cas échéant
AIDEZ À ÉVITER DES TRAGÉDIES
Alarmes
VOTRE CONTRÔLE DE REFROIDISSEMENT
REMARQUE
Démarrage de votre appareil
Mise à l’arrêt du refroidissement
Durée totale de fonctionnement du condenseur
depuis le dernier nettoyage cnd Actionnez le
Menu d’informations
UTILISATION DU RÉFRIGÉRATEUR/ DE LA TIREUSE DE BIÈRE
TIRER UN VERRE DE BIÈRE
ENTRETIEN ET MAINTENANCE
NETTOYAGE ET MAINTENANCE DE LAPPAREIL
Remarque importante
Condensateur
REMPLACEMENT DE LAMPOULE INTÉRIEURE
À NE PAS OUBLIER
CONSEILS DÉCONOMIE DÉNERGIE
DÉPLACEMENT OU REMISAGE DU RÉFRIGÉRATEUR
DÉPLACEMENT DU RÉFRIGÉRATEUR OU DE LA TIREUSE DE BIÈRE
REMISAGE DU RÉFRIGÉRATEUR OU DE LA TIREUSE DE BIÈRE
VACANCES
CAUSE POSSIBLE/SOLUTIONS
DÉPANNAGE
PROBLÈME
PROBLÈME COURANT DE BIÈRE PRESSION
POUR LOBTENTION DU SERVICE DE GARANTIE
AVANT DAPPELER LE SERVICE TECHNIQUE
GARANTIE
GARANTIE LIMITÉE
FISHER & PAYKEL SENGAGE À
QUELLE EST LA DURÉE DE CETTE GARANTIE LIMITÉE?
POUR OBTENIR DES RÉPARATIONS
UTILISATION COMMERCIALE
AUCUNE AUTRE GARANTIE
REMARQUE
REMARQUE
REMARQUE
Page
Fisher & Paykel Appliances, Inc
5900 Skylab Road, Huntington Beach, CA 92647 Customer Care
Part No. 241585 Rev. E Litho in USA 09/2008
Top
Page
Image
Contents