WARM UP & COOL DOWN STRETCHES
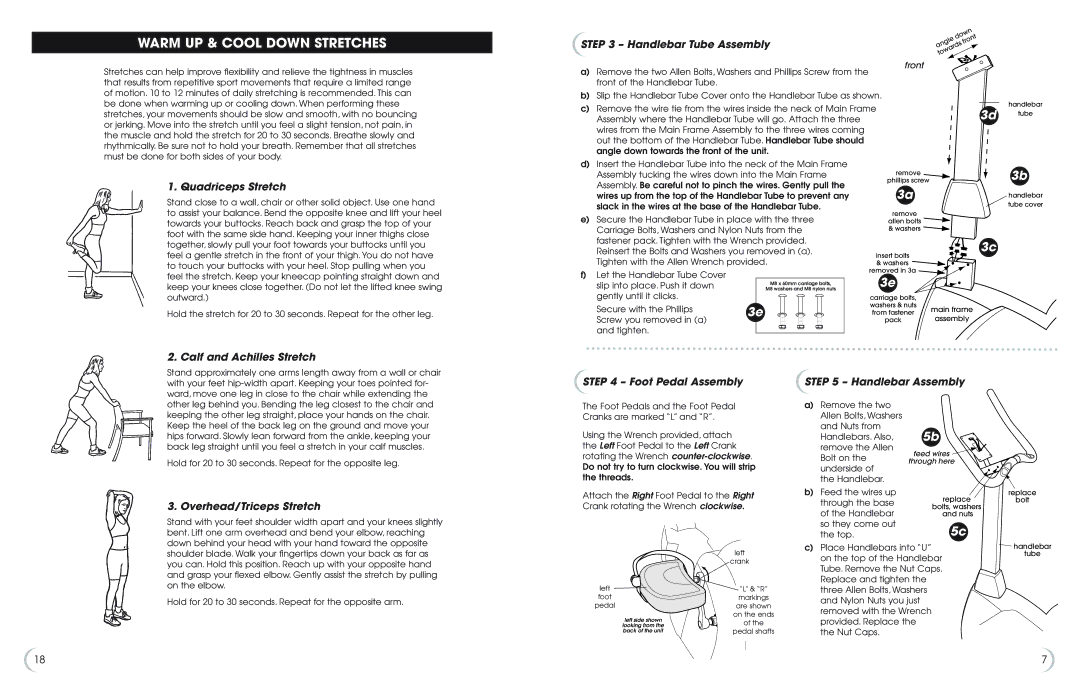
STEP 3 – Handlebar Tube Assembly | down | |
angle | front | |
| ||
| towards |
|
Stretches can help improve flexibility and relieve the tightness in muscles that results from repetitive sport movements that require a limited range of motion. 10 to 12 minutes of daily stretching is recommended. This can be done when warming up or cooling down. When performing these stretches, your movements should be slow and smooth, with no bouncing or jerking. Move into the stretch until you feel a slight tension, not pain, in the muscle and hold the stretch for 20 to 30 seconds. Breathe slowly and rhythmically. Be sure not to hold your breath. Remember that all stretches must be done for both sides of your body.
1. Quadriceps Stretch
Stand close to a wall, chair or other solid object. Use one hand
a)Remove the two Allen Bolts, Washers and Phillips Screw from the front of the Handlebar Tube.
b)Slip the Handlebar Tube Cover onto the Handlebar Tube as shown.
c)Remove the wire tie from the wires inside the neck of Main Frame Assembly where the Handlebar Tube will go. Attach the three wires from the Main Frame Assembly to the three wires coming out the bottom of the Handlebar Tube. Handlebar Tube should angle down towards the front of the unit.
d)Insert the Handlebar Tube into the neck of the Main Frame Assembly tucking the wires down into the Main Frame Assembly. Be careful not to pinch the wires. Gently pull the wires up from the top of the Handlebar Tube to prevent any slack in the wires at the base of the Handlebar Tube.
front
remove
phillips screw
3a
handlebar
3d tube
3b
handlebar tube cover
to assist your balance. Bend the opposite knee and lift your heel towards your buttocks. Reach back and grasp the top of your foot with the same side hand. Keeping your inner thighs close together, slowly pull your foot towards your buttocks until you feel a gentle stretch in the front of your thigh. You do not have to touch your buttocks with your heel. Stop pulling when you feel the stretch. Keep your kneecap pointing straight down and keep your knees close together. (Do not let the lifted knee swing outward.)
Hold the stretch for 20 to 30 seconds. Repeat for the other leg.
2. Calf and Achilles Stretch
e)Secure the Handlebar Tube in place with the three Carriage Bolts, Washers and Nylon Nuts from the fastener pack. Tighten with the Wrench provided. Reinsert the Bolts and Washers you removed in (a). Tighten with the Allen Wrench provided.
f)Let the Handlebar Tube Cover
slip into place. Push it down | M8 x 60mm carriage bolts, | |
M8 washers and M8 nylon nuts | ||
gently until it clicks. |
| |
Secure with the Phillips | 3e | |
Screw you removed in (a) | ||
| ||
and tighten. |
|
remove
allen bolts ![]() & washers
& washers ![]()
insert bolts![]() & washers
& washers ![]()
![]()
removed in 3a ![]()
3e
carriage bolts,
washers & nuts
from fastener main frame
packassembly
3c
Stand approximately one arms length away from a wall or chair with your feet
STEP 4 – Foot Pedal Assembly
STEP 5 – Handlebar Assembly
other leg behind you. Bending the leg closest to the chair and keeping the other leg straight, place your hands on the chair. Keep the heel of the back leg on the ground and move your hips forward. Slowly lean forward from the ankle, keeping your back leg straight until you feel a stretch in your calf muscles.
Hold for 20 to 30 seconds. Repeat for the opposite leg.
3. Overhead/Triceps Stretch
Stand with your feet shoulder width apart and your knees slightly bent. Lift one arm overhead and bend your elbow, reaching down behind your head with your hand toward the opposite
The Foot Pedals and the Foot Pedal Cranks are marked “L” and “R”.
Using the Wrench provided, attach the Left Foot Pedal to the Left Crank rotating the Wrench
Attach the Right Foot Pedal to the Right Crank rotating the Wrench clockwise.
a)Remove the two Allen Bolts, Washers and Nuts from Handlebars. Also, remove the Allen Bolt on the underside of
the Handlebar.
b)Feed the wires up through the base of the Handlebar so they come out the top.
5b
feed wires ![]() through here
through here
replace
bolts, washers and nuts
5c
replace
bolt
shoulder blade. Walk your fingertips down your back as far as you can. Hold this position. Reach up with your opposite hand and grasp your flexed elbow. Gently assist the stretch by pulling on the elbow.
Hold for 20 to 30 seconds. Repeat for the opposite arm.
| left | |
| crank | |
left | “L” & “R” | |
foot | markings | |
pedal | are shown | |
left side shown | on the ends | |
of the | ||
looking from the | ||
back of the unit | pedal shafts |
c)Place Handlebars into “U” on the top of the Handlebar Tube. Remove the Nut Caps. Replace and tighten the three Allen Bolts, Washers and Nylon Nuts you just removed with the Wrench provided. Replace the
the Nut Caps.
![]() handlebar tube
handlebar tube
18 | 7 |