L i f e B o o k C S e r i e s B I O S

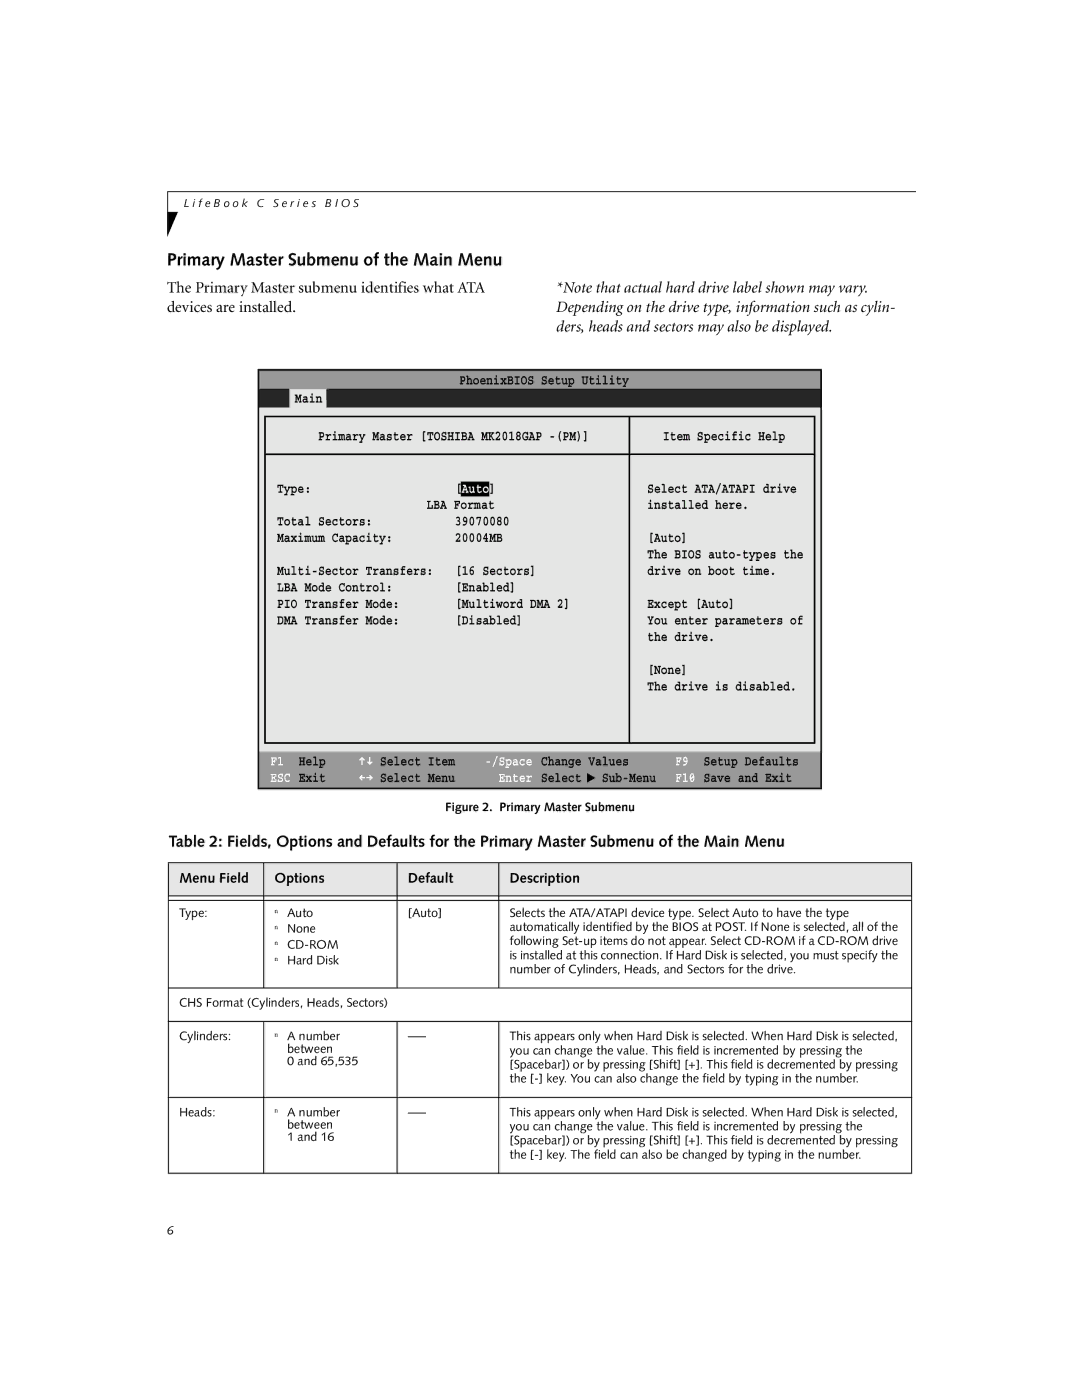
Primary Master Submenu of the Main Menu

The Primary Master submenu identifies what ATA devices are installed.

*Note that actual hard drive label shown may vary. Depending on the drive type, information such as cylin- ders, heads and sectors may also be displayed.

PhoenixBIOS Setup Utility

Main


Primary Master [TOSHIBA MK2018GAP -(PM)]

Item Specific Help


Type:

[Auto]

Select ATA/ATAPI drive


LBA Format

installed here.


Total Sectors:

39070080


Maximum Capacity:

20004MB

[Auto]


The BIOS auto-types the


Multi-Sector Transfers:

[16 Sectors]

drive on boot time.


LBA Mode Control:

[Enabled]


PIO Transfer Mode:

[Multiword DMA 2]

Except [Auto]


DMA Transfer Mode:

[Disabled]

You enter parameters of


the drive.


[None]


The drive is disabled.


F1

Help

Select

Item

ESC

Exit

Select

Menu

-/Space

Change

Values

Enter

Select

Sub-Menu

F9 Setup Defaults

F10 Save and Exit

Figure 2. Primary Master Submenu

Table 2: Fields, Options and Defaults for the Primary Master Submenu of the Main Menu

Menu Field

Options

Default

Description


Type:

n

Auto

[Auto]

Selects the ATA/ATAPI device type. Select Auto to have the type


n

None


automatically identified by the BIOS at POST. If None is selected, all of the


n

CD-ROM


following Set-up items do not appear. Select CD-ROM if a CD-ROM drive


n

Hard Disk


is installed at this connection. If Hard Disk is selected, you must specify the


number of Cylinders, Heads, and Sectors for the drive.


CHS Format (Cylinders, Heads, Sectors)


Cylinders:

n

A number

–—

This appears only when Hard Disk is selected. When Hard Disk is selected,


between


you can change the value. This field is incremented by pressing the


0 and 65,535


[Spacebar]) or by pressing [Shift] [+]. This field is decremented by pressing


the [-] key. You can also change the field by typing in the number.


Heads:

n

A number

–—

This appears only when Hard Disk is selected. When Hard Disk is selected,


between


you can change the value. This field is incremented by pressing the


1 and 16


[Spacebar]) or by pressing [Shift] [+]. This field is decremented by pressing


the [-] key. The field can also be changed by typing in the number.


6

Page 6
Image 6
Fujitsu Siemens Computers C2110 manual Primary Master Submenu of the Main Menu, Auto, Enter

C2110 specifications

Fujitsu Siemens Computers, a prominent name in the computer industry, produced a variety of notable systems in the early 2000s, one of which was the C2110. The C2110 was designed primarily for business environments, offering a reliable option for enterprises that required robust performance for everyday computing tasks.

At the heart of the C2110 was its reliable processor architecture. The system utilized an Intel Pentium 4 processor, which was widely regarded for its solid performance during its time. This processor allowed users to run multiple applications smoothly and efficiently, making it ideal for tasks such as word processing, spreadsheet management, and browsing the internet.

The C2110 came equipped with an ample amount of RAM, which could be configured to support various business applications. With options typically ranging from 512 MB to 2 GB of RAM, the system provided the necessary memory for multitasking and resource-intensive applications, ensuring that users experienced minimal slowdowns.

Storage was another key feature of the C2110, with configurations that included IDE hard drives ranging from 40 GB to 80 GB. This provided enough space for users to store essential files, documents, and applications, allowing for efficient data management in a business setting.

Display capabilities were also noteworthy. The Fujitsu Siemens C2110 supported a variety of monitors, providing users with flexibility in choosing their display size and resolution. The system's graphics capabilities were suitable for standard office applications, enabling clear and sharp visuals for presentations and reports.

Connectivity options were robust for its time, featuring multiple USB ports that facilitated easy connection to peripherals such as printers, scanners, and external storage devices. Additionally, it offered options for Ethernet and modem connections, ensuring users could easily access networks for their online activities.

In terms of design, the Fujitsu Siemens C2110 maintained a professional appearance, with a compact and functional case that fit well into office environments. The system’s cooling solutions were designed to operate quietly, making it unobtrusive in busy workplaces.

Overall, the Fujitsu Siemens Computers C2110 provided a solid balance of performance, expandability, and reliability. Its combination of a capable processor, sufficient RAM, and good storage options made it a viable choice for businesses looking for dependable computing solutions during the early 2000s. As a result, the C2110 left an impact as a trustworthy workhorse in the professional computing landscape of the time.