OPERATING CONTROLS AND FUNCTIONS
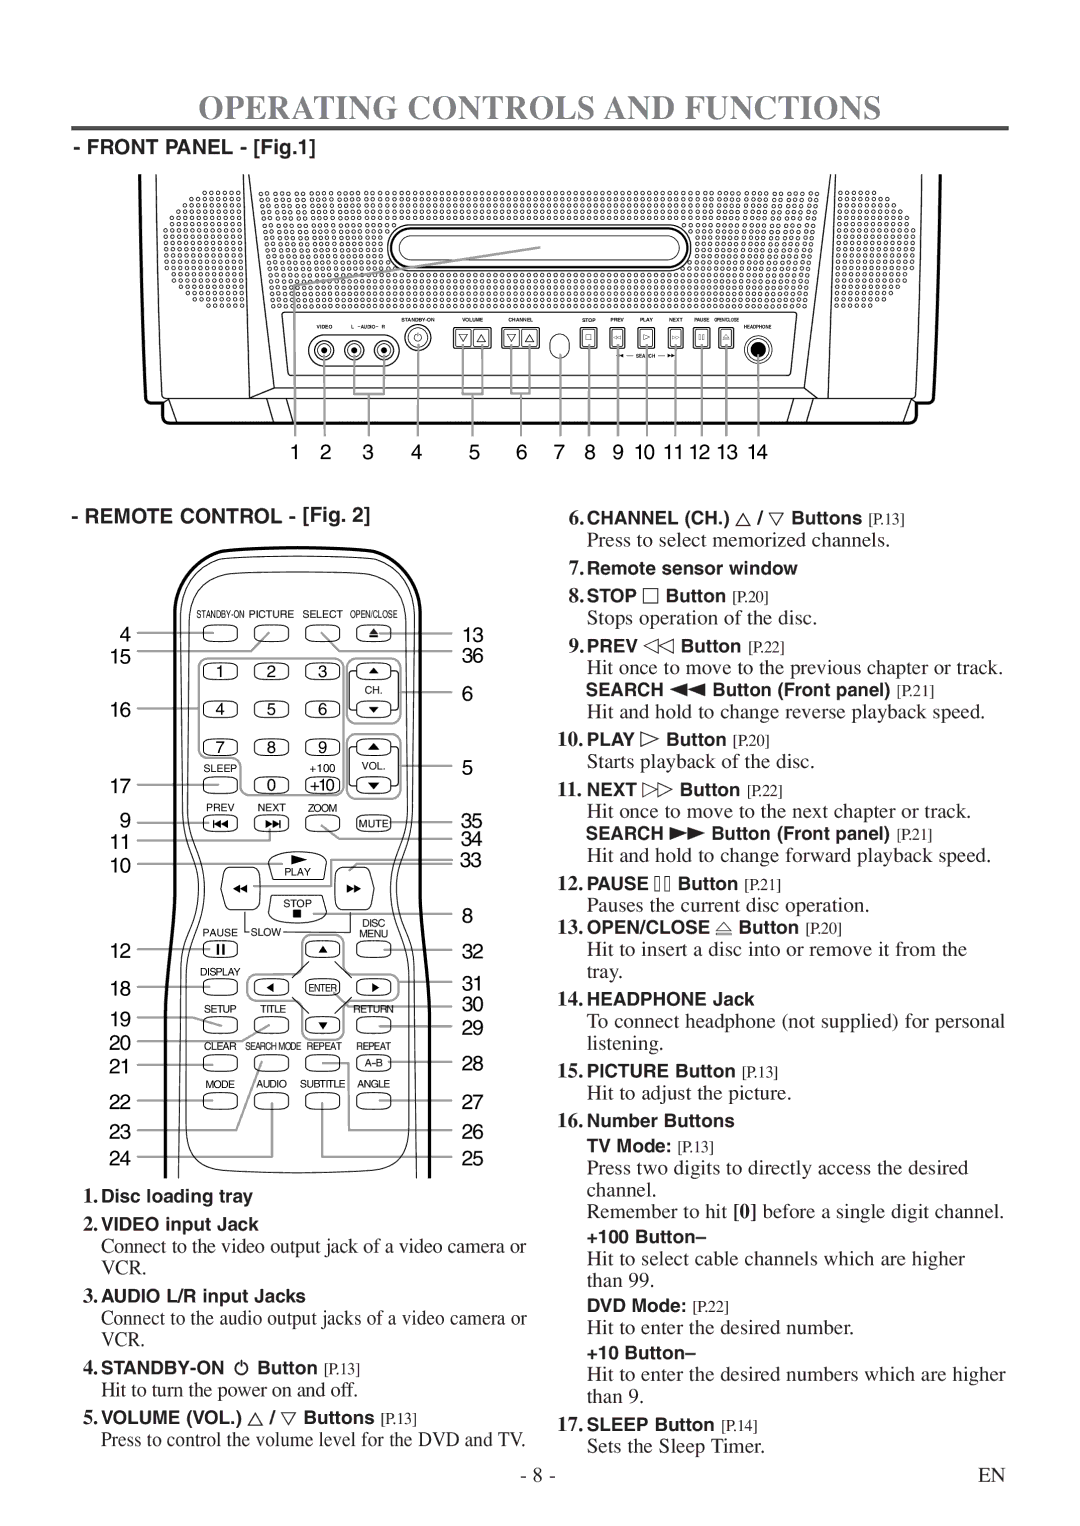
- FRONT PANEL - [Fig.1]
| VOLUME | CHANNEL | STOP | PREV | PLAY | NEXT | PAUSE OPEN/CLOSE | |
VIDEO | L |
|
|
|
|
|
| HEADPHONE |
y Y X Y X
P R O Q S N
E – SEARCH – D
1 | 2 | 3 | 4 | 5 | 6 | 7 | 8 | 9 10 11 12 13 14 |
- REMOTE CONTROL - [Fig. 2] |
|
|
|
| 6. CHANNEL (CH.) X / Y Buttons [P.13] | |||
|
|
|
|
|
|
| Press to select memorized channels. | |
| OPEN/CLOSE |
| |||
4 |
|
|
|
| 13 |
15 | 1 | 2 | 3 |
| 36 |
|
| 6 | |||
|
|
|
| CH. | |
16 | 4 | 5 | 6 |
|
|
| 7 | 8 | 9 |
| 5 |
| SLEEP |
| +100 | VOL. | |
17 |
|
| |||
| 0 | +10 |
|
| |
9 | PREV | NEXT | ZOOM |
| 35 |
|
|
| MUTE | ||
11 |
|
|
|
| 34 |
10 |
| PLAY |
| 33 | |
|
| STOP |
| 8 | |
| PAUSE | SLOW |
| DISC | |
12 |
| MENU | 32 | ||
|
|
|
| ||
18 | DISPLAY |
|
|
| 31 |
|
| ENTER |
| ||
19 | SETUP | TITLE |
| RETURN | 30 |
|
|
|
| 29 | |
20 |
|
|
|
| |
CLEAR | SEARCH MODE REPEAT | REPEAT | 28 | ||
21 |
|
|
| ||
|
|
|
|
| |
22 | MODE | AUDIO | SUBTITLE | ANGLE | 27 |
|
|
|
| ||
23 |
|
|
|
| 26 |
24 |
|
|
|
| 25 |
1.Disc loading tray
2.VIDEO input Jack
Connect to the video output jack of a video camera or VCR.
3.AUDIO L/R input Jacks
Connect to the audio output jacks of a video camera or VCR.
4.
Hit to turn the power on and off.
5.VOLUME (VOL.) X / Y Buttons [P.13]
Press to control the volume level for the DVD and TV.
-8 -
7.Remote sensor window
8.STOP P Button [P.20]
Stops operation of the disc.
9.PREV R Button [P.22]
Hit once to move to the previous chapter or track.
SEARCH h Button (Front panel) [P.21]
Hit and hold to change reverse playback speed.
10.PLAY O Button [P.20]
Starts playback of the disc.
11.NEXT Q Button [P.22]
Hit once to move to the next chapter or track.
SEARCH g Button (Front panel) [P.21]
Hit and hold to change forward playback speed.
12.PAUSE S Button [P.21]
Pauses the current disc operation.
13.OPEN/CLOSE N Button [P.20]
Hit to insert a disc into or remove it from the tray.
14.HEADPHONE Jack
To connect headphone (not supplied) for personal listening.
15.PICTURE Button [P.13]
Hit to adjust the picture.
16.Number Buttons
TV Mode: [P.13]
Press two digits to directly access the desired channel.
Remember to hit [0] before a single digit channel.
+100 Button–
Hit to select cable channels which are higher than 99.
DVD Mode: [P.22]
Hit to enter the desired number.
+10 Button–
Hit to enter the desired numbers which are higher than 9.
17.SLEEP Button [P.14]
Sets the Sleep Timer.
EN