Refrigerator Connection
1/4Compression Nut

3ROUTE THE COPPER TUBING BETWEEN THE COLD WATER LINE AND THE REFRIGERATOR.

Route the tubing through a hole drilled in the floor or wall (behind the refrigerator or adjacent base cabinet) as close to the wall as possible. Be sure there is sufficient extra tubing [about 244 cm (8′) coiled into 3 turns of about 25 cm (10″) diameter] to allow the refrigerator to move out from the wall after installation.

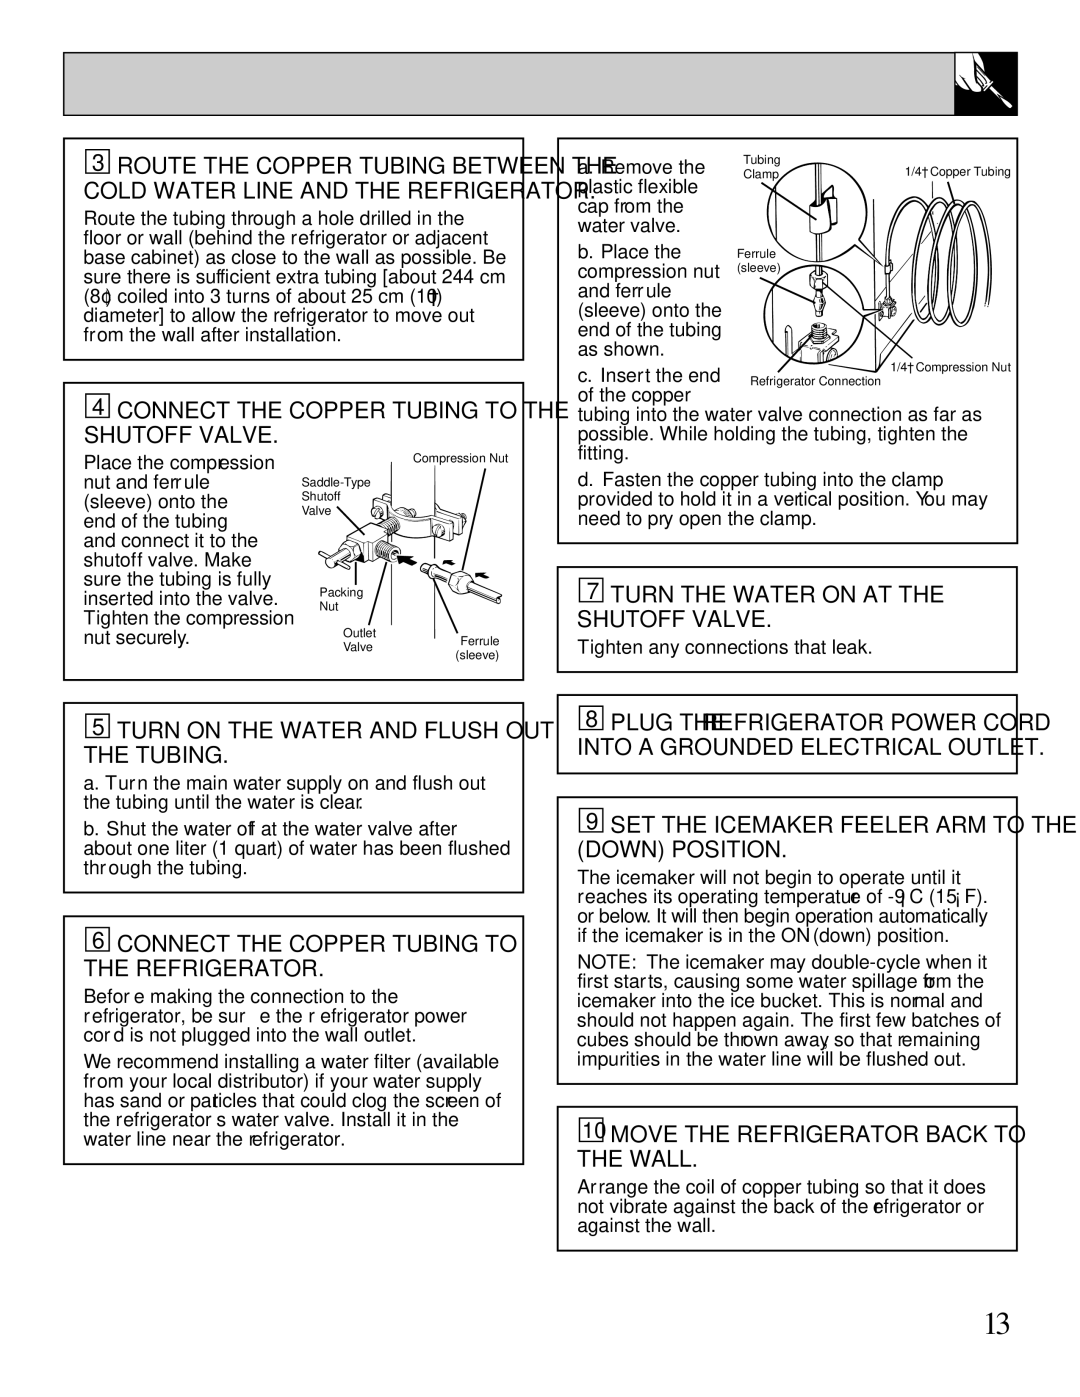
4CONNECT THE COPPER TUBING TO THE SHUTOFF VALVE.

a. Remove the

Tubing


1/4Copper Tubing

Clamp

plastic flexible


cap from the


water valve.


b. Place the

Ferrule


compression nut

(sleeve)


and ferrule


(sleeve) onto the


end of the tubing


as shown.


c. Insert the end of the copper

tubing into the water valve connection as far as possible. While holding the tubing, tighten the fitting.

Place the compression nut and ferrule (sleeve) onto the end of the tubing and connect it to the shutoff valve. Make sure the tubing is fully inserted into the valve. Tighten the compression nut securely.

Compression Nut

Saddle-Type

Shutoff

Valve

Packing

Nut

Outlet

ValveFerrule

(sleeve)

d.Fasten the copper tubing into the clamp provided to hold it in a vertical position. You may need to pry open the clamp.

7TURN THE WATER ON AT THE SHUTOFF VALVE.

Tighten any connections that leak.

5TURN ON THE WATER AND FLUSH OUT THE TUBING.

a.Turn the main water supply on and flush out the tubing until the water is clear.

b.Shut the water off at the water valve after about one liter (1 quart) of water has been flushed through the tubing.

6CONNECT THE COPPER TUBING TO THE REFRIGERATOR.

Before making the connection to the refrigerator, be sure the refrigerator power cord is not plugged into the wall outlet.

We recommend installing a water filter (available from your local distributor) if your water supply has sand or particles that could clog the screen of the refrigerator’s water valve. Install it in the water line near the refrigerator.

8PLUG THE REFRIGERATOR POWER CORD INTO A GROUNDED ELECTRICAL OUTLET.

9SET THE ICEMAKER FEELER ARM TO THE ON (DOWN) POSITION.

The icemaker will not begin to operate until it reaches its operating temperature of -9°C (15°F). or below. It will then begin operation automatically if the icemaker is in the ON (down) position.

NOTE: The icemaker may double-cycle when it first starts, causing some water spillage from the icemaker into the ice bucket. This is normal and should not happen again. The first few batches of cubes should be thrown away, so that remaining impurities in the water line will be flushed out.

10MOVE THE REFRIGERATOR BACK TO THE WALL.

Arrange the coil of copper tubing so that it does not vibrate against the back of the refrigerator or against the wall.

13

Page 13
Image 13
GE 162D7740P005 dimensions Connect the Copper Tubing to the Shutoff Valve, Turn the Water on AT the Shutoff Valve

162D7740P005 specifications

The GE 162D7740P005 is a key component in the spectrum of industrial-grade electronic controls, renowned for its reliability and performance in various applications. Manufactured by General Electric, this device exemplifies the company’s commitment to delivering advanced technological solutions that enhance operational efficiency and productivity.

One of the main features of the GE 162D7740P005 is its robust construction, which is designed to withstand harsh industrial environments. The device is encapsulated in a durable housing that protects it from dust, moisture, and other external threats, making it suitable for use in factories, power plants, and other challenging settings. This durability ensures a long operational life, reducing maintenance costs and downtime.

In terms of technology, the GE 162D7740P005 is equipped with advanced electronic circuitry that enables precise control and monitoring of various processes. It boasts a high degree of accuracy, which is critical for applications that require exact measurements and responses to varying conditions. This precision is complemented by the device’s ability to integrate seamlessly with other electronic systems, facilitating communication and coordination among different equipment.

Another characteristic that sets the GE 162D7740P005 apart is its versatility. The device can be utilized in a wide range of applications, including automation systems, HVAC controls, and motor control centers. This flexibility makes it a valuable asset for industries seeking to optimize their operations and improve task efficiency.

Additionally, the GE 162D7740P005 incorporates user-friendly features such as intuitive interface options and configurable settings. This design ensures that operators can easily interact with the device, making adjustments as needed without extensive training. The availability of comprehensive documentation and support further enhances user experience, allowing for quick troubleshooting and setup.

Overall, the GE 162D7740P005 is a testament to General Electric’s prowess in producing reliable and efficient industrial controls. With its durable construction, advanced technology, versatility, and user-friendly interface, it stands as a preferred choice for businesses aiming to leverage high-performance electronic solutions in their operations. Whether you're looking to optimize control processes or enhance automation capabilities, the GE 162D7740P005 offers the features and characteristics necessary to meet those goals.