Instructions

Using the oven.

To avoid possible burns, place the shelves in the desired position before you turn the oven on.

Safety

Operating Instructions

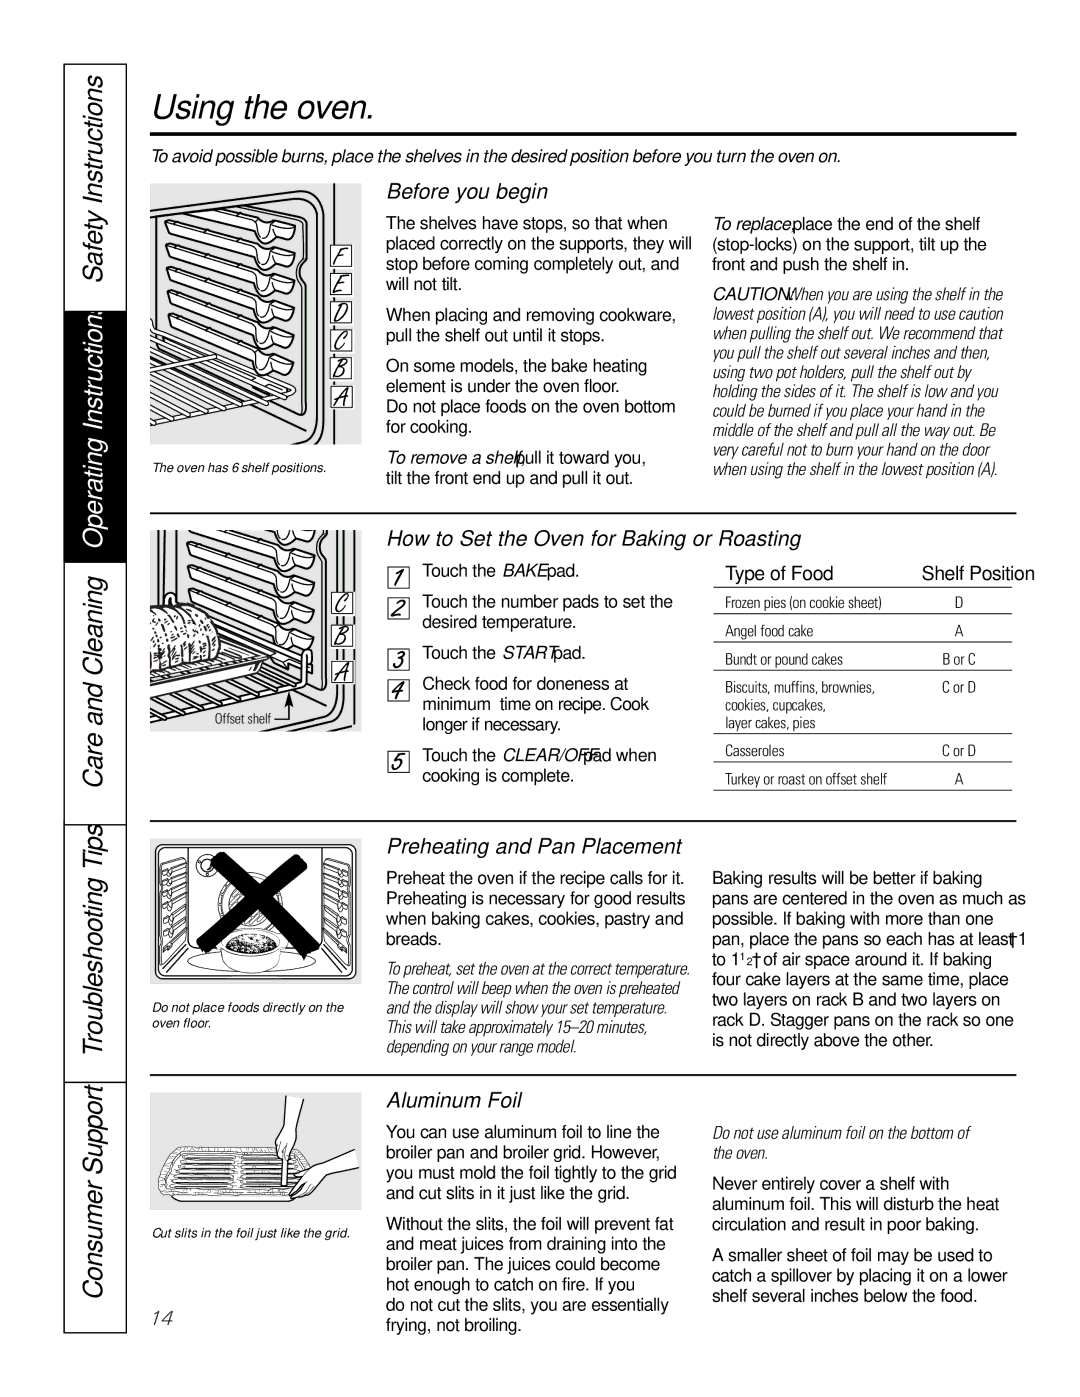
The oven has 6 shelf positions.

Before you begin…

The shelves have stops, so that when placed correctly on the supports, they will stop before coming completely out, and will not tilt.

When placing and removing cookware, pull the shelf out until it stops.

On some models, the bake heating element is under the oven floor.

Do not place foods on the oven bottom for cooking.

To remove a shelf, pull it toward you, tilt the front end up and pull it out.

To replace, place the end of the shelf (stop-locks) on the support, tilt up the front and push the shelf in.

CAUTION: When you are using the shelf in the lowest position (A), you will need to use caution when pulling the shelf out. We recommend that you pull the shelf out several inches and then, using two pot holders, pull the shelf out by holding the sides of it. The shelf is low and you could be burned if you place your hand in the middle of the shelf and pull all the way out. Be very careful not to burn your hand on the door when using the shelf in the lowest position (A).

How to Set the Oven for Baking or Roasting

Care and Cleaning

Offset shelf

Touch the BAKE pad.

Touch the number pads to set the desired temperature.

Touch the START pad.

Check food for doneness at minimum time on recipe. Cook longer if necessary.

Touch the CLEAR/OFF pad when cooking is complete.

Type of Food

Shelf Position

Frozen pies (on cookie sheet)

D

Angel food cake

A

Bundt or pound cakes

B or C

Biscuits, muffins, brownies,

C or D

cookies, cupcakes,


layer cakes, pies


Casseroles

C or D

Turkey or roast on offset shelf

A

Troubleshooting Tips

Do not place foods directly on the oven floor.

Preheating and Pan Placement

Preheat the oven if the recipe calls for it. Preheating is necessary for good results when baking cakes, cookies, pastry and breads.

To preheat, set the oven at the correct temperature. The control will beep when the oven is preheated and the display will show your set temperature. This will take approximately 15–20 minutes, depending on your range model.

Baking results will be better if baking pans are centered in the oven as much as possible. If baking with more than one pan, place the pans so each has at least 1″ to 11⁄2″ of air space around it. If baking four cake layers at the same time, place two layers on rack B and two layers on rack D. Stagger pans on the rack so one is not directly above the other.

Consumer Support

Cut slits in the foil just like the grid.

14

Aluminum Foil

You can use aluminum foil to line the broiler pan and broiler grid. However, you must mold the foil tightly to the grid and cut slits in it just like the grid.

Without the slits, the foil will prevent fat and meat juices from draining into the broiler pan. The juices could become hot enough to catch on fire. If you

do not cut the slits, you are essentially frying, not broiling.

Do not use aluminum foil on the bottom of the oven.

Never entirely cover a shelf with aluminum foil. This will disturb the heat circulation and result in poor baking.

A smaller sheet of foil may be used to catch a spillover by placing it on a lower shelf several inches below the food.

Page 14
Image 14
GE 164D4290P075-1, JBP91, 49-80117-1 Troubleshooting Tips, Before you begin…, Preheating and Pan Placement, Aluminum Foil

164D4290P075-1, 49-80117-1, JBP91 specifications

The GE JBP91 is a notable addition to the line of residential cooking appliances by General Electric, recognized for its innovative features and user-friendly design. This model, often identified with part numbers 49-80117-1 and 164D4290P075-1, is primarily a combination of conventional and modern technologies aimed at enhancing cooking efficiency and convenience in the kitchen.

One of the standout features of the GE JBP91 is its versatile cooking capabilities, which include both electric coil burners and a spacious oven. The electric burners provide consistent heat distribution, allowing for even cooking and simmering. With multiple heat settings, users can easily adjust the temperature to suit their specific cooking needs.

The oven features a self-cleaning option, which is an essential characteristic for busy households. This feature saves time and effort, allowing users to choose a self-cleaning cycle that utilizes high temperatures to eliminate food residue, thus ensuring a tidy and sanitary cooking environment. Additionally, the oven is equipped with a precision temperature control system, which promotes accurate cooking results and better meal preparation.

In terms of safety, the GE JBP91 incorporates several important technologies. The appliance features a built-in automatic shut-off system that engages after a specified period of inactivity, providing peace of mind for users who may forget to turn off the oven or burners. Furthermore, the appliance has heat-resistant door handles and a sturdy build, ensuring durability and resilience through regular use.

The design of the GE JBP91 is both sleek and practical, fitting seamlessly into various kitchen aesthetics. The control knobs are conveniently placed, offering easy access and operation. Moreover, the appliance includes a windowed oven door, enabling users to monitor cooking progress without opening the door and losing heat.

Energy efficiency is another highlight of the GE JBP91, as it adheres to modern standards for power consumption, making it an environmentally friendly choice for those looking to reduce their carbon footprint while enjoying high-quality cooking.

Overall, the GE JBP91, with its part numbers 49-80117-1 and 164D4290P075-1, represents an excellent balance of traditional cooking technology and modern appliance innovation, perfect for both novice cooks and seasoned chefs alike. With its dependable performance, safety features, and user-centric design, it stands out as a reliable cooking solution for any home.