Installation Instructions

7ADJUST BROIL AND OVEN BURNER AIR ADJUSTMENT SHUTTERS IF NECESSARY

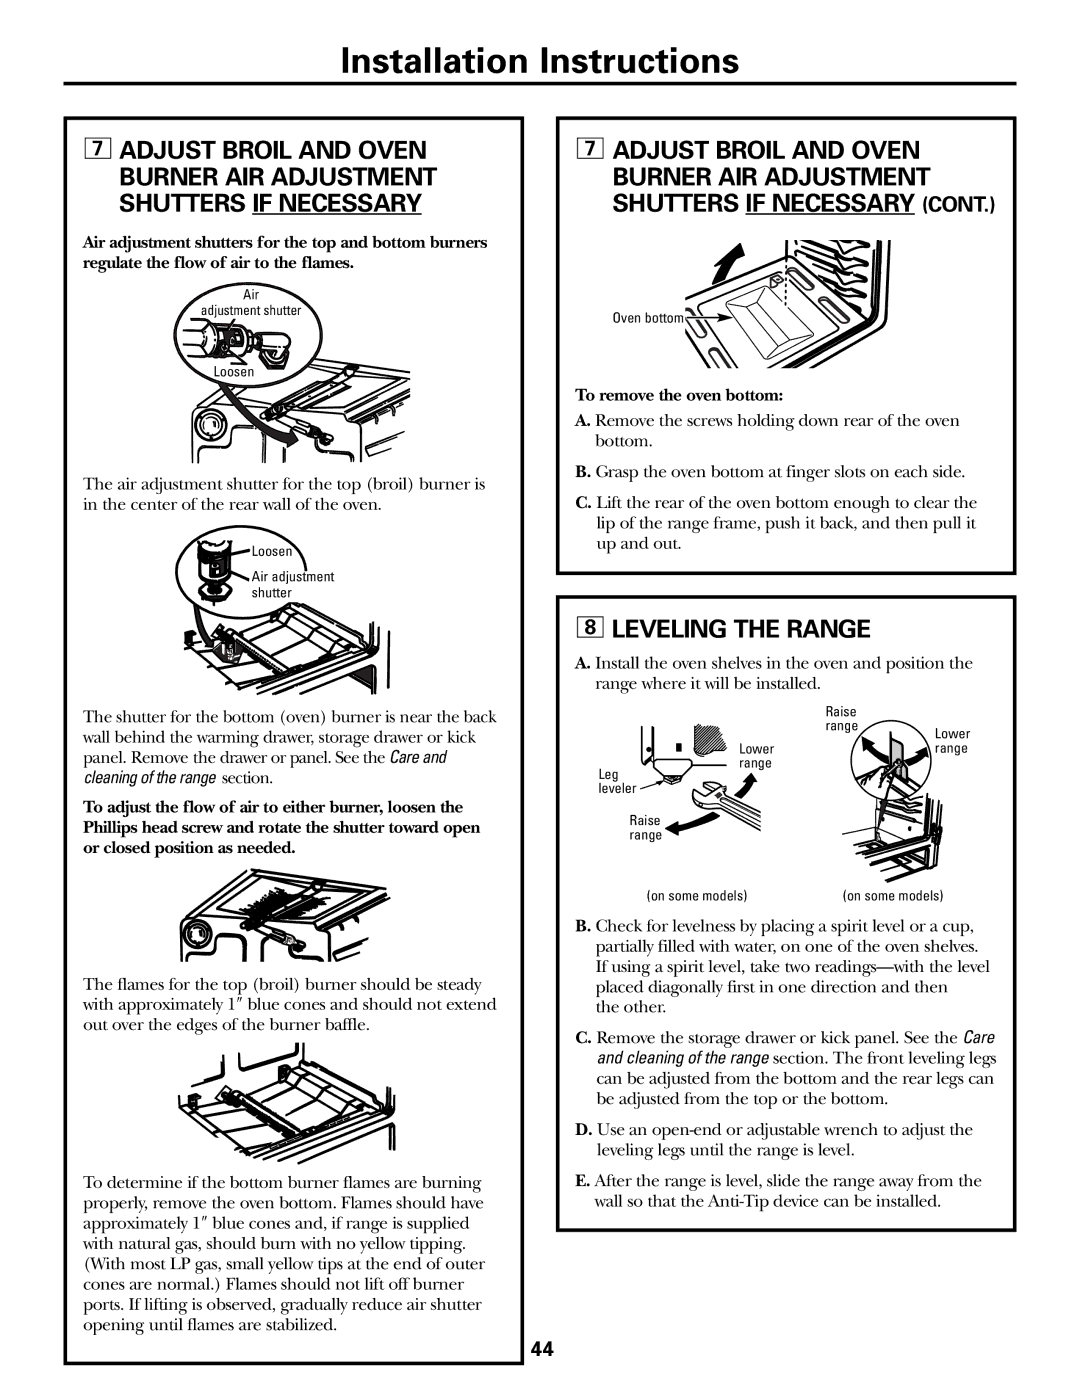
Air adjustment shutters for the top and bottom burners regulate the flow of air to the flames.

Air

adjustment shutter

Loosen

The air adjustment shutter for the top (broil) burner is in the center of the rear wall of the oven.

Loosen

Air adjustment shutter

The shutter for the bottom (oven) burner is near the back wall behind the warming drawer, storage drawer or kick panel. Remove the drawer or panel. See the Care and cleaning of the range section.

To adjust the flow of air to either burner, loosen the Phillips head screw and rotate the shutter toward open or closed position as needed.

The flames for the top (broil) burner should be steady with approximately 1″ blue cones and should not extend out over the edges of the burner baffle.

To determine if the bottom burner flames are burning properly, remove the oven bottom. Flames should have approximately 1″ blue cones and, if range is supplied with natural gas, should burn with no yellow tipping. (With most LP gas, small yellow tips at the end of outer cones are normal.) Flames should not lift off burner ports. If lifting is observed, gradually reduce air shutter opening until flames are stabilized.

7ADJUST BROIL AND OVEN BURNER AIR ADJUSTMENT SHUTTERS IF NECESSARY (CONT.)

Oven bottom

To remove the oven bottom:

A. Remove the screws holding down rear of the oven bottom.

B. Grasp the oven bottom at finger slots on each side.

C. Lift the rear of the oven bottom enough to clear the lip of the range frame, push it back, and then pull it up and out.

8LEVELING THE RANGE

A.Install the oven shelves in the oven and position the range where it will be installed.


Raise


range

Lower


Lower


range

range


Leg leveler

Raise range

(on some models)

(on some models)

B. Check for levelness by placing a spirit level or a cup, partially filled with water, on one of the oven shelves. If using a spirit level, take two readings—with the level placed diagonally first in one direction and then

the other.

C. Remove the storage drawer or kick panel. See the Care and cleaning of the range section. The front leveling legs can be adjusted from the bottom and the rear legs can be adjusted from the top or the bottom.

D. Use an open-end or adjustable wrench to adjust the leveling legs until the range is level.

E. After the range is level, slide the range away from the wall so that the Anti-Tip device can be installed.

44

Page 44
Image 44
GE JGBP31 installation instructions Leveling the Range, To remove the oven bottom

JGBP31 specifications

The GE JGBP31 is a versatile and reliable gas range designed to meet the needs of both casual cooks and culinary enthusiasts. With a perfect blend of style and efficiency, this gas range features a sleek design that fits seamlessly into any modern kitchen decor. Sturdily constructed, it is built with high-quality materials to ensure durability and longevity.

One of the standout features of the GE JGBP31 is its powerful burners. It comes equipped with four sealed burners that allow for precise temperature control. The burners range from a high-output burner for searing and boiling to a low simmer burner for delicate sauces and melting chocolate. This versatility makes it an excellent choice for a wide range of cooking techniques.

Another notable characteristic of the GE JGBP31 is the large oven capacity. The oven is spacious enough to accommodate multiple dishes at once, making it perfect for family meals and gatherings. The oven also features an innovative convection cooking system, which circulates hot air for even heat distribution. This ensures that dishes are cooked uniformly whether baking, roasting, or broiling.

The range also includes a self-cleaning feature, which saves time and effort for the user. With the push of a button, the oven can clean itself using high temperatures to burn away residue, allowing for a hassle-free cleaning experience. Additionally, the oven has a built-in temperature probe that provides accurate readings of the internal temperature of meats, ensuring perfectly cooked results every time.

For safety, the GE JGBP31 is equipped with features like the electronic ignition system, which eliminates the need for a standing pilot light. This not only enhances safety but also improves energy efficiency. The control knobs are designed with a smooth operation in mind, allowing for easy adjustments while cooking.

This model also emphasizes user-friendly design, featuring a clear and easy-to-read control panel. With its attention to functionality, style, and safety, the GE JGBP31 stands out as a quality gas range that caters to every cooking enthusiast's needs, making it a dependable choice in today's kitchens.