8LEVELING THE RANGE

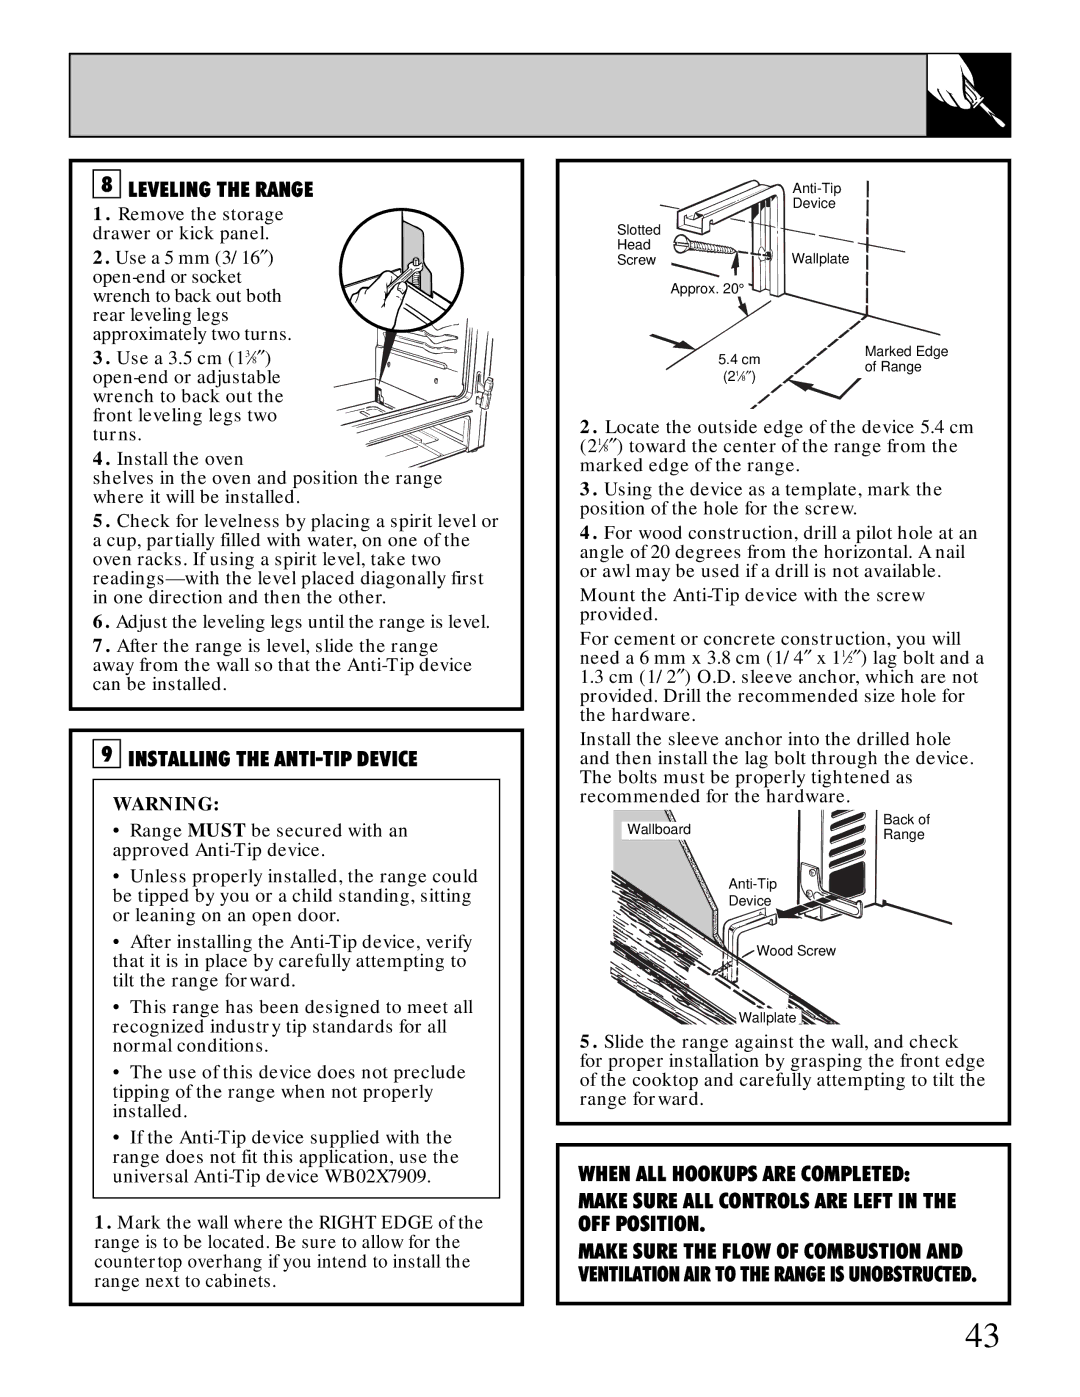
1.Remove the storage drawer or kick panel.

2. Use a 5 mm (3/16″) open-end or socket wrench to back out both rear leveling legs approximately two turns.

3. Use a 3.5 cm (138″) open-end or adjustable wrench to back out the front leveling legs two turns.

4. Install the oven

shelves in the oven and position the range where it will be installed.

5.Check for levelness by placing a spirit level or a cup, partially filled with water, on one of the oven racks. If using a spirit level, take two readings—with the level placed diagonally first in one direction and then the other.

6.Adjust the leveling legs until the range is level.

7.After the range is level, slide the range

away from the wall so that the Anti-Tip device can be installed.

9 INSTALLING THE ANTI-TIP DEVICE

WARNING:

Range MUST be secured with an approved Anti-Tip device.

Unless properly installed, the range could be tipped by you or a child standing, sitting or leaning on an open door.

After installing the Anti-Tip device, verify that it is in place by carefully attempting to tilt the range forward.

This range has been designed to meet all recognized industry tip standards for all normal conditions.

The use of this device does not preclude tipping of the range when not properly installed.

If the Anti-Tip device supplied with the range does not fit this application, use the universal Anti-Tip device WB02X7909.

1.Mark the wall where the RIGHT EDGE of the range is to be located. Be sure to allow for the countertop overhang if you intend to install the range next to cabinets.


Anti-Tip


Device

Slotted


Head

Wallplate

Screw


Approx. 20°

Marked Edge

5.4 cm of Range (218)

2.Locate the outside edge of the device 5.4 cm (218″) toward the center of the range from the marked edge of the range.

3.Using the device as a template, mark the position of the hole for the screw.

4.For wood construction, drill a pilot hole at an angle of 20 degrees from the horizontal. A nail or awl may be used if a drill is not available.

Mount the Anti-Tip device with the screw provided.

For cement or concrete construction, you will need a 6 mm x 3.8 cm (1/4″ x 112″) lag bolt and a

1.3cm (1/2″) O.D. sleeve anchor, which are not provided. Drill the recommended size hole for the hardware.

Install the sleeve anchor into the drilled hole and then install the lag bolt through the device. The bolts must be properly tightened as recommended for the hardware.

Wallboard

Back of

Range


Anti-Tip

Device

Wood Screw

Wallplate

5.Slide the range against the wall, and check for proper installation by grasping the front edge of the cooktop and carefully attempting to tilt the range forward.

WHEN ALL HOOKUPS ARE COMPLETED:

MAKE SURE ALL CONTROLS ARE LEFT IN THE OFF POSITION.

MAKE SURE THE FLOW OF COMBUSTION AND VENTILATION AIR TO THE RANGE IS UNOBSTRUCTED.

43

Page 43
Image 43
GE JGBP35GZX manual Leveling the Range

JGBP35GZX specifications

The GE JGBP35GZX is a versatile and efficient freestanding gas range that epitomizes modern cooking technology while prioritizing user convenience. This appliance boasts a combination of traditional features and innovative advancements, making it a staple in many contemporary kitchens.

One of the standout features of the GE JGBP35GZX is its powerful gas burners. The range includes four sealed burners that deliver precise heat control, allowing users to easily adjust their cooking temperature according to their culinary needs. The burners range from high-output options for rapid boiling to low-simmer settings for delicate sauces, providing versatility for any recipe.

In addition to its cooking capabilities, the GE JGBP35GZX is equipped with a spacious oven. With a capacity of 5.0 cubic feet, it allows for cooking multiple dishes simultaneously, making it ideal for large family meals or entertaining guests. The oven features a convenient self-cleaning option, which saves users time and effort in maintaining a clean cooking space.

The range includes an integrated broiler with a split rack, providing additional cooking flexibility. The broil feature is perfect for achieving a beautifully crisp finish on meats and casseroles. Moreover, the electronic ignition system ensures easy and reliable burner lighting, enhancing the overall cooking experience.

In terms of design, the GE JGBP35GZX showcases a sleek, modern aesthetic with its stainless steel finish, complementing a variety of kitchen decors. The control knobs are conveniently located at the front, enabling easy access while cooking, and the large oven window allows users to monitor their dishes without opening the door.

A notable technology included in this model is the Precise Simmer burner. This feature is particularly beneficial for maintaining low cooking temperatures and preventing delicate sauces from scorching. The continuous grates provide a stable surface for cookware, allowing for easy sliding of pots and pans between burners.

Moreover, the oven is equipped with a temperature probe, ensuring that meals are cooked to perfection by alerting the user when the desired internal temperature is reached.

In summary, the GE JGBP35GZX combines efficient cooking performance, convenient features, and modern design, making it an excellent choice for home chefs looking for reliability and versatility in their kitchen appliances. Whether you're baking, broiling, or simmering, this range meets the diverse needs of modern cooking with ease.