Installation Instructions

7ADJUST BROIL AND OVEN BURNER AIR ADJUSTMENT SHUTTERS IF NECESSARY

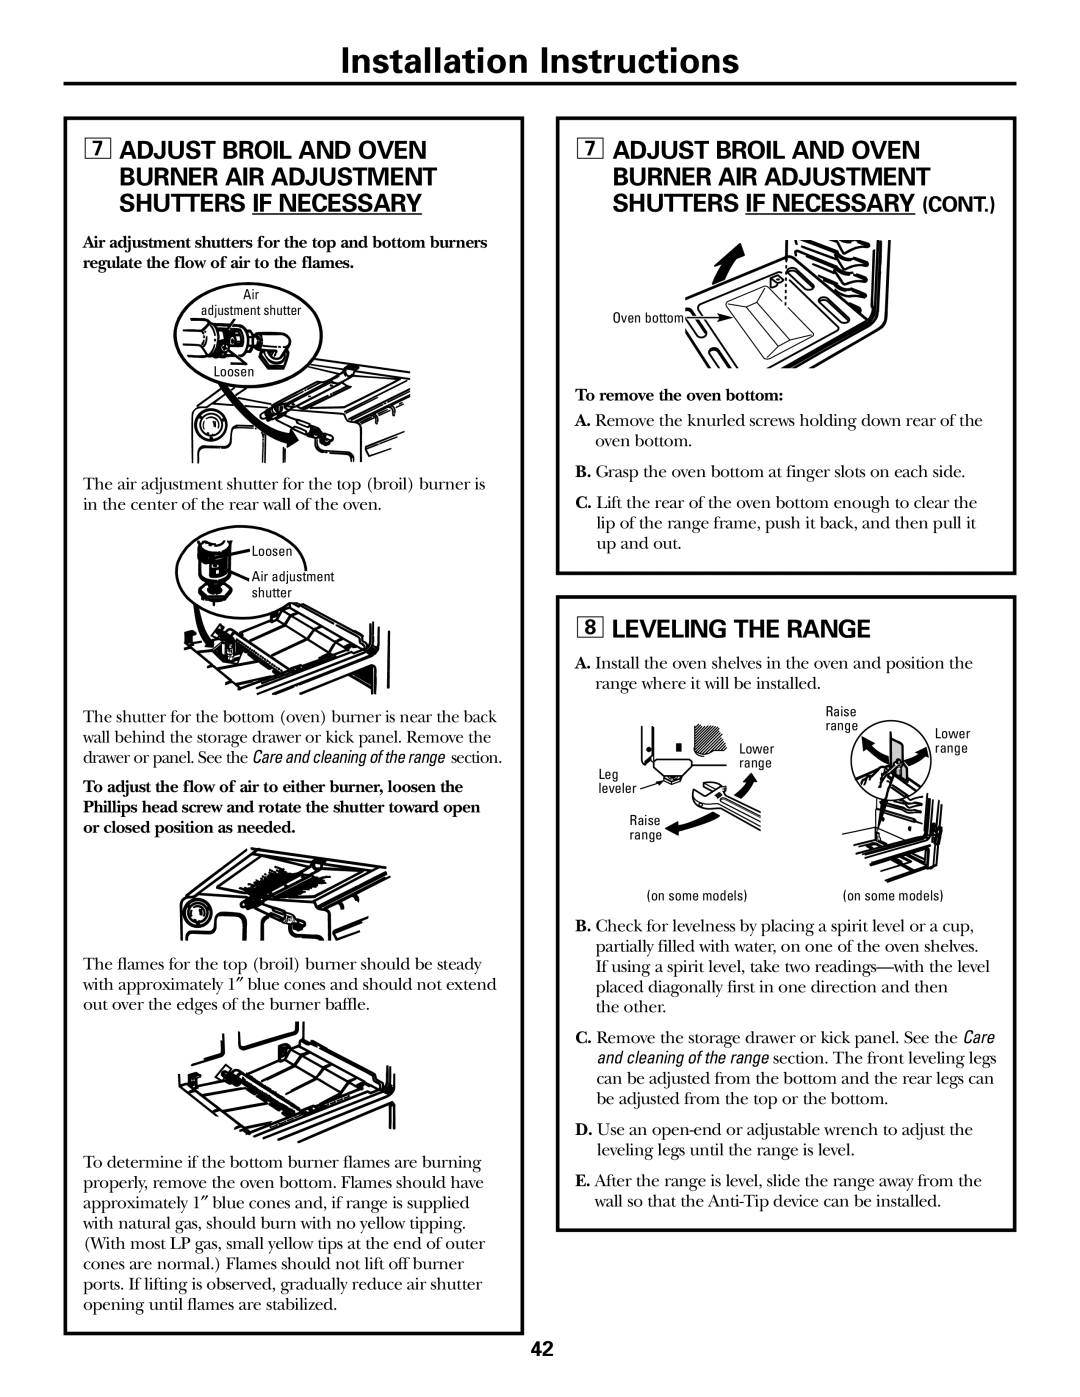
Air adjustment shutters for the top and bottom burners regulate the flow of air to the flames.

Air

adjustment shutter

Loosen

The air adjustment shutter for the top (broil) burner is in the center of the rear wall of the oven.

Loosen

Air adjustment shutter

The shutter for the bottom (oven) burner is near the back wall behind the storage drawer or kick panel. Remove the drawer or panel. See the Care and cleaning of the range section.

To adjust the flow of air to either burner, loosen the Phillips head screw and rotate the shutter toward open or closed position as needed.

The flames for the top (broil) burner should be steady with approximately 1″ blue cones and should not extend out over the edges of the burner baffle.

To determine if the bottom burner flames are burning properly, remove the oven bottom. Flames should have approximately 1″ blue cones and, if range is supplied with natural gas, should burn with no yellow tipping. (With most LP gas, small yellow tips at the end of outer cones are normal.) Flames should not lift off burner ports. If lifting is observed, gradually reduce air shutter opening until flames are stabilized.

7ADJUST BROIL AND OVEN BURNER AIR ADJUSTMENT SHUTTERS IF NECESSARY (CONT.)

Oven bottom

To remove the oven bottom:

A. Remove the knurled screws holding down rear of the oven bottom.

B. Grasp the oven bottom at finger slots on each side.

C. Lift the rear of the oven bottom enough to clear the lip of the range frame, push it back, and then pull it up and out.

8LEVELING THE RANGE

A.Install the oven shelves in the oven and position the range where it will be installed.


Raise


range

Lower


Lower


range

range


Leg leveler

Raise range

(on some models)

(on some models)

B. Check for levelness by placing a spirit level or a cup, partially filled with water, on one of the oven shelves. If using a spirit level, take two readings—with the level placed diagonally first in one direction and then

the other.

C. Remove the storage drawer or kick panel. See the Care and cleaning of the range section. The front leveling legs can be adjusted from the bottom and the rear legs can be adjusted from the top or the bottom.

D. Use an open-end or adjustable wrench to adjust the leveling legs until the range is level.

E. After the range is level, slide the range away from the wall so that the Anti-Tip device can be installed.

42

Page 43
Image 43
GE Oven warranty Leveling the Range, To remove the oven bottom

Oven specifications

General Electric (GE) has long been a name synonymous with innovation and reliability in the home appliance market, particularly in kitchen technology. One of their flagship products, the GE Oven, embodies a combination of advanced features, sophisticated technologies, and user-friendly characteristics that cater to modern cooking needs.

One of the standout features of GE Ovens is their smart technology integration. Many models are equipped with Wi-Fi connectivity, allowing users to control the oven remotely via a smartphone app. This means you can preheat your oven on the way home from work or adjust cooking settings while multitasking around the house. The integration of voice control through virtual assistants like Amazon Alexa or Google Assistant adds another layer of convenience, making it easier to manage cooking tasks hands-free.

In terms of cooking performance, GE Ovens come with advanced cooking modes that enhance versatility. The True European Convection technology circulates air for even cooking, ensuring that baked goods rise perfectly and roasts are cooked thoroughly. Additionally, features such as air fry capabilities transform the oven into a multi-functional cooking device, allowing users to achieve crispy textures without the need for excess oil.

Another notable characteristic is the user interface. GE Ovens typically feature intuitive touch controls and digital displays, making it easy to navigate through various settings and choose the right cooking temperature and time. Safety is also a priority; many models include features such as auto shut-off, child lock settings, and self-cleaning options that simplify maintenance.

The design of GE Ovens also reflects contemporary aesthetics and functionality. Available in different finishes, such as stainless steel and matte black, these ovens can seamlessly blend into any kitchen decor while providing the durability needed for daily use. Additionally, many GE Ovens come with spacious interiors and adjustable racks, accommodating large cookware and multiple dishes simultaneously.

Overall, GE Ovens combine cutting-edge technology with practical features that enhance the cooking experience. Their commitment to innovation ensures that users not only enjoy outstanding performance but also the convenience and efficiency that come with modern cooking solutions. Whether you are a novice home cook or an experienced chef, a GE Oven is engineered to support your culinary adventures with ease and excellence.