Installation Instructions
STEP 3 CHECK DOOR BALANCE
•With dishwasher on the wood skid, check the door balance by opening and closing the door.
•If the door drops when released, increase the spring tension. If the door rises when released, decrease the tension.
•There are two types of counter balance and therefore two methods of adjustment. Identify which counter balance is present and adjust tension accordingly. Please note: if there are 3 holes on the cable, use the cable to adjust;
if there is one hole on cable use the tub leg to adjust.
Type 1 – One-hole cable
Adjust tension by moving spring hook to one of the three holes on the tub leg.
INCREASE
Figure H
DECREASE
One Hole
Type 2 – Three-hole cable
Adjust tension by moving spring hook to one of the three holes on the pulley cable.
Use This
Mounting
Hole
| Decrease |
Figure I | Tension |
| Increase |
| Tension |
After adjusting spring tension, open and close the door to make sure the door operates smoothly. If the door is hard to move or if the spring cable binds, check the routing of the spring cable. The cable should be routed between the shoulders of the pulley cable roller. If the cable is off the roller: latch door, remove spring tension and route the cable between the shoulders of the roller. See Figure J.
Figure J
Pulley
Shoulder
Correct Spring
Incorrect Spring
Cable Routing
Cable Routing
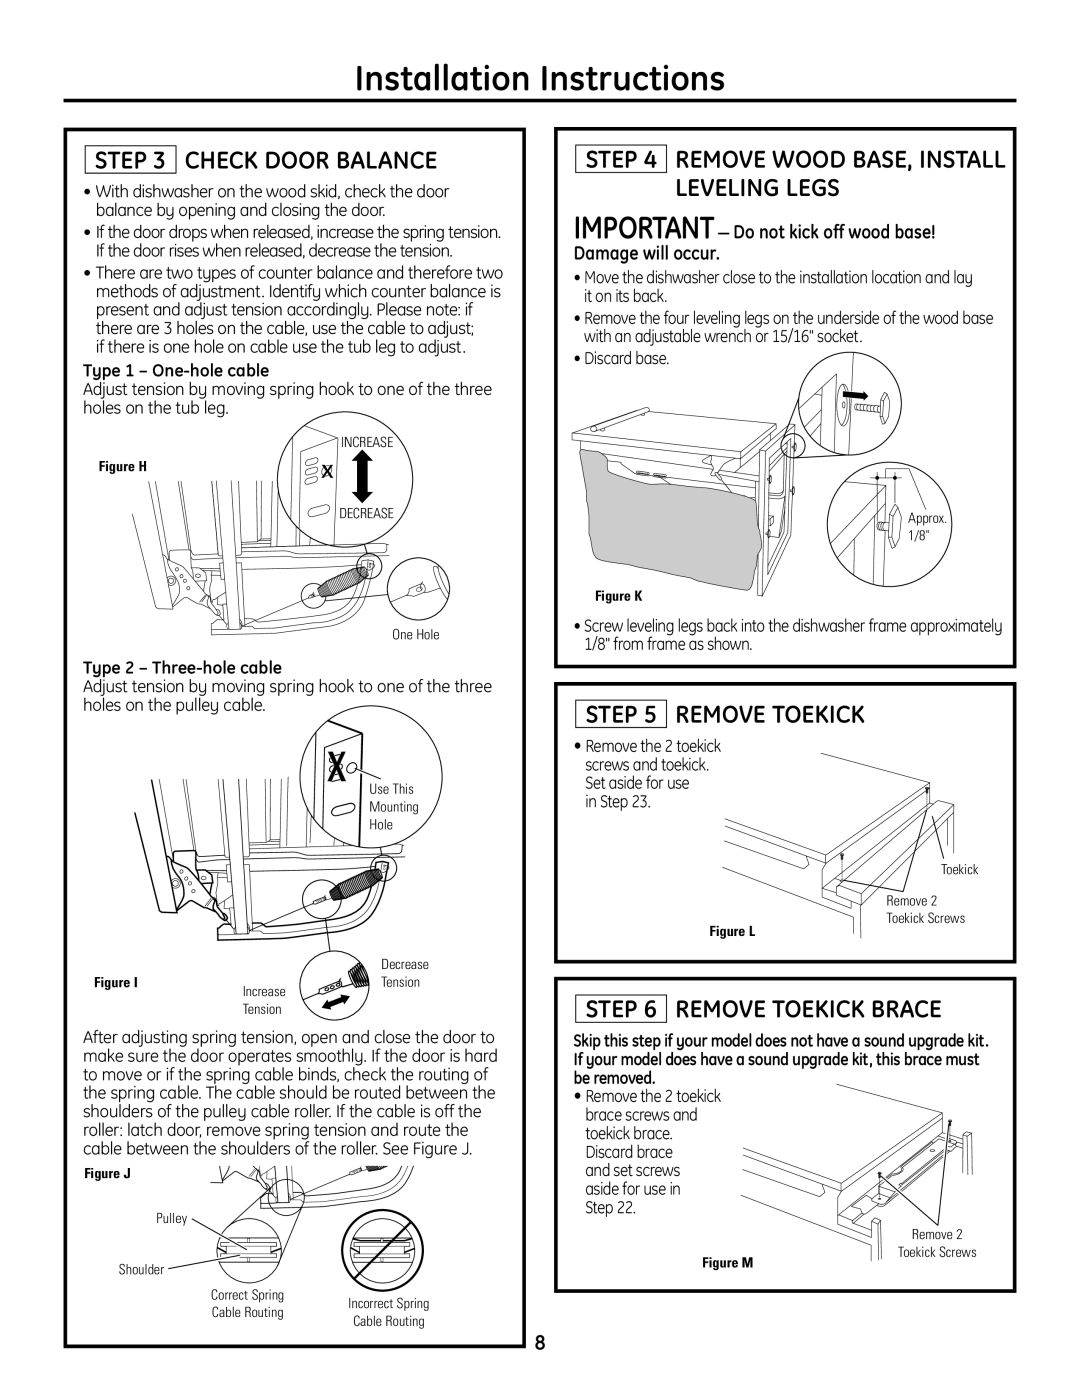
STEP 4 REMOVE WOOD BASE, INSTALL LEVELING LEGS
IMPORTANT— Do not kick off wood base! Damage will occur.
•Move the dishwasher close to the installation location and lay it on its back.
•Remove the four leveling legs on the underside of the wood base with an adjustable wrench or 15/16" socket.
•Discard base.
Approx.
1/8"
Figure K
•Screw leveling legs back into the dishwasher frame approximately 1/8" from frame as shown.
STEP 5 REMOVE TOEKICK
•Remove the 2 toekick screws and toekick. Set aside for use
in Step 23.
Toekick
Remove 2
Toekick Screws
Figure L
STEP 6 REMOVE TOEKICK BRACE
Skip this step if your model does not have a sound upgrade kit. If your model does have a sound upgrade kit, this brace must be removed.
•Remove the 2 toekick brace screws and
toekick brace. Discard brace and set screws aside for use in Step 22.
Remove 2
Toekick Screws
Figure M
8