Tables de cuisson professionnelles de 36 91 cm et de 48 122 cm
Installation Instructions
Instructions d’installation
Estufas profesionales de 36 91 cm y 48 122 cm
Vent hood Combinations
Safety Information
BEFORE YOU BEGIN
Completion Time - 1 to 3 hours
Installation Instructions
CONTENTS
BACKSPLASH ACCESSORIES
Installation Preparation
PRODUCT DIMENSIONS AND CLEARANCES FOR 48” MODELS
ADDITIONAL CLEARANCES
PRODUCT DIMENSIONS AND CLEARANCES FOR 36” MODELS
Universal Utility Locations
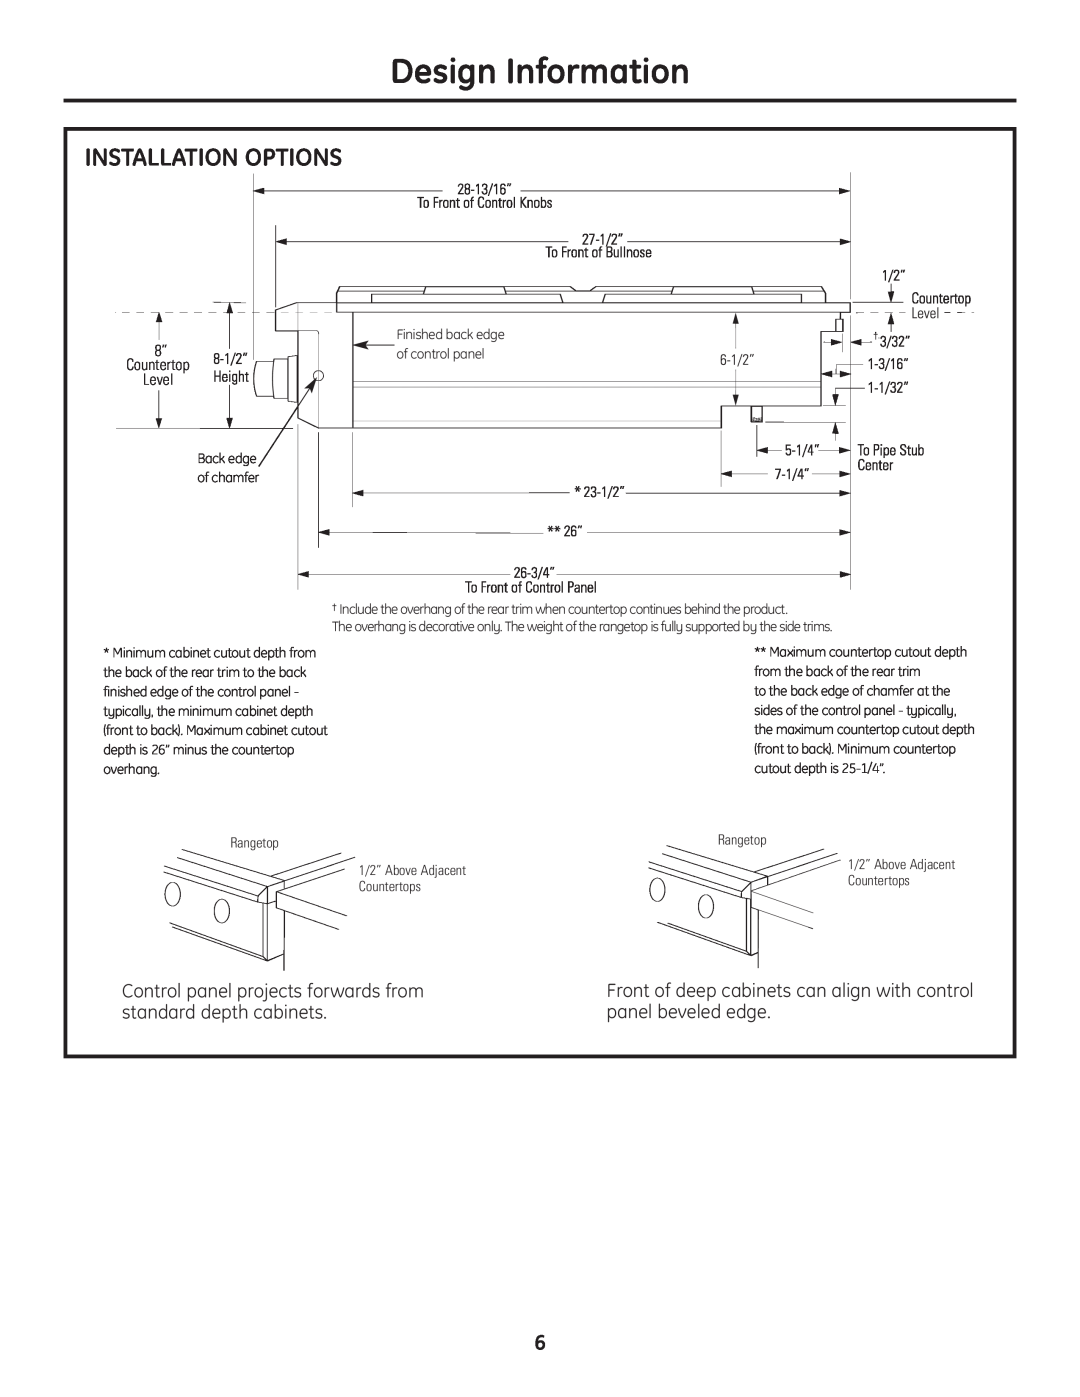
INSTALLATION OPTIONS
Control panel projects forwards from standard depth cabinets
Front of deep cabinets can align with control panel beveled edge
TOOLS REQUIRED
Installation Preparation
POWER SUPPLY LOCATIONS
MATERIALS PROVIDED
REMOVE PACKAGING
Stand clear. The ends of the cut metal banding may snap toward you
Installation
STEP 1 CUT THE COUNTERTOP OPENING
Cutout Opening with False Bottom
STEP 2 INSTALL RANGETOP
STEP 3 CONNECT RANGETOP TO GAS
Assure that gas is turned off at the shut-off valve
STEP 4 CONNECT ELECTRICAL
FINALIZE INSTALLATION
INSTALLATION CHECKLIST
STEP 5 CHECK BURNERS
INSTALL 12 BACKSPLASH
ZX12B30PSS, ZX12B36PSS, ZX12B48PSS Accessory Installation
OPTIONAL ACCESSORIES-12 HIGH BACKSPLASH
TOOLS AND MATERIALS REQUIRED
INSTALL THE WALL SUPPORT PANELS
ZXADJB30PSS, ZXADJB36PSS, ZXADJB48PSS Accessory Installation
ACCESSORIES-30 TO 36 ADJUSTABLE BACKSPLASH not included
Maximum shelf load-bearing weight is 40 lbs
See alternate method if side access is blocked
INSTALL COVER PANELS
INSTALL COVER PANELS cont
ALTERNATE METHOD When side access is blocked
2 CONVERT THE REGULATOR
Convert Natural Gas to LP Gas Operation
Convert LP Gas to Natural Gas Operation
TOOLS YOU NEEDED FOR CONVERSION
4 CHANGE GRILL ORIFICE if present
Installation Instructions for Gas Conversion
3 CHANGE BURNER ORIFICES cont
ZDP364, ZDP366, ZDP484, ZDP486
6 ADJUST BURNER FLAMES
5 CHANGE GRIDDLE ORIFICE if present
Consignes de sécurité
Remarque à l’attention de l’installateur
Temps d’installation - 1 à 3 heures
AVANT DE COMMENCER
Caractéristiques
Consignes d’installation
Préparation de linstallation
TABLE DES MATIÈRES
AVERTISEMENT
ESPACES DE SÉPARATION SUPPLÉMENTAIRES
Emplacements de raccord universels
AVERTISEMENT
Bord fini arrière du
OPTIONS DINSTALLATION
panneau de commande
Bord arrière
OUTILS NÉCESSAIRES
Préparation de l’installation
EMPLACEMENT DES ALIMENTATIONS
MATÉRIEL FOURNI
SORTEZ LAPPAREIL DE SON EMBALLAGE
ÉTAPE 1 COUPEZ L’OUVERTURE DU PLAN DE TRAVAIL
Ouverture découpée à faux-fond
ÉTAPE 2 INSTALLEZ LA TABLE DE CUISSON
ÉTAPE 3 RACCORDEZ LA TABLE DE CUISSON AU GAZ
Assurez-vous que le gaz est coupé
ÉTAPE 5 VÉRIFIEZ LES BRÛLEURS
TERMINEZ L’INSTALLATION
LISTE DE VÉRIFICATION POUR L’INSTALLATION
ÉTAPE 4 RACCORDEZ AU RÉSEAU ÉLECTRIQUE
AVERTISSEMENT Ce dosseret
ACCESSOIRES EN OPTION-DOSSERET DE 30 CM 12 DE HAUTEUR
INSTALLEZ LE DOSSERET 30 CM
OUTILS ET MATÉRIEL NÉCESSAIRES
INSTALLEZ LES PANNEAUX DE SUPPORT MURAL
ZXADJB30PSS, ZXADJB36PSS, ZXADJB48PSS Installation d’accessoires
ACCESSOIRES-DOSSERET AJUSTABLE 30-36 non fourni
AVERTISSEMENT Les panneaux
Optez pour la méthode alternative si l’accès latéral est bloqué
INSTALLEZ LES PANNEAUX DE RECOUVREMENT
INSTALLEZ LES PANNEAUX DE RECOUVREMENT suite
MÉTHODE ALTERNATIVE en cas d’obstruction de l’accès latéral
2 CONVERTIR LE RÉGULATEUR
Conversion du gaz naturel au propane
Conversion du propane au gaz naturel
OUTILS DONT VOUS AUREZ BESOIN POUR LA CONVERSION
3 CHANGEZ L’ORIFICE DU GRILL suite
Consignes d’installation pour la conversion de gaz
4 CHANGEZ L’ORIFICE DU GRILL si installé
ORIFICES DE MIIJOTAGE ZDP304
5 CHANGEZ L’ORIFICE DE LA PLAQUE CHAUFFANTE si installé
6 AJUSTEZ LES FLAMMES DU BRÛLEUR
Combinaciones de capuchas de ventilación
Información de seguridad
ADVERTENCIA
PRECAUCIÓN
MODELOS DISPONIBLES
Información de diseño
CONTENIDOS
ACCESORIOS PARA SALPICADERO
DIMENSIONES Y ESPACIOS DEL PRODUCTO PARA MODELOS DE 48”
ADVERTENCIA
ESPACIOS ADICIONALES
DIMENSIONES Y ESPACIOS DEL PRODUCTO PARA MODELOS DE 36”
Ubicaciones de los servicios públicos
OPCIONES DE INSTALACIÓN
MATERIALES PROVISTOS
Preparación para la instalación
HERRAMIENTAS REQUERIDAS
MATERIALES REQUERIDOS NO PROVISTOS
Mantenga una distancia prudencial. Cuando
Preparaciòn Instalación
QUITE EL EMPAQUE
se cortan, los extremos de los precintos de metal pueden golpearlo
Instalación
PASO 1 CORTE LA ABERTURA DEL MOSTRADOR DE ENCIMERA
Abertura de recorte con fondo falso
PASO 2 INSTALE LA ESTUFA
PASO 3 CONECTE LA ESTUFA AL SUMINISTRO DE GAS
FINALICE LA INSTALACIÓN
PASO 4 CONECTE LA ELECTRICIDAD
PASO 5 CONTROLE LOS QUEMADORES
LISTA DE CONTROL DE LA INSTALACIÓN
ACCESORIOS OPCIONALES - SALPICADERO ALTO DE 12”
ANTES DE COMENZAR
Instalación de accesorios ZX12B30PSS, ZX12B36PSS, ZX12B48PSS
INSTALE EL SALPICADERO DE 12”
ACCESORIOS -SALPICADERO AJUSTABLE DE 30 A 36” no incluido
ADVERTENCIA Los paneles
ANTES DE COMENZAR
INSTALELOSPANELESDESOPORTEDEPARED
INSTALE LOS PANELES DE CUBIERTA cont
Instalación de accesorios ZXADJB30PSS, ZXADJB36PSS, ZXADJB48PSS
INSTALE LOS PANELES DE CUBIERTA
Ver el método alternativo si el acceso lateral se encuentra bloqueado
HERRAMIENTAS NECESARIAS PARA LA CONVERSIÓN
Conversión de gas natural a gas LP Conversión de gas LP a gas natural
2 CONVIERTA EL REGULADOR
3 CAMBIE LOS ORIFICIOS DE LOS QUEMADORES
4 CAMBIE EL ORIFICIO DE LA PARRILLA si corresponde
Instrucciones de instalación para conversión de gas
3 CAMBIE LOS ORIFICIOS DE LOS QUEMADORES cont
ZDP304 ORIFICIOS DE FUEGO LENTO
6 AJUSTE LAS LLAMAS DEL QUEMADOR
Ajuste la configuración de la hilera superior
5 CAMBIE EL ORIFICIO DE LA
PLANCHA si corresponde
Page
Page
Para servicio técnico local Monogram en su área, llame al
For Monogram local service in your area, call
GE Consumer & Industrial
Appliances General Electric Company Louisville, KY 40225 ge.com