Specifications
WEATHER AND MAINTENANCE KITS
To keep the generator running at its peak, the following kits are offered:
•Cold Weather Kit
~Recommended for climates with temperatures below 32° F.
•Extreme Cold Weather Kit
~Recommended Block Heater Kit for protection in tempera- tures below 32° F.
•Scheduled Maintenance Kit
~Kit includes the recommended parts to maintain the genera- tor. Refer to the Service Schedule for regular maintenance intervals.
For additional information, or to order any of these kits, please contact an Authorized Service Dealer or Customer Service Representative.
RECONFIGURING THE FUEL SYSTEM
NOTE:
All models are configured to run on natural gas from the fac- tory.
Before the generator can be operated using a LP fuel source, the fuel system and control panel (refer to the installation drawing for location) must be reconfigured. The steps to reconfigure the gen- erator from a natural gas (NG) to a liquidified petroleum (LP) fuel source are as follows:
FUEL SYSTEM
1.Turn the main gas supply off and disconnect the battery.
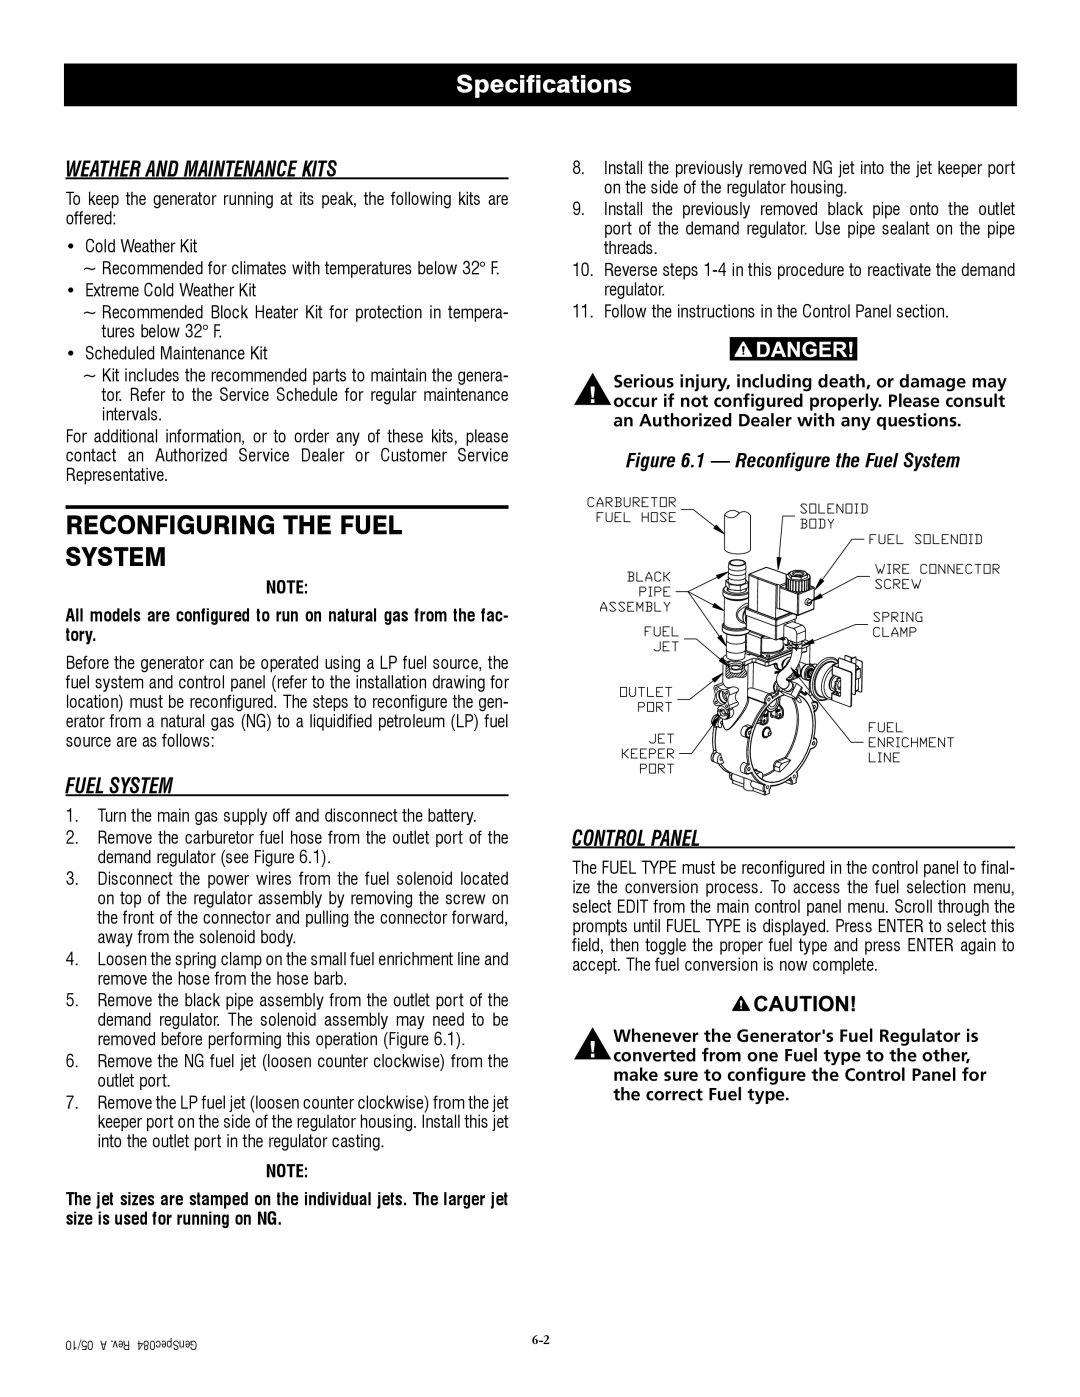
2.Remove the carburetor fuel hose from the outlet port of the demand regulator (see Figure 6.1).
3.Disconnect the power wires from the fuel solenoid located on top of the regulator assembly by removing the screw on the front of the connector and pulling the connector forward, away from the solenoid body.
4.Loosen the spring clamp on the small fuel enrichment line and remove the hose from the hose barb.
5.Remove the black pipe assembly from the outlet port of the demand regulator. The solenoid assembly may need to be removed before performing this operation (Figure 6.1).
6.Remove the NG fuel jet (loosen counter clockwise) from the outlet port.
7.Remove the LP fuel jet (loosen counter clockwise) from the jet keeper port on the side of the regulator housing. Install this jet into the outlet port in the regulator casting.
NOTE:
The jet sizes are stamped on the individual jets. The larger jet size is used for running on NG.
8.Install the previously removed NG jet into the jet keeper port on the side of the regulator housing.
9.Install the previously removed black pipe onto the outlet port of the demand regulator. Use pipe sealant on the pipe threads.
10.Reverse steps
11.Follow the instructions in the Control Panel section.
nSerious injury, including death, or damage may occur if not configured properly. Please consult an Authorized Dealer with any questions.
Figure 6.1 — Reconfigure the Fuel System
CONTROL PANEL
The FUEL TYPE must be reconfigured in the control panel to final- ize the conversion process. To access the fuel selection menu, select EDIT from the main control panel menu. Scroll through the prompts until FUEL TYPE is displayed. Press ENTER to select this field, then toggle the proper fuel type and press ENTER again to accept. The fuel conversion is now complete.
nWhenever the Generator's Fuel Regulator is converted from one Fuel type to the other, make sure to configure the Control Panel for the correct Fuel type.
05/10 A .Rev GenSpec084
