Ch |
| Setting Contact |
|
Adjustment 2: |
| Reverse Function |
|
|
|
| |
| NOTE |
| |
Limit Switch and Force Adjustments must be completed before checking the contact reverse function..
AOpen garage door using Wall Console..
BLay a 2” x 4” board flat in center of doorway (Figure 10)..
CClose door using Wall Console..
DCheck that door stops and reverses within 2 seconds after it contacts board:
•If door does not reverse, decrease Close Force until door reverses (Figure 9)..
•If door still does not reverse, move Limit Switch toward door..
![]() WARNING
WARNING
A moving garage door may cause serious injury or death.
•Keep people clear of opening while door is moving.
•Do not allow children to play with the Remote Controls..
If the Safety Reverse does not work properly:
•Close the door and disconnect the Opener using the Emergency Release Cord.
•Do not use the door Opener, Remote Controls, or Wireless Keypad.
•Refer to the door and door Opener Owner’s Manuals before attempting any repairs..
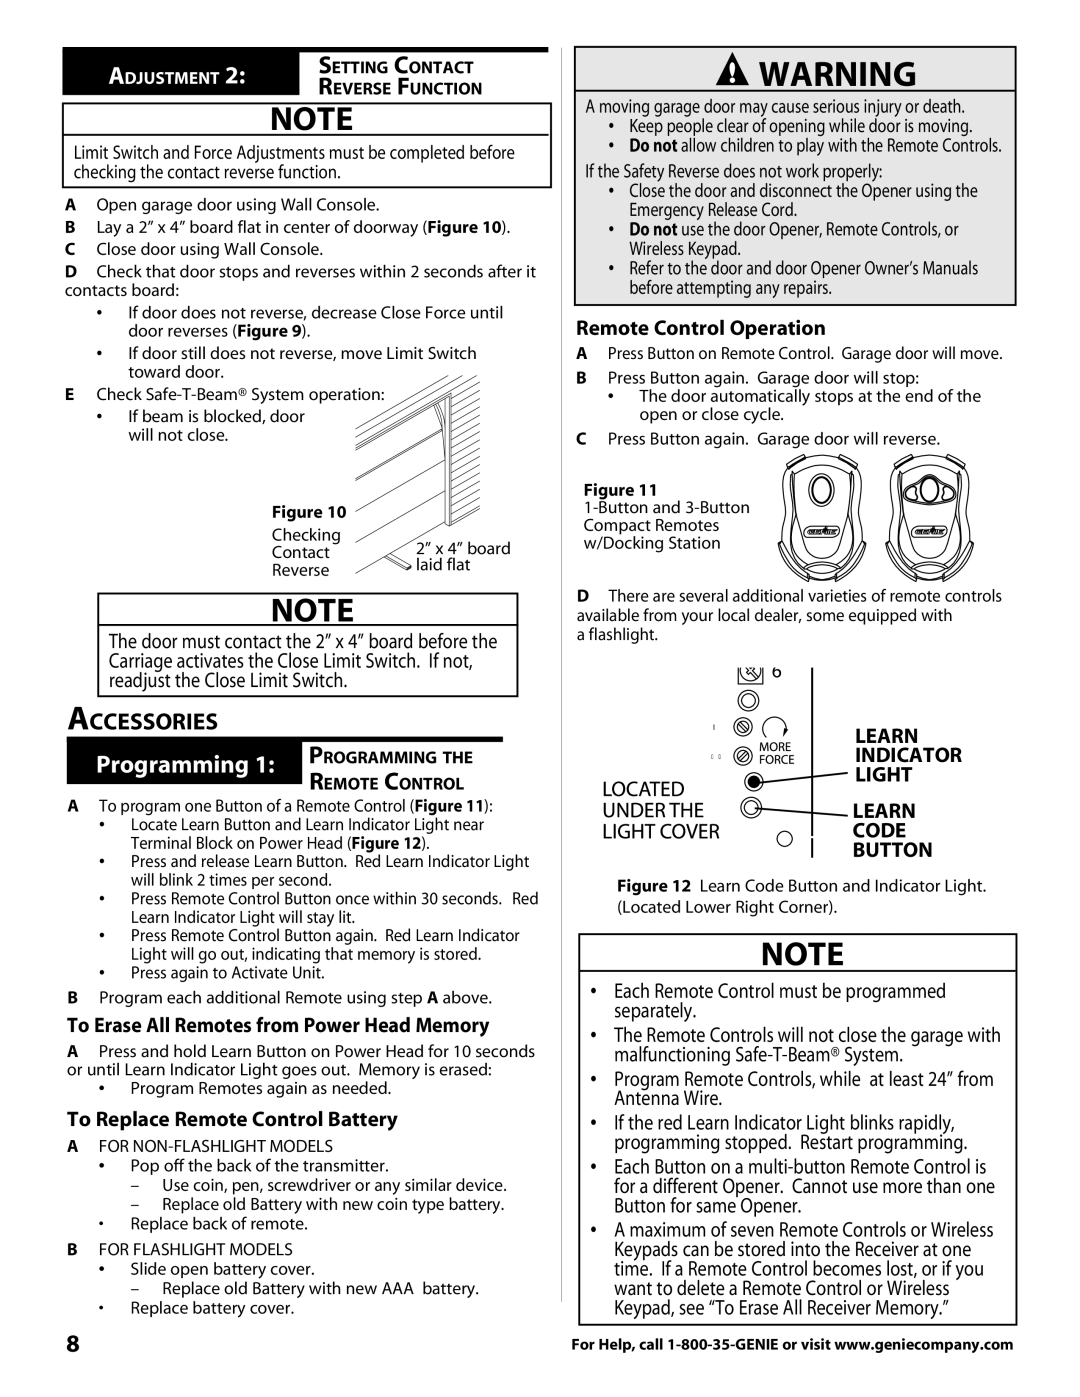
Remote Control Operation
A | Press Button on Remote Control.. Garage door will move.. |
B | Press Button again.. Garage door will stop: |
ECheck
•If beam is blocked, door will not close..
Figure 10
Checking
Contact
Reverse
2” x 4” board laid flat
• The door automatically stops at the end of the |
open or close cycle.. |
C Press Button again.. Garage door will reverse.. |
Figure 11
NOTE
The door must contact the 2” x 4” board before the Carriage activates the Close Limit Switch.. If not, readjust the Close Limit Switch..
Accessories
Programming the
Remote Control
ATo program one Button of a Remote Control (Figure 11):
•Locate Learn Button and Learn Indicator Light near Terminal Block on Power Head (Figure 12).
•Press and release Learn Button.. Red Learn Indicator Light will blink 2 times per second.
•Press Remote Control Button once within 30 seconds.. Red Learn Indicator Light will stay lit.
•Press Remote Control Button again.. Red Learn Indicator Light will go out, indicating that memory is stored.
•Press again to Activate Unit..
BProgram each additional Remote using step A above..
To Erase All Remotes from Power Head Memory
APress and hold Learn Button on Power Head for 10 seconds or until Learn Indicator Light goes out.. Memory is erased:
•Program Remotes again as needed..
To Replace Remote Control Battery
AFOR NON-FLASHLIGHT MODELS
•Pop off the back of the transmitter.
–Use coin, pen, screwdriver or any similar device.
–Replace old Battery with new coin type battery.
•Replace back of remote.
BFOR FLASHLIGHT MODELS
•Slide open battery cover.
–Replace old Battery with new AAA battery.
•Replace battery cover.
DThere are several additional varieties of remote controls available from your local dealer, some equipped with
a flashlight..
OPEN | LEARN |
| |
CLOSE | INDICATOR |
| LIGHT |
 LEARN
LEARN
CODE
BUTTON
Figure 12 Learn Code Button and Indicator Light.. (Located Lower Right Corner)..
NOTE
•Each Remote Control must be programmed separately..
•The Remote Controls will not close the garage with malfunctioning
•Program Remote Controls, while at least 24” from Antenna Wire..
•If the red Learn Indicator Light blinks rapidly, programming stopped.. Restart programming..
•Each Button on a
•A maximum of seven Remote Controls or Wireless Keypads can be stored into the Receiver at one time.. If a Remote Control becomes lost, or if you want to delete a Remote Control or Wireless Keypad, see “To Erase All Receiver Memory..”
8 | For Help, call |