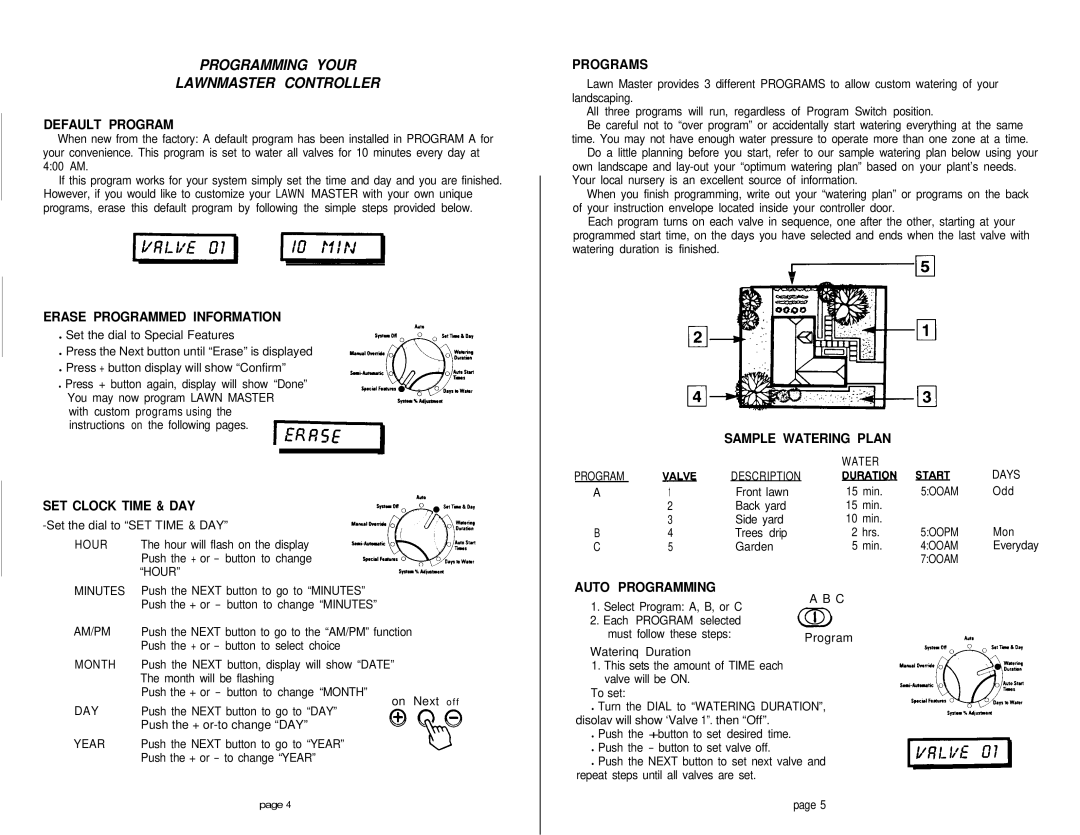
PROGRAMMING YOUR

LAWNMASTER CONTROLLER

DEFAULT PROGRAM

When new from the factory: A default program has been installed in PROGRAM A for your convenience. This program is set to water all valves for 10 minutes every day at 4:00 AM.

If this program works for your system simply set the time and day and you are finished. However, if you would like to customize your LAWN MASTER with your own unique programs, erase this default program by following the simple steps provided below.

pzEq (ID

ERASE PROGRAMMED INFORMATION

Set the dial to Special Features

Press the Next button until “Erase” is displayed

Press + button display will show “Confirm”

Press + button again, display will show “Done”

You may now program LAWN MASTER

_%ui_n

with custom programs using the


instructions on the following pages.


II

SET CLOCK TIME & DAY

-Set the dial to “SET TIME & DAY”

HOUR

The hour will flash on the display


Push the + or - button to change

IPl”XU,“%.e”I


“HOUR”

MINUTES Push the NEXT button to go to “MINUTES”

Push the + or - button to change “MINUTES”

AM/PM

Push the NEXT button to go to the “AM/PM” function


Push the + or - button to select choice

MONTH

Push the NEXT button, display will show “DATE”


The month will be flashing


Push the + or - button to change “MONTH”

DAY

on Next o f f

Push the NEXT button to go to “DAY”


Push the + or-to change “DAY”

YEAR

Push the NEXT button to go to “YEAR”


Push the + or - to change “YEAR”


page 4

PROGRAMS

Lawn Master provides 3 different PROGRAMS to allow custom watering of your landscaping.

All three programs will run, regardless of Program Switch position.

Be careful not to “over program” or accidentally start watering everything at the same time. You may not have enough water pressure to operate more than one zone at a time.

Do a little planning before you start, refer to our sample watering plan below using your own landscape and lay-out your “optimum watering plan” based no your plant’s needs. Your local nursery is an excellent source of information.

When you finish programming, write out your “watering plan” or programs on the back of your instruction envelope located inside your controller door.

Each program turns on each valve in sequence, one after the other, starting at your

programmed start time, on the days you have selected and ends when the last valve with watering duration is finished.

750

SAMPLE WATERING PLAN


WATER


DAYS

PROGRAM

yx

DESCRIPTION

DURATloNm

A

1

Front lawn

15

min.

5:OOAM

Odd


2

Back yard

15

min.


3

Side yard

10

min.


Mon

B

4

Trees drip

2

hrs.

5:OOPM

C

5

Garden

5

min.

4:OOAM

Everyday


7:OOAM


AUTO PROGRAMMING

1. Select Program: A, B, or C

A B C

I

2. Each PROGRAM selected

must follow these steps:

Q

Program


Waterinq Duration

1.This sets the amount of TIME each valve will be ON.

To set:

Turn the DIAL to “WATERING DURATION”, disolav will show ‘Valve 1”. then “Off”.

Push the +button to set desired time.

Push the - button to set valve off.

Push the NEXT button to set next valve and repeat steps until all valves are set.

page 5

Page 5
Image 5
Genie LM-12, LM-6, LM-9 manual Programming Your Lawnmaster Controller

LM-12, LM-9, LM-6 specifications

The Genie LM series is renowned in the realm of lift equipment, offering exceptional capabilities for a variety of aerial applications. Among the most notable models in this series are the LM-12, LM-6, and LM-9. Each of these lifts is designed to cater to the diverse needs of industries such as construction, maintenance, and warehousing, providing reliable access solutions with impressive performance and safety features.

The Genie LM-12 model stands out for its impressive lift height capability, reaching up to 12 feet. This model features a lightweight, compact design, making it highly maneuverable in tight spaces. A key characteristic is its user-friendly control system, which allows operators to manage the lift with ease. The LM-12 is equipped with a robust battery system, ensuring prolonged usage without the need for constant recharging. It also includes safety features such as automatic braking systems and non-slip platforms, ensuring a secure working environment.

Moving to the Genie LM-6, this model is well-suited for indoor applications due to its compact size and low weight, making it easy to transport and position. The LM-6 reaches a maximum working height of 6 feet, ideal for tasks such as shelving and painting in small spaces. This model is designed with an intuitive control panel, enhancing operator efficiency. Additionally, it incorporates advanced stability control systems that provide confidence while working at height.

The Genie LM-9, with its 9-foot lift height, strikes a perfect balance between the features of the LM-12 and LM-6. It’s versatile enough for both indoor and outdoor applications, making it a popular choice among contractors. The LM-9 is characterized by its rugged build quality and efficient battery system, providing reliable performance over extended periods. Safety remains a priority, with features designed to prevent tipping and ensure the safety of operators.

In conclusion, the Genie LM-12, LM-6, and LM-9 models each offer unique features tailored to various applications. From high lift capabilities to compact designs, these lifts encompass the reliability, safety, and efficiency that Genie is known for in the world of aerial access equipment. Whether it’s for indoor maintenance or outdoor construction work, the LM series continues to be an indispensable asset for professionals in a multitude of fields.