GP8155-R PUMP REPAIR KITS
Plunger Packing Kit #09616 |
| Inlet Valve Kit - #09587 |
| ||||
Item | Part # | Description | Qty. | Item | Part # | Description | Qty. |
38A | 13286 | 6 | 51B | 05078 | Inlet Valve Seat | 1 | |
39A | 05066 | 6 | 51C | 05079 | Valve Plate | 1 | |
40 | 07723 | Seal Ring | 3 | 51D | 07658 | 1 | |
42 | 05277 | 9 | 51E | 05080 | Valve Spring | 1 | |
|
|
|
| 51F | 05081 | Valve Spring Guide | 1 |
|
|
|
| 56A | 06258 | 3 | |
Oil Seal Kit - #09584 |
| Discharge Valve Kit - #09588 |
| ||||
Item | Part # | Description | Qty. | Item | Part # | Description | Qty. |
32 | 05058 | Radial Shaft Seal | 3 | 52B | 05084 | Discharge Valve Seat | 1 |
33A | 05056 | 3 | 52C | 05079 | Valve Plate | 1 | |
|
|
|
| 52D/56A 06258 | 2 | ||
|
|
|
| 52E | 05080 | Valve Spring | 1 |
|
|
|
| 52F | 05081 | Valve Spring Guide | 1 |
GP8155-R TOOL LIST AND TORQUE SPECIFICATIONS
Item | Part # | Description | Torque | Tool Needed |
17 | 05038 | Hexagon Socket Screw | 64 (87) | 10mm Allen Wrench |
24 | 05047 | Connecting Rod Hex. Hd. Socket Screw | 37 (50) | 8mm Allen Wrench |
33B | 05054 | Clip Ring | N/A | Industrial Snap Ring Pliers |
36C | 05062 | Tension Screw | 30 (40) | 16mm Socket |
49A | 05073 | Hexagon Nut (Manifold) | 265 (360) | 30mm Socket |
Valve Assemblies | N/A | Valve Puller (p/n 07662) Included | ||
|
|
|
| w/pump |
58 | 05087 | Hexagon Socket Screw | 132 (180) | 12mm Allen Wrench |
K5 | 07381 | Hexagon Socket Screw | N/A | 8mm Allen Wrench |
GP8155-R TROUBLESHOOTING
Problem | Cause | Solution |
Pressure Drops, water leaks | Replace | |
|
| plunger |
Pressure drops, pump gets loud | Discharge or suction valve leaks | Replace valve(s) |
| Steam formation (Cavitation) | Reduce suction height, reduce flow |
|
| resistance in inlet line, clean inlet |
|
| filter, lower water temperature. |
Irregular pressure | Worn Valves | Examine valves |
|
| |
| adapter leaks | Examine |
|
| casing for unevenness on the |
|
| sealing surfaces |
Oil leaks at visible part of plunger | Gear sealing is leaking | Examine seals and running surface |
|
| of plunger |
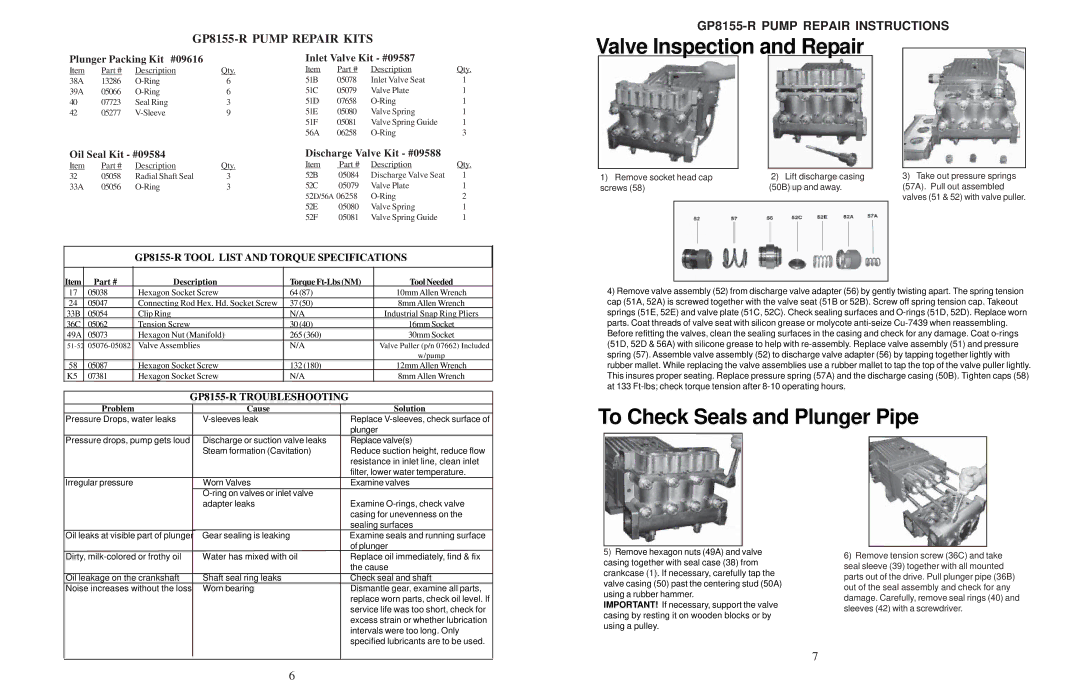
GP8155-R PUMP REPAIR INSTRUCTIONS
Valve Inspection and Repair
1) Remove socket head cap | 2) Lift discharge casing | 3) Take out pressure springs | |
screws (58) | (50B) up and away. | (57A). Pull out assembled | |
|
|
| valves (51 & 52) with valve puller. |
|
|
|
|
4)Remove valve assembly (52) from discharge valve adapter (56) by gently twisting apart. The spring tension cap (51A, 52A) is screwed together with the valve seat (51B or 52B). Screw off spring tension cap. Takeout springs (51E, 52E) and valve plate (51C, 52C). Check sealing surfaces and
To Check Seals and Plunger Pipe
Dirty, | Water has mixed with oil | Replace oil immediately, find & fix |
|
| the cause |
Oil leakage on the crankshaft | Shaft seal ring leaks | Check seal and shaft |
Noise increases without the loss | Worn bearing | Dismantle gear, examine all parts, |
|
| replace worn parts, check oil level. If |
|
| service life was too short, check for |
|
| excess strain or whether lubrication |
|
| intervals were too long. Only |
|
| specified lubricants are to be used. |
5)Remove hexagon nuts (49A) and valve casing together with seal case (38) from crankcase (1). If necessary, carefully tap the valve casing (50) past the centering stud (50A) using a rubber hammer.
IMPORTANT! If necessary, support the valve casing by resting it on wooden blocks or by using a pulley.
6)Remove tension screw (36C) and take seal sleeve (39) together with all mounted parts out of the drive. Pull plunger pipe (36B) out of the seal assembly and check for any damage. Carefully, remove seal rings (40) and sleeves (42) with a screwdriver.
7
6