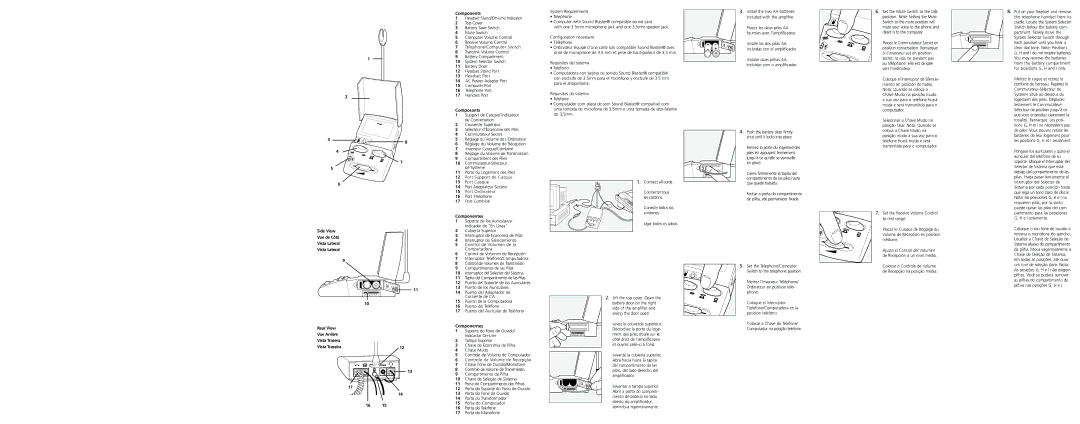
Components
1 | Headset Stand/On-Line Indicator |
2 | Top Cover |
3 | Battery Save Switch |
4 | Mute Switch |
5 | Computer Volume Control |
6 | Receive Volume Control |
7 | Telephone/Computer Switch |
8 | Transmit Volume Control |
9 | Battery Compartment |
10 | System Selector Switch |
11 | Battery Door |
12 | Headset Stand Port |
13 | Headset Port |
System Requirements
•Telephone
•Computer with Sound Blaster® compatible sound card
with one 3.5mm microphone jack and one 3.5mm speaker jack.
Configuration nécessaire
•Téléphone
•Ordinateur équipé d’une carte son compatible Sound Blaster® avec prise de microphone de 3,5 mm et prise de haut-parleur de 3,5 mm.
Requisitos del sistema
• Teléfono |
• Computadora con tarjeta de sonido Sound Blaster® compatible |
Install the two AA batteries included with the amplifier.
Placez les deux piles AA fournies avec l’amplificateur.
Instale las dos pilas AA incluidas con el amplificador.
Instalar duas pilhas AA, incluídas com o amplificador.
Set the Mute Switch to the talk position. Note: Setting the Mute Switch to the mute position will mute your voice to the phone and direct it to the computer.
Placez le Commutateur Secret en position conversation. Remarque: Si L’Inverseur est en position secret, la voix ne parvient pas au téléphone: elle est dirigée vers l’ordinateur.
8. Put on your headset and remove |
the telephone handset from its |
cradle. Locate the System Selector |
Switch below the battery com- |
partment. Slowly move the |
System Selector Switch through |
each position until you hear a |
clear dial tone. Note: Positions |
G, H and I do not require batteries. |
You may remove the batteries |
from the battery compartment |
for positions G, H and I only. |
4

 7
7
5
6
2 | de Conversation |
Couvercle Supérieur |
3 | Sélecteur d’Économie des Piles |
4 | Commutateur Secret |
5 | Réglage du Volume de L’Ordinateur |
6 | Réglage du Volume de Réception |
7 | Inverseur Casque/Combiné |
8 | Réglage du Volume de Transmission |
9 | Compartiment des Piles |
10 | Commutateur-Sélecteur |
11 | de Système |
Porte du Logement des Piles |
12 Port Support de Casque |
13 | Port Casque |
14 | Port Adaptateur Secteur |
Connect all cords.
Push the battery door firmly shut until it locks into place.
Fermez la porte du logementdes piles en appuyant fermement jusqu’à ce qu’elle se verrouille en place.
Cierre firmemente la tapita del compartimento de las pilas hasta que quede trabada.
Selecionar a Chave Mudo na posição falar. Nota: Quando se coloca a Chave Mudo na posição mudo a sua voz para o telefone ficará muda e será transmitida para o computador.
tonalité. Remarque: Les posi- |
tions G, H et I ne nécessitent pas |
de piles. Vous pouvez retirer les |
batteries de leur logement pour |
les positions G, H et I seulement. |
Póngase los auriculares y quite el |
auricular del teléfono de su |
soporte. Ubique el Interruptor del |
Selector de Sistema que está |
debajo del compartimento de las |
pilas. Haga pasar lentamente el |
Interruptor del Selector de |
Sistema por cada posición hasta |
Side View Vue de Côté Vista Lateral Vista Lateral
9
15 | Port Ordinateur |
16 | Port Téléphone |
17 | Port Combiné |
Componentes
1 | Soporte de los Auriculares/ |
2 | Indicador de "En Línea" |
Cubierta Superior |
3 | Interruptor de Economía de Pilas |
4 | Interruptor de Silenciamiento |
5 | Control de Volumen de la |
6 | Computadora |
Control de Volumen de Recepción |
7 | Interruptor Teléfono/Computadora |
8 | Control de Volumen de Transmisión |
Connecter tous les cordons.
Conecte todos los cordones.
Ligar todos os cabos.
Fechar a porta do compartimento de pilha, até permanecer fixada.
Set the Receive Volume Control to mid range.
Placez le Curseur de Réglage du Volume de Réception en position médiane.
Ajuste el Control del Volumen de Recepción a un nivel medio.
que oiga un tono claro de discar. |
Nota: las posiciones G, H e I no |
requieren pilas, por lo tanto |
puede quitar las pilas del com |
partimento para las posiciones |
G, H e I solamente. |
Coloque o seu fone de ouvido e |
remova o monofone do gancho. |
Localize a Chave de Seleção de |
Sistema abaixo do compartimento |
da pilha. Mova vagarosamente a |
Chave de Seleção de Sistema, |
em todas as posições, até ouvir |
11
| A B | C D E F G H I |
| 10 | | | |
Rear View | | | | | |
Vue Arrière | | | | | |
Vista Trasera | | | | | |
| | | | |
Vista Traseira | | | | 12 |
| | | | | |
9 | Compartimento de las Pilas |
10 | Interruptor del Selector del Sistema |
11 | Tapita del Compartimento de las Pilas |
12 | Puerto del Soporte de los Auriculares |
13 | Puerto de los Auriculares |
14 | Puerto del Adaptador de |
15 | Corriente de CA |
Puerto de la Computadora |
16 | Puerto del Teléfono |
17 | Puerto del Auricular de Teléfono |
Componentes
1Suporte do Fone de Ouvido/ Indicador On-Line
2Tampa Superior
3Chave de Economia de Pilha
4Chave Mudo
5Controle de Volume do Computador
6Controle de Volume de Recepção
7Chave Fone de Ouvido/Monofone
8Controle de Volume de Transmissão
9Compartimento da Pilha
10Chave de Seleção de Sistema
11Porta do Compartimento das Pilhas
12Porta do Suporte do Fono de Ouvido
13Porta do Fone de Ouvido
14Porta do Transformador
15Porta do Computador
16Porta do Telefone
17Porta do Monofone
Lift the top cover. Open the battery door on the right side of the amplifier and swing the door open.
Levez le couvercle supérieur. Décrochez la porte du loge- ment des piles située sur le côté droit de l’amplificateur et ouvrez celle-ci à fond.
Levante la cubierta superior. Abra hacia fuera la tapita del compartimento de las pilas, del lado derecho del amplificador.
Levantar a tampa superior. Abrir a porta do comparti- mento de bateria no lado direito do amplificador, abrindo-a repentinamente.
5.Set the Telephone/Computer Switch to the telephone position.
Mettez l’Inverseur Téléphone/ Ordinateur en position télé- phone.
Coloque el Interruptor
Tteléfono/Computadora en la posición teléfono.
Colocar a Chave de Telefone/ Computador na posição telefone.
Colocar o Controle de Volume de Recepção na posição média.
um tom de seleção claro. Nota: |
As posições G, H e I não exigem |
pilhas. Você só poderá remover |
as pilhas do compartimento de |
pilhas nas posições G, H e I. |