| INSTRUCTIONS FOR | ||
| |||
| STILE AND RAIL SET | ||
Introduction | ! |
| |
The Model | Always disconnect power | ||
Sets allow you to shape ¾" material into door stiles | |||
to the machine when set- | |||
and then simply reverse the cutter components to |
| ting up or making adjust- | |
shape the door rails. This set comes complete with |
| ||
| ments. Failure to do this | ||
a ball bearing guide and shims. |
| ||
| may result in serious per- | ||
|
| ||
|
| sonal injury. | |
21⁄2" |
|
| |
Cutting Rails
| 1⁄4" | 1" |
|
| For safety and best results, we recommend using | ||||||||||
|
|
| a shaper with adjustable fences and a miter gauge. | ||||||||||||
|
|
|
|
| |||||||||||
|
|
|
|
| These instructions are only intended for setting up | ||||||||||
|
|
|
|
| the cutter for counterclockwise rotation. |
| |||||||||
| Reversible Stile and Rail Set |
|
| To cut the rail ends: |
| ||||||||||
|
|
|
|
|
| ||||||||||
|
|
| 1. | UNPLUG THE SHAPER! |
| ||||||||||
|
|
|
| ||||||||||||
• | Failure to follow these guidelines will result | 2. | Slide the flat cutter, bearing side up, over the | ||||||||||||
• | in serious personal injury. |
|
|
|
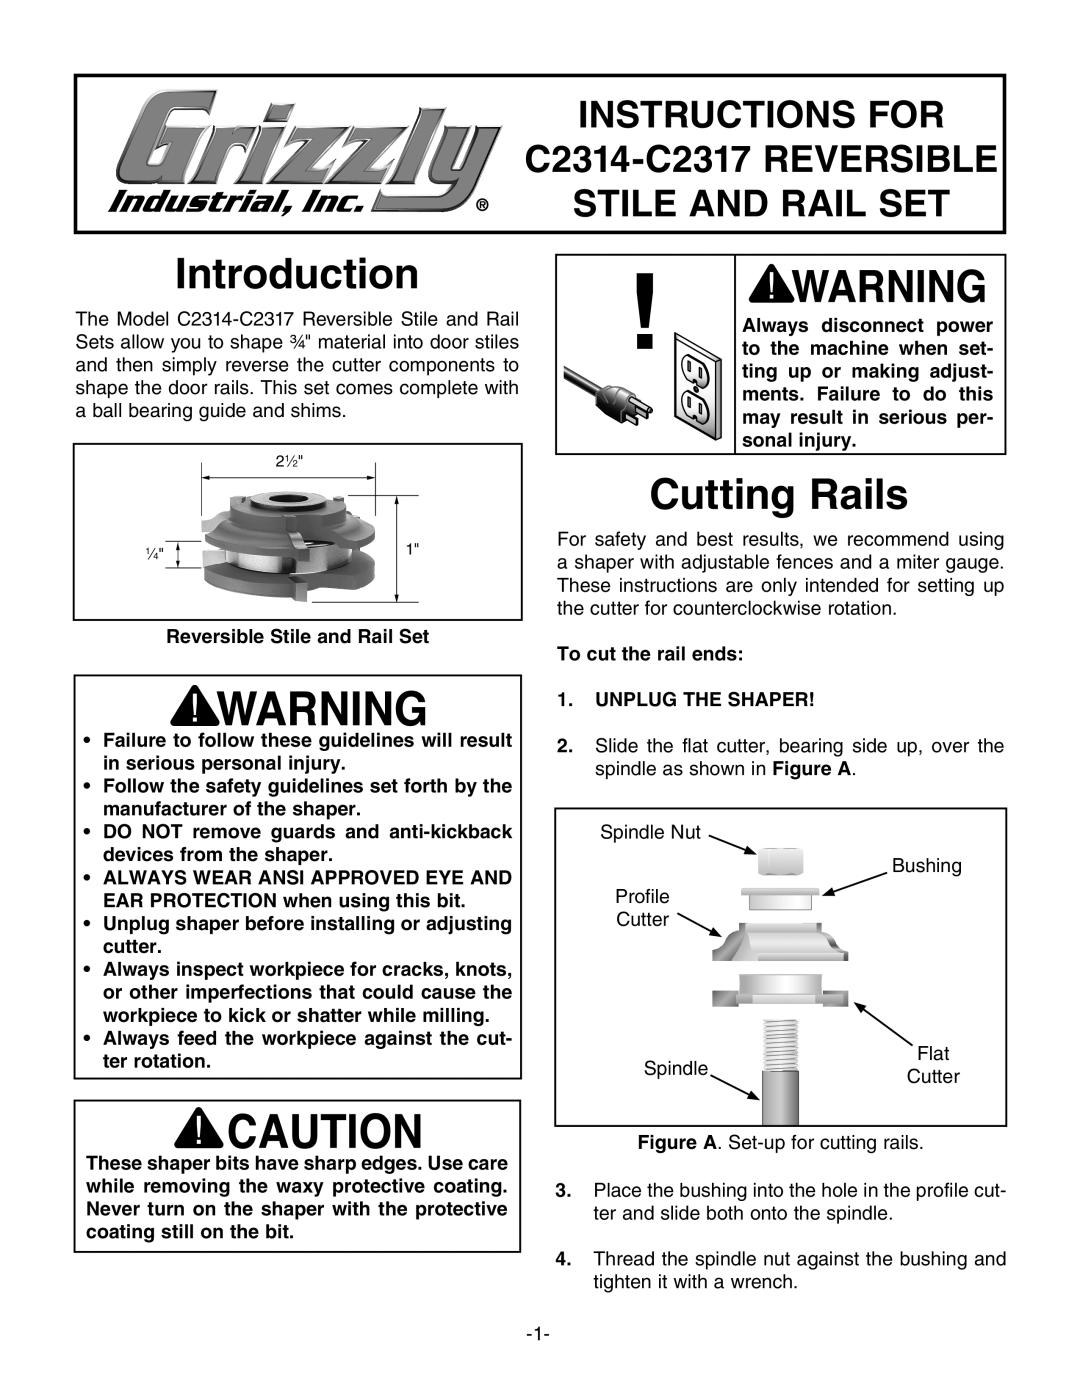
| spindle as shown in Figure A. |
| ||||||||
Follow the safety guidelines set forth by the |
|
|
|
|
|
|
|
|
|
|
|
|
| ||
| manufacturer of the shaper. |
|
|
|
|
|
|
|
|
|
|
|
|
|
|
|
|
|
|
|
|
|
|
|
|
|
|
|
|
| |
• | DO NOT remove guards and |
|
|
| Spindle Nut |
| |||||||||
| devices from the shaper. |
|
|
|
|
|
|
|
|
|
|
|
| Bushing | |
• ALWAYS WEAR ANSI APPROVED EYE AND |
|
|
|
|
|
|
|
|
|
|
| ||||
|
|
| Profile |
|
|
|
|
|
|
| |||||
| EAR PROTECTION when using this bit. |
|
|
|
|
|
|
|
|
|
| ||||
|
|
|
|
|
|
|
|
| |||||||
• Unplug shaper before installing or adjusting |
|
|
| Cutter |
|
|
|
|
|
|
| ||||
| cutter. |
|
|
|
|
|
|
|
|
|
|
|
|
|
|
• | Always inspect workpiece for cracks, knots, |
|
|
|
|
|
|
|
|
|
|
|
|
| |
|
|
|
|
|
|
|
|
|
|
|
|
| |||
| or other imperfections that could cause the |
|
|
|
|
|
|
|
|
|
|
|
|
| |
| workpiece to kick or shatter while milling. |
|
|
|
|
|
|
|
|
|
|
|
|
| |
• | Always feed the workpiece against the cut- |
|
|
|
|
|
|
|
|
|
|
|
| Flat | |
|
|
|
|
|
|
|
|
|
|
|
| ||||
| ter rotation. |
|
|
|
| Spindle |
|
|
|
|
| ||||
|
|
|
|
|
|
|
|
|
| ||||||
|
|
|
|
|
|
|
|
|
| Cutter | |||||
|
|
|
|
|
|
|
|
|
|
| |||||
|
|
|
|
|
|
|
|
|
|
|
|
|
|
| |
|
|
|
|
|
|
|
|
|
|
|
|
|
|
| |
|
|
|
|
|
|
|
|
|
| ||||||
These shaper bits have sharp edges. Use care |
|
|
| Figure A. | |||||||||||
|
|
|
|
|
|
|
|
|
|
|
|
| |||
while removing the waxy protective coating. | 3. | Place the bushing into the hole in the profile cut- | |||||||||||||
Never turn on the shaper with the protective |
|
|
| ter and slide both onto the spindle. |
| ||||||||||
coating still on the bit. |
|
|
|
|
|
|
|
|
|
|
|
|
|
| |
|
|
|
|
| 4. Thread the spindle nut against the bushing and | ||||||||||
|
|
| |||||||||||||
|
|
|
|
|
| tighten it with a wrench. |
| ||||||||
|
|
|
|
|
|
|
|
|
|
|
|
|
| ||
