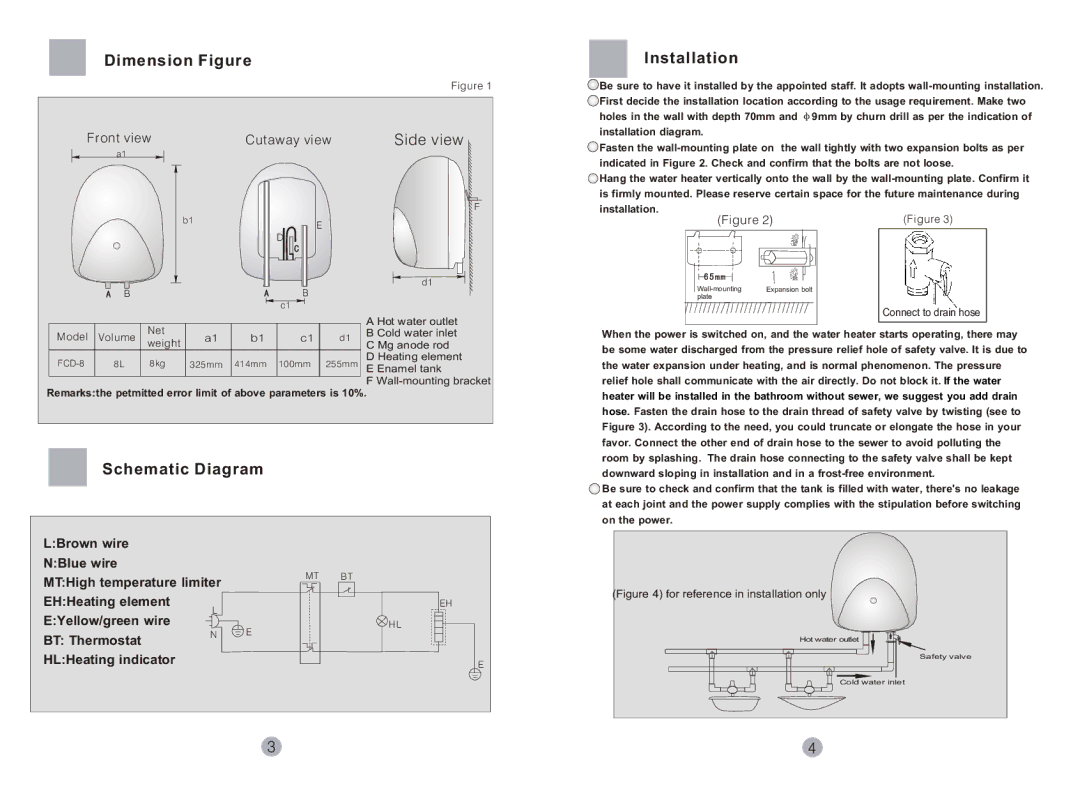
Dimension Figure

£¨Figure 1£©

Front view

Cutaway view

Side view

Installation

Be sure to have it installed by the appointed staff. It adopts wall-mounting installation. First decide the installation location according to the usage requirement. Make two holes in the wall with depth 70mm and 9mm by churn drill as per the indication of installation diagram.

Fasten the wall-mounting plate on the wall tightly with two expansion bolts as per

a1

b1

D

F

E

indicated in Figure 2. Check and confirm that the bolts are not loose.

Hang the water heater vertically onto the wall by the wall-mounting plate. Confirm it is firmly mounted. Please reserve certain space for the future maintenance during installation.


(Figure 2)

(Figure 3)


d1


B


B


c1


A Hot water outlet


Model

Volume

Net


a1

b1


c1

d1

B Cold water inlet

weight


C Mg anode rod


FCD-8

8L

8kg


325mm

414mm


100mm

255mm

D Heating element


E Enamel tank

F Wall-mounting bracket

Remarks:the petmitted error limit of above parameters is 10%.

Schematic Diagram

Wall-mounting

Expansion bolt

plate


Connect to drain hose

When the power is switched on, and the water heater starts operating, there may be some water discharged from the pressure relief hole of safety valve. It is due to the water expansion under heating, and is normal phenomenon. The pressure relief hole shall communicate with the air directly. Do not block it. If the water heater will be installed in the bathroom without sewer, we suggest you add drain hose. Fasten the drain hose to the drain thread of safety valve by twisting (see to Figure 3). According to the need, you could truncate or elongate the hose in your favor. Connect the other end of drain hose to the sewer to avoid polluting the room by splashing. The drain hose connecting to the safety valve shall be kept downward sloping in installation and in a frost-free environment.

Be sure to check and confirm that the tank is filled with water, there's no leakage at each joint and the power supply complies with the stipulation before switching on the power.

L:Brown wire

N:Blue wire

MT:High temperature limiter

MT

BT

(Figure 4) for reference in installation only

EH:Heating element

E:Yellow/green wire

BT: Thermostat HL:Heating indicator

L

N

E

EH

HL

E

Hot water outlet

Safety valve

Cold water inlet

3

4

Page 4
Image 4
Haier FCD-8 user manual Dimension Figure, Side view, Installation, Schematic Diagram

FCD-8 specifications

Haier FCD-8 is a cutting-edge compact refrigerator designed for those who require efficient cooling solutions without compromising on space. This model is particularly popular in small apartments, dorm rooms, and offices, where every inch counts. With its sleek design and innovative features, the Haier FCD-8 not only meets but exceeds expectations for quality and performance.

One of the standout features of the Haier FCD-8 is its impressive capacity. With 8 cubic feet of storage space, it manages to provide ample room for groceries, beverages, and essential items while maintaining a compact form. The adjustable shelves allow users to customize the interior layout to accommodate taller items or bulk purchases, making it a versatile choice for various storage needs.

The technology behind the Haier FCD-8 ensures optimal cooling performance. It is equipped with a high-efficiency compressor that operates quietly, providing a tranquil environment, while also consuming less energy. This energy-efficient design not only saves on electricity bills but also supports eco-friendly practices, aligning with modern consumer preferences for sustainable products.

Another notable characteristic of the Haier FCD-8 is its temperature control system. With adjustable thermostat settings, users have the flexibility to set the interior temperature according to their specific requirements. This feature is particularly beneficial for preserving the freshness of food and beverages, ensuring that items are kept at their ideal temperatures.

The exterior design of the Haier FCD-8 also adds to its appeal. Available in various finishes, including stainless steel and classic white, it complements a range of interior styles. The reversible door feature allows for flexible installation options, making it easy to place the refrigerator in tight spaces or areas with limited accessibility.

In summary, the Haier FCD-8 stands out as an efficient, stylish, and practical refrigerator choice for individuals seeking a space-saving solution without sacrificing functionality. Its ample capacity, effective cooling technology, and customizable features cater to modern living needs, making it a reliable partner in everyday life. Whether in a home, office, or student residence, the Haier FCD-8 delivers excellent performance with a focus on user convenience and energy efficiency.