Setting Environment
Do not locate in freezing places. If |
| |
ice forms, tank and pipes will break, | Do not install it outdoors. | |
causing scalding and leakage. | ||
|
Do not install it as | It shall be hung on firm and solid wall. |
Do not install it in places unable to drain | If a drain hose is connected, it shall be |
water. | connected to sewage drain, avoiding |
| spilling the room. |
The tubes and pipes fitted on the product are inseparable parts of the ![]() Safe Care
Safe Care![]() technology, and shall not be removed by yourself. Otherwise, Haier shall not be liable for any damages or injuries caused due to resulted potential risks.
technology, and shall not be removed by yourself. Otherwise, Haier shall not be liable for any damages or injuries caused due to resulted potential risks.
Symbol Denotation
![]() Do not proceed!Wrong operation may cause fatal injury or death.
Do not proceed!Wrong operation may cause fatal injury or death.
![]() Do follow the instructions!Wrong operation may cause human injury or house property loss.
Do follow the instructions!Wrong operation may cause human injury or house property loss.
Installation
![]() Installation must be made by installers of or designated by our company
Installation must be made by installers of or designated by our company
![]() The water heater shall be
The water heater shall be
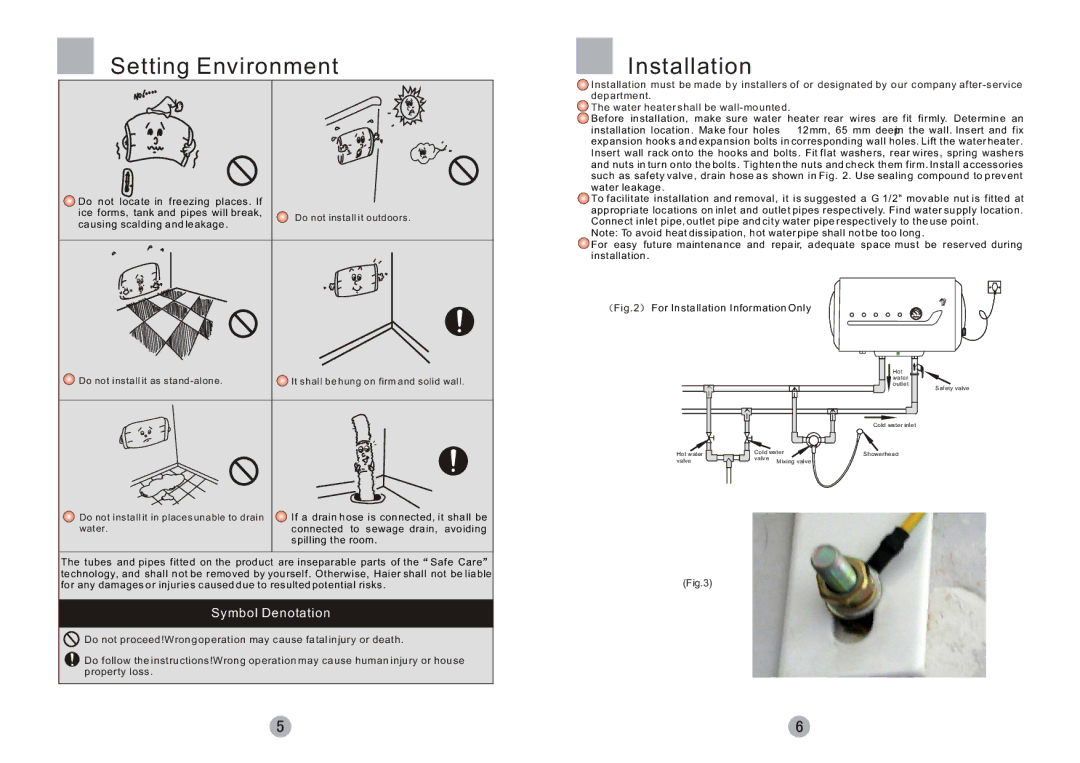
![]() Before installation, make sure water heater rear wires are fit firmly. Determine an installation location. Make four holes 12mm, 65 mm deepin the wall. Insert and fix expansion hooks and expansion bolts in corresponding wall holes. Lift the water heater. Insert wall rack onto the hooks and bolts. Fit flat washers, rear wires, spring washers and nuts in turn onto the bolts. Tighten the nuts and check them firm. Install accessories such as safety valve, drain hose as shown in Fig. 2. Use sealing compound to prevent water leakage.
Before installation, make sure water heater rear wires are fit firmly. Determine an installation location. Make four holes 12mm, 65 mm deepin the wall. Insert and fix expansion hooks and expansion bolts in corresponding wall holes. Lift the water heater. Insert wall rack onto the hooks and bolts. Fit flat washers, rear wires, spring washers and nuts in turn onto the bolts. Tighten the nuts and check them firm. Install accessories such as safety valve, drain hose as shown in Fig. 2. Use sealing compound to prevent water leakage.
![]() To facilitate installation and removal, it is suggested a G 1/2" movable nut is fitted at appropriate locations on inlet and outlet pipes respectively. Find water supply location. Connect inlet pipe, outlet pipe and city water pipe respectively to the use point.
To facilitate installation and removal, it is suggested a G 1/2" movable nut is fitted at appropriate locations on inlet and outlet pipes respectively. Find water supply location. Connect inlet pipe, outlet pipe and city water pipe respectively to the use point.
Note: To avoid heat dissipation, hot water pipe shall not be too long.
![]() For easy future maintenance and repair, adequate space must be reserved during installation.
For easy future maintenance and repair, adequate space must be reserved during installation.
 Fig.2
Fig.2  For Installation Information Only
|
|
| Hot |
|
|
| water |
|
|
| outlet |
|
|
| Safety valve |
|
|
| Cold water inlet |
Hot water | Cold water | Showerhead | |
valve |
| ||
valve | Mixing valve |
| |
|
| ||
(Fig.3)