In this section, you will configure the AVR 160 to match your actual system. A video display must be connected to one of the video monitor outputs on the receiver.

Using the On-Screen Menu System

Although it’s possible to configure the AVR using only the remote and the front-panel messages, it is easier to use the full-screen menu system.

The menu system is accessed by pressing the OSD Button on the remote or front panel.

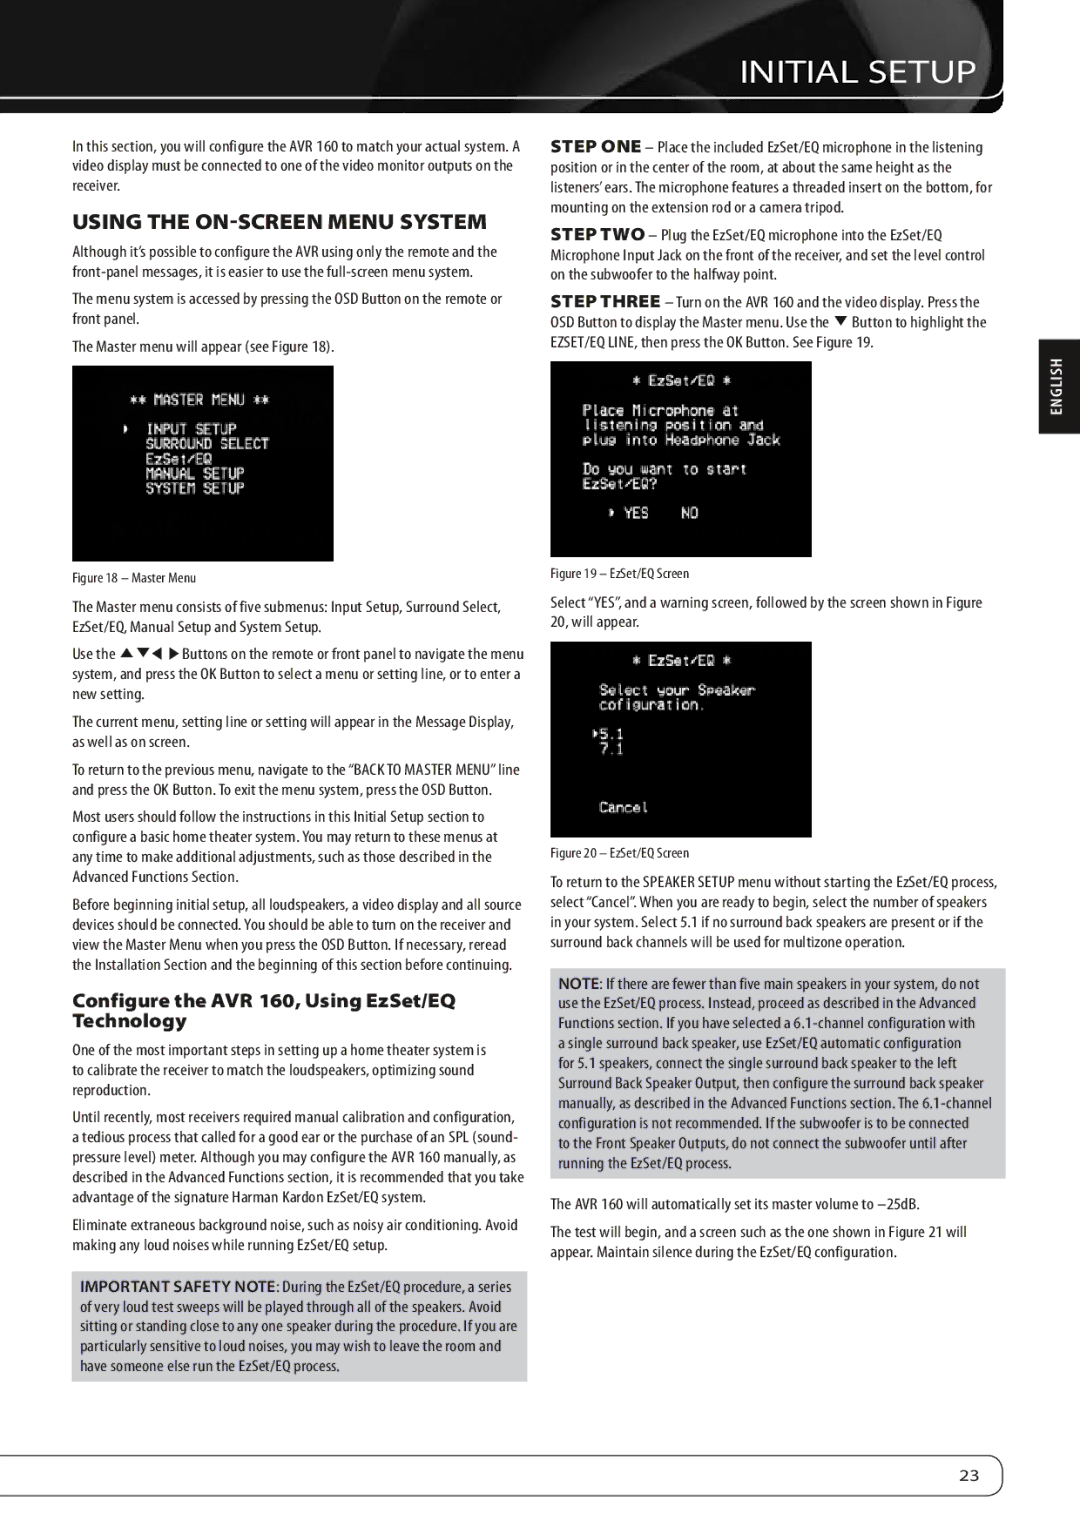
The Master menu will appear (see Figure 18).

Figure 18 – Master Menu

The Master menu consists of five submenus: Input Setup, Surround Select, EzSet/EQ, Manual Setup and System Setup.

Use the KLM N Buttons on the remote or front panel to navigate the menu system, and press the OK Button to select a menu or setting line, or to enter a new setting.

The current menu, setting line or setting will appear in the Message Display, as well as on screen.

To return to the previous menu, navigate to the “BACK TO MASTER MENU” line and press the OK Button. To exit the menu system, press the OSD Button.

Most users should follow the instructions in this Initial Setup section to configure a basic home theater system. You may return to these menus at any time to make additional adjustments, such as those described in the Advanced Functions Section.

Before beginning initial setup, all loudspeakers, a video display and all source devices should be connected. You should be able to turn on the receiver and view the Master Menu when you press the OSD Button. If necessary, reread the Installation Section and the beginning of this section before continuing.

Configure the AVR 160, Using EzSet/EQ Technology

One of the most important steps in setting up a home theater system is to calibrate the receiver to match the loudspeakers, optimizing sound reproduction.

Until recently, most receivers required manual calibration and configuration, a tedious process that called for a good ear or the purchase of an SPL (sound- pressure level) meter. Although you may configure the AVR 160 manually, as described in the Advanced Functions section, it is recommended that you take advantage of the signature Harman Kardon EzSet/EQ system.

Eliminate extraneous background noise, such as noisy air conditioning. Avoid making any loud noises while running EzSet/EQ setup.

IMPORTANT SAFETY NOTE: During the EzSet/EQ procedure, a series of very loud test sweeps will be played through all of the speakers. Avoid sitting or standing close to any one speaker during the procedure. If you are particularly sensitive to loud noises, you may wish to leave the room and have someone else run the EzSet/EQ process.

INITIAL SETUP

Step One – Place the included EzSet/EQ microphone in the listening position or in the center of the room, at about the same height as the listeners’ ears. The microphone features a threaded insert on the bottom, for mounting on the extension rod or a camera tripod.

Step Two – Plug the EzSet/EQ microphone into the EzSet/EQ Microphone Input Jack on the front of the receiver, and set the level control on the subwoofer to the halfway point.

Step Three – Turn on the AVR 160 and the video display. Press the OSD Button to display the Master menu. Use the L Button to highlight the EZSET/EQ LINE, then press the OK Button. See Figure 19.

ENGLISH

Figure 19 – EzSet/EQ Screen

Select “YES”, and a warning screen, followed by the screen shown in Figure 20, will appear.

Figure 20 – EzSet/EQ Screen

To return to the SPEAKER SETUP menu without starting the EzSet/EQ process, select “Cancel”. When you are ready to begin, select the number of speakers in your system. Select 5.1 if no surround back speakers are present or if the surround back channels will be used for multizone operation.

NOTE: If there are fewer than five main speakers in your system, do not use the EzSet/EQ process. Instead, proceed as described in the Advanced Functions section. If you have selected a 6.1-channel configuration with a single surround back speaker, use EzSet/EQ automatic configuration for 5.1 speakers, connect the single surround back speaker to the left Surround Back Speaker Output, then configure the surround back speaker manually, as described in the Advanced Functions section. The 6.1-channel configuration is not recommended. If the subwoofer is to be connected

to the Front Speaker Outputs, do not connect the subwoofer until after running the EzSet/EQ process.

The AVR 160 will automatically set its master volume to –25dB.

The test will begin, and a screen such as the one shown in Figure 21 will appear. Maintain silence during the EzSet/EQ configuration.

23

Page 23
Image 23
Harman-Kardon AVR 160 Initial Setup, Using the On-Screen Menu System, Configure the AVR 160, Using EzSet/EQ Technology

AVR 160 specifications

The Harman-Kardon AVR 160 is a versatile and powerful audio/video receiver that delivers a remarkable home theater experience. Designed for audio enthusiasts and casual listeners alike, this model combines cutting-edge technology, sophisticated design, and intuitive controls.

One of the standout features of the AVR 160 is its robust 7.1-channel surround sound output, which supports the latest audio formats including Dolby TrueHD and DTS-HD Master Audio. This allows users to enjoy a truly immersive sound experience when watching movies or playing video games. With a total power output of 75 watts per channel, the AVR 160 ensures that every sound detail is crystal clear, from explosive action sequences to the softest dialogue.

Another significant aspect of the AVR 160 is its advanced connectivity options. It comes equipped with multiple HDMI inputs, allowing you to connect a variety of devices such as Blu-ray players, gaming consoles, and streaming devices. The HDMI 1.4 version support ensures compatibility with 3D video and offers audio return channel (ARC) functionality, simplifying connections with your TV. Additionally, the receiver features wide compatibility with legacy devices through analog audio inputs, as well as USB ports for direct playback of your music collections.

The AVR 160 also includes Harman's proprietary technology, like the EZSet/EQ automatic speaker calibration system. This feature effortlessly optimizes speaker performance by analyzing the acoustic properties of your room and adjusting settings accordingly. Users can also benefit from the integrated SiriusXM and Spotify support, allowing streaming of music directly through the receiver.

In terms of design, the AVR 160 presents a sleek aesthetic that complements any home entertainment setup. The minimalist front panel, with its bright display and easy-to-use controls, makes operation straightforward. Whether you are adjusting settings or selecting inputs, the receiver’s user-friendly interface enhances the overall experience.

In conclusion, the Harman-Kardon AVR 160 is an exceptional receiver that boasts remarkable audio quality, extensive connectivity options, innovative technologies, and a stylish design. Whether you're a movie enthusiast, music lover, or gaming aficionado, this receiver is well-equipped to meet diverse entertainment needs and elevate your audio experience to new heights.