Trademark acknowledgment
About this manual
Thank you for purchasing this projector
CP-X2011N/CP-X2511N /CP-X3011N/CP-X4011N
Contents
Checking the contents of package
Features
Part names
Projector
HOT
Audio OUT L,R ports
Control panel STANDBY/ON button
Rear panel 9 ~ USB Type a port
LAN port
Remote control
Down button Volume + button
Computer button
Setting up
Arrangement
On a horizontal surface Suspended from the ceiling
Arrangement
About Plug-and-Play capability
Connecting with your devices
VCR/DVD/Blu-ray Disc Computer Player
Connecting with your devices
Connecting with your devices
Speakers
Monitor Microphone system
USB storage Device
Computer Access point
Using the security bar and slot
Connecting to a power supply
Hitachi MAXELL, Part No.LR6 or R6P
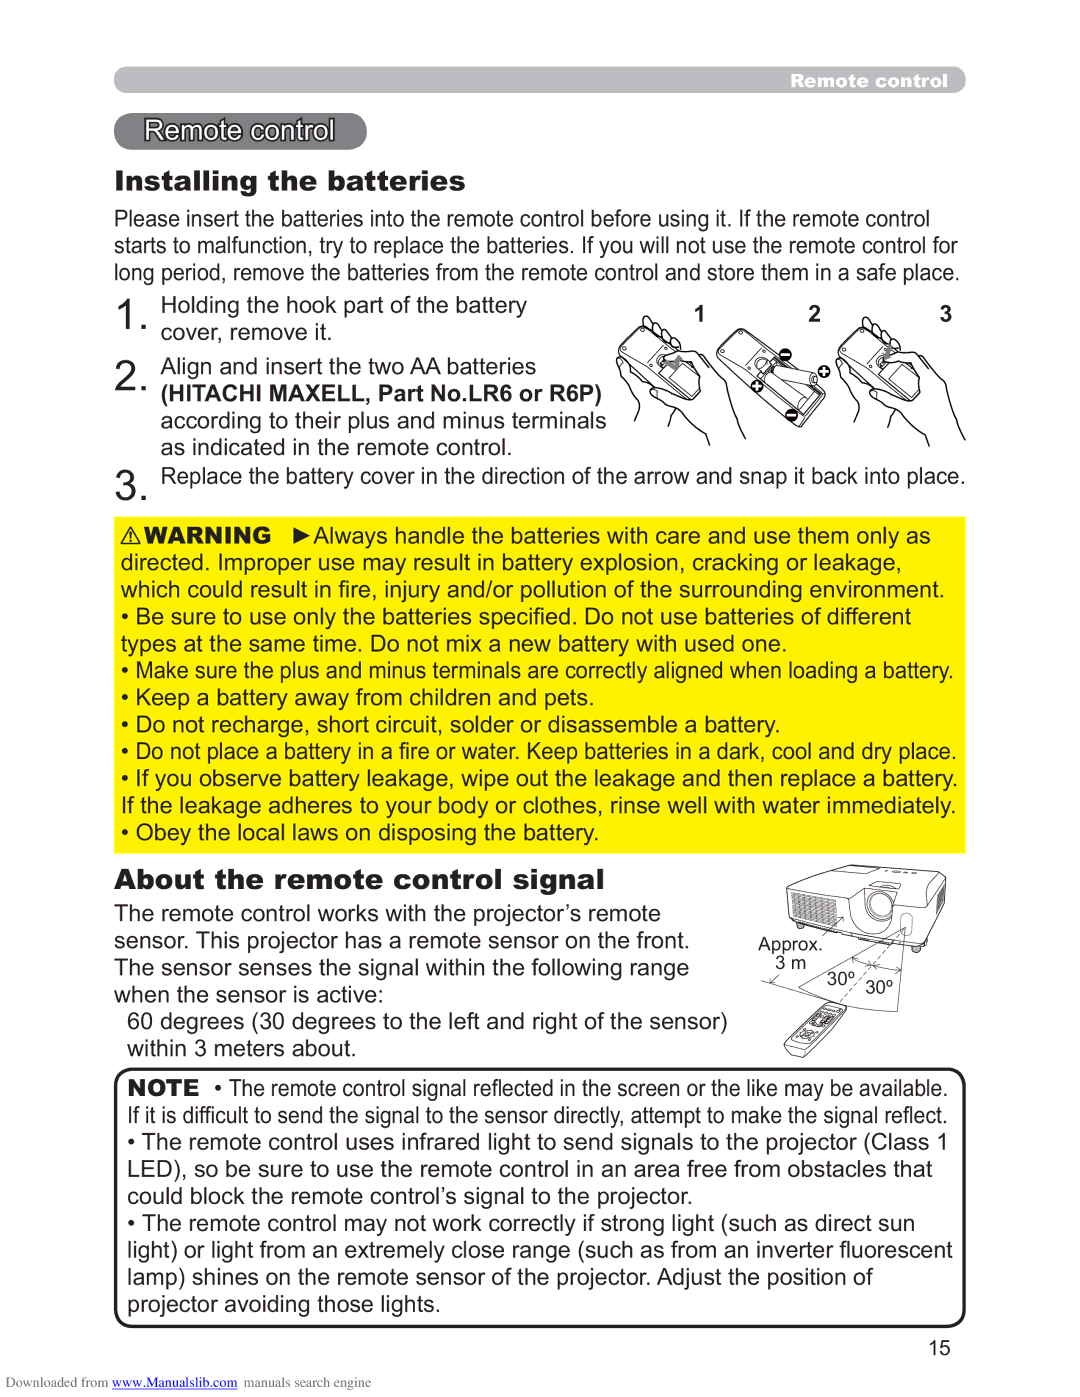
Remote control
Installing the batteries
About the remote control signal
Changing the frequency of remote control signal
Using as a simple PC mouse & keyboard
USB port
STANDBY/ON button
Power on/off
Turning on the power
Turning off the power
Temporarily muting the sound
Adjusting the volume
Selecting an input signal
Operating
MY Source
Press the MY Source / DOC. Camera button on
Computer button
Video button
Search button
Searching an input signal
For an Hdmi signal
Selecting an aspect ratio
Adjusting the zoom and focus
Adjusting the projectors elevator
Adjusting the position
Using the automatic adjustment feature
Keystone button
Correcting the keystone distortions
Magnify ON/OFF button
Using the magnify feature
Blank button
Temporarily freezing the screen
Temporarily blanking the screen
Freeze button
Advanced Menu
Using the menu function
Reset button
Easy Menu
Indication Meaning
Indication in OSD On Screen Display
Description
Normal Cinema Dynamic Boardblack
Daytime Whiteboard Boardgreen
Security
ECO Mode
Mirror
Language
Gamma
Picture menu
Custom
MY Memory LOAD-1,LOAD-2,LOAD-3,LOAD-4
Presentation Theater OFF
Active Iris
SAVE-1, SAVE-2, SAVE-3, SAVE-4
Aspect
For a computer signal
For an Hdmi signal
Image menu
USB Type B or Hdmi port
Position
Size
For a video signal and s-video signal
For a component video signal
From the LAN, USB Type A, USB Type B or Hdmi port
Component Scart RGB
Input menu
TV Film OFF
High MID LOW
Video Format
Hdmi Format
Hdmi Range
Auto Sync on G OFF
Frame Lock
On OFF
Resolution
Setup menu
Auto Keystone
Keystone
Monitor OUT
Normal ECO
Normal Hinvert Vinvert H&VINVERT
Normal Saving
480i@60 for COMPONENT, Computer IN1 or Computer IN2
Audio menu
High LOW
MIC Volume
Hdmi Audio
MIC Level
Start UP
Screen menu
English Français Deutsch Español
Blank
Capturing error has occurred. Please try again
MyScreen
MyScreen registration is finished
Message
No Input is Detected
Sync is OUT of Range
Invalid Scan Freq
Use the / buttons on the Screen menu to select Source
MAP2 MAP1 CIRCLE2 CIRCLE1 DOT-LINE4
Test Pattern DOT-LINE1 DOT-LINE2 DOT-LINE3
Channel
Description Closed Caption
Display
Mode
Option menu
USB Type B port
Auto
Type B port
OFF
Mouse USB Display
USB Type B
Lamp Time
Cancel OK
MY Button
Computer IN1 Computer IN2 LAN USB Type a
X4011N
Ghost
Service
Auto Adjust
FAN Speed
Control port
KEY Lock
Remote Freq
1NORMAL 2HIGH
Parity
Serial Settings
Communication Type
Baud Rate
Transmission Method
Response Limit Time
Information
Factory Reset
Configuration
Network menu
Dhcp
Dynamic Host
Time
Address
Mask
Difference
Projector Name
AMX D.D
MY Image
Quit
Presenter
Presentation
Section Switching
Guide
If you have forgotten your password
Security menu
Enter the Security menu
Turning on the MyScreen Password
Turning off the MyScreen Password
MyScreen
If you have forgotten your PIN code
PIN Lock
Turning on the PIN Lock
Turning off the PIN Lock
Transition Detector
Turning on the Transition Detector
Turning off the Transition Detector
MY Text Password
Turning on the MY Text Password
Turning off the MY Text Password
Writing
MY Text
Supported format
Presentation tools
PC-LESS Presentation
Supported storage media
Thumbnail mode
Enter Input
Setup menu for the selected image
Operating by buttons or keys
Down
Operating by the menu on the Thumbnail screen
PC-LESS Presentation
Down UP, Left
DOWN, Right
Slideshow mode
Return
Example of playlist.txt files
Playlist
USB Display
Hardware and software requirement for computer
USB Port USB cable 1 piece
Right-Click menu
Image quality
Keep PC resolution
Optimize Performance
Transmission speed
Replacing the lamp
Maintenance
Replacing the lamp
Type number DT01021
Lamp warning
High Voltage High Temperature High Pressure
Type number MU06481 Filter set
Cleaning and replacing the air filter
Cleaning and replacing the air filter
Hitachi MAXELL, part number CR2032 or CR2032H
Replacing the internal clock battery
Caring for the lens
Caring for the cabinet and remote control
Other care
Inside of the projector
Troubleshooting
Related messages
Message Description
Related messages
Internal temperature is rising
Off
Regarding the indicator lamps
Power Lamp Temp
Indicator
Resetting all settings
Power Lamp Temp indicator indicator indicator Description
Shutting the projector down
Phenomenon Cases not involving a machine defect
Signal source does not correctly work
Mode selected for Hdmi Audio is not suitable
Signal cables are not correctly connected
Volume is adjusted to an extremely low level
Audio SOURCE/SPEAKER setting is not correct
Freeze function is working
Color settings are not correctly adjusted
Color Space setting is not suitable
Projector is operating in Eco mode
Bridge
Network
Specification
Specifications
End User License Agreement for the Projector Software
Specifications