MANUALE DISTRUZIONI Vol.1 Informazioni di base
CPS318W/CPX328W
BRUKERHÅNDBOK Vol.1 Grunnleggende
ENGLISH
SETTING UP
CONTENTS
CONNECTING
USING THE REMOTE
Ultra High Brightness
PROJECTOR FEATURES
Keystone Distortion Correction
Partial Magnification Function
Connect your devices to the projector
3 Connect the power cord
8 ~
Insert the batteries into the remote
THE PROJECTOR
PART NAMES
THE REMOTE CONTROL
Adjusting the Projectors Elevator Feet
SETTING UP THE PROJECTOR
Press and hold in the elevator 1 buttons
Raise or lower the projector to the
If 43 aspect ratio
Adjusting the Screen Size and Projection Distance
If 169 aspect ratio
Top view Side view Top view Side view
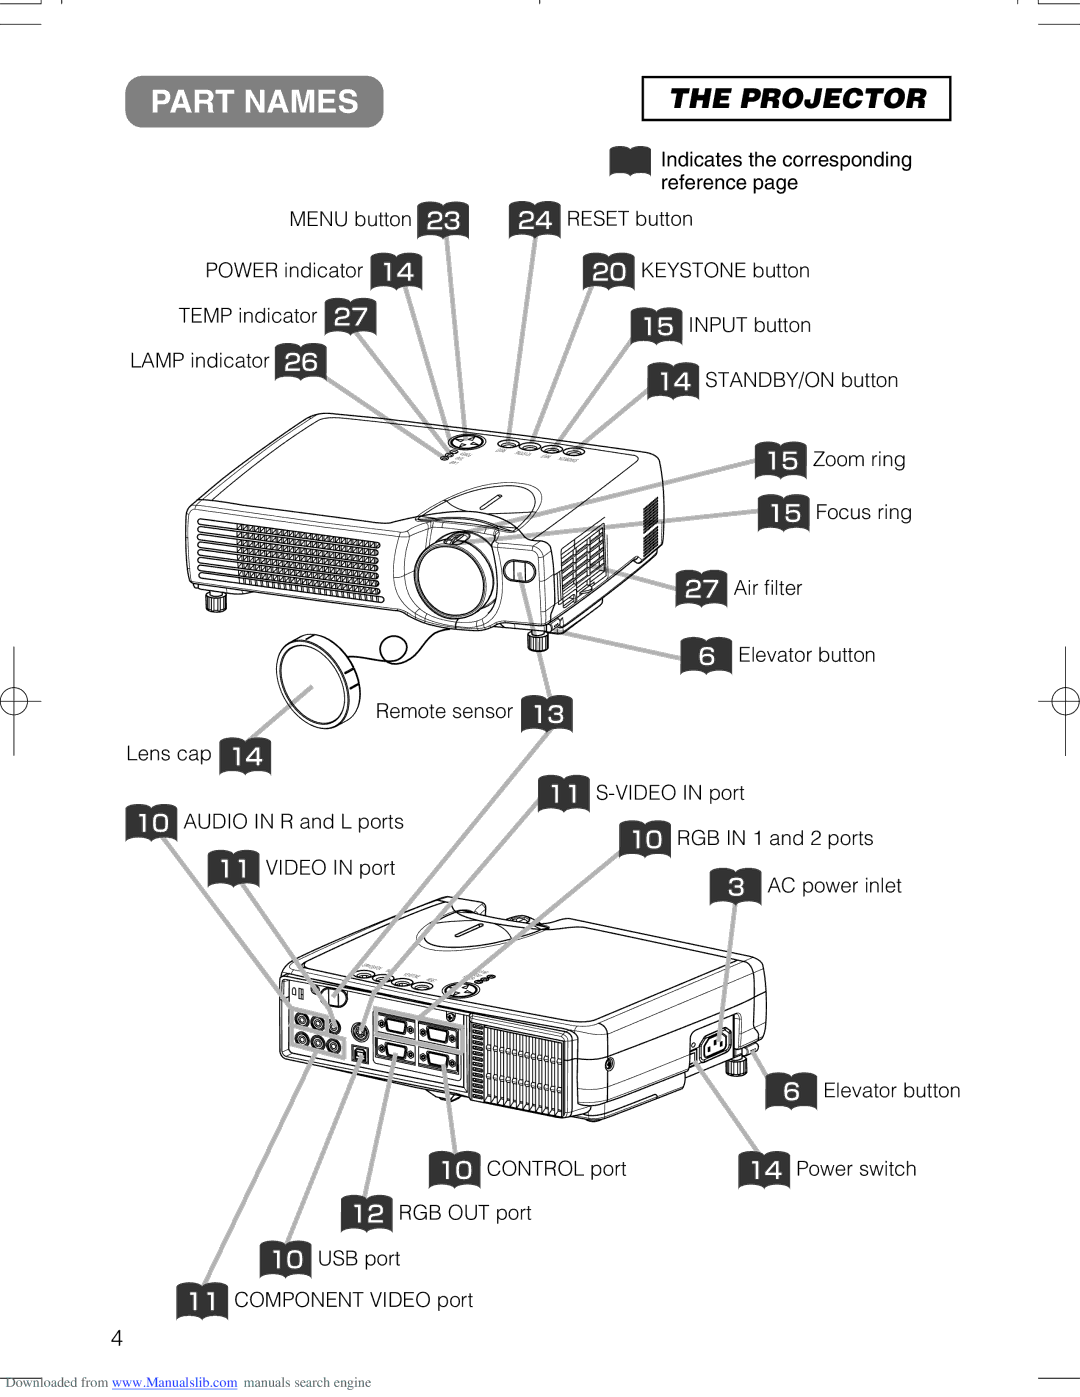
Indicates the corresponding reference page
CONNECTING YOUR DEVICES
NOTE About Plug-and-Play Capability
Ports and Cables
Function
Projector Port
Connecting to a Computer
CONNECTING YOUR DEVICES continued
Laptop computer
Desktop computer
Connecting to a VCR
Connecting to a DVD Player
DVD player
B B B
Display monitor
Connecting to a Display Monitor
CONNECTING YOUR DEVICES continued
RGB OUT RGB IN
Putting batteries into the remote control unit
USING THE REMOTE CONTROL
Operating the remote control
Remove the battery
Precautions
TURNING ON THE POWER
Make sure that the power cord is firmly and
Turn on the projectors power
Using the remote control If selecting RGB input Press the RGB button
Selecting an Input Signal
Using the projectors control panel Press the INPUT button
Use the zoom ring to adjust the
panel or remote control
TURNING OFF THE POWER
control panel or remote control
Check that the POWER indicator stops
1 Press the VOLUME button
ADJUSTING THE VOLUME
buttons to adjust
the volume
1 Press the POSITION button
ADJUSTING THE POSITION
Use the
the position
Automatic Adjustment for RGB Input
USING THE AUTOMATIC ADJUSTMENT FEATURE
Automatic Adjustment for Video Input
Press the AUTO button
Press the KEYSTONE button
CORRECTING KEYSTONE DISTORTIONS
buttons to select the
direction of distortion to correct
FREEZING THE SCREEN
USING THE MAGNIFY FEATURE
Press the MAGNIFY ON button
Press the POSITION button, then use the
SELECTING THE ASPECT RATIO
SIGNAL SEARCHING
TEMPORARILY BLANKING THE SCREEN
1 Press the SEARCH button
2 Select a menu using the
USING THE MENU FUNCTIONS
Select an item using the
buttons to adjust the level
OPERATING THE PC SCREEN
You can use the remote control as a simplified mouse or keyboard
PS/2, ADB, Serial Mouse Control
USB Mouse/Keyboard Control
THE LAMP
THE LAMP continued
the menu, reset the lamp timer
Replacing the lamp
for at least 45 minutes, and prepare a
Apply a vacuum cleaner to
Turn off the projector, and unplug the power cord
to clean the air filter
Turn on the projector, and use the menu to reset the filter
Turn on the projector power, and using the menu, reset the
Turn off the projector, and unplug the power cord. Prepare a
filter timer
THE AIR FILTER continued
OTHER CARE
Caring for the cabinet and remote control transmitter
Caring for the inside of the projector
Caring for the lens
WHAT TO DO WHEN YOU THINK A MACHINE DEFECT HAS OCCURRED
MULTIFUNCTIONAL SETTINGS
SPECIFICATIONS
WARRANTY AND AFTER-SERVICE
Execution of settings and/or adjustments Operate by using the
MULTIFUNCTIONAL SETTINGS
MAIN Menu
MAIN Menu
PICTURE 2 Menu
PICTURE 1 Menu
PICTURE1 Menu
PICTURE2 Menu
INPUT Menu
MULTIFUNCTIONAL SETTINGS continued
INPUT Menu
SCREEN Menu
SCREEN Menu
Description
BLANK
MULTIFUNCTIONAL SETTINGS continued
OPTION Menu
OPTION Menu
WHAT TO DO WHEN YOU THINK A MACHINE DEFECT HAS OCCURRED
Related Messages
Message
Description
POWER
Regarding the Indicator Lamps
LAMP
TEMP
Phenomena That May Easily Be Mistaken for Machine Defects
WHAT TO DO WHEN YOU THINK A MACHINE DEFECT HAS OCCURRED continued
Dimension Diagram
SPECIFICATIONS
Specification
RGB Terminal
WARRANTY AND AFTER-SERVICE
FCC Statement Warning
REGULATORY NOTICES
For the Customers in CANADA
Pour les utilisateurs au Canada
International Sales Division