Command Control via the Network (continued)
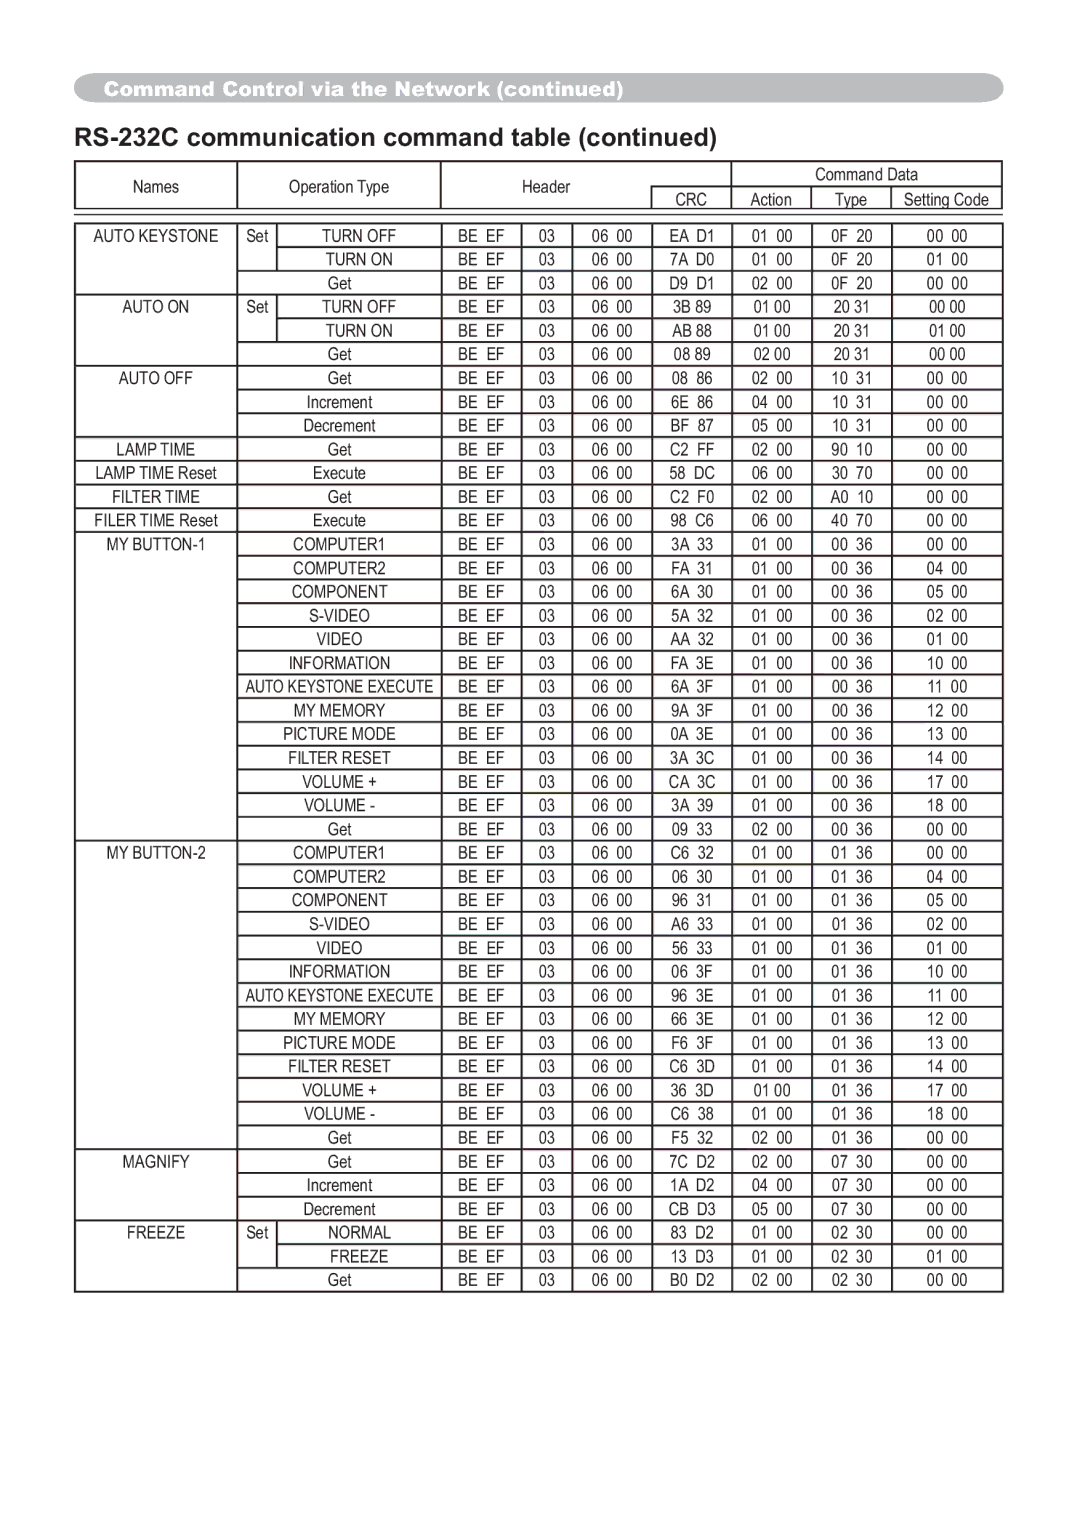
RS-232C communication command table (continued)
Names
Operation Type
Header
Command Data
CRC | Action | Type | Setting Code |
AUTO KEYSTONE | Set | TURN OFF | BE EF | 03 | 06 | 00 | EA D1 | 01 | 00 | 0F | 20 | 00 | 00 | |
|
| TURN ON | BE EF | 03 | 06 | 00 | 7A | D0 | 01 | 00 | 0F | 20 | 01 | 00 |
|
| Get | BE EF | 03 | 06 | 00 | D9 | D1 | 02 | 00 | 0F | 20 | 00 | 00 |
AUTO ON | Set | TURN OFF | BE EF | 03 | 06 | 00 | 3B 89 | 01 00 | 20 31 | 00 00 | ||||
|
| TURN ON | BE EF | 03 | 06 | 00 | AB 88 | 01 00 | 20 31 | 01 00 | ||||
|
| Get | BE EF | 03 | 06 | 00 | 08 89 | 02 00 | 20 31 | 00 00 | ||||
AUTO OFF |
| Get | BE EF | 03 | 06 | 00 | 08 | 86 | 02 | 00 | 10 | 31 | 00 | 00 |
|
| Increment | BE EF | 03 | 06 | 00 | 6E 86 | 04 | 00 | 10 | 31 | 00 | 00 | |
|
| Decrement | BE EF | 03 | 06 | 00 | BF 87 | 05 | 00 | 10 | 31 | 00 | 00 | |
LAMP TIME |
| Get | BE EF | 03 | 06 | 00 | C2 | FF | 02 | 00 | 90 | 10 | 00 | 00 |
LAMP TIME Reset |
| Execute | BE EF | 03 | 06 | 00 | 58 DC | 06 | 00 | 30 | 70 | 00 | 00 | |
FILTER TIME |
| Get | BE EF | 03 | 06 | 00 | C2 F0 | 02 | 00 | A0 10 | 00 | 00 | ||
FILER TIME Reset |
| Execute | BE EF | 03 | 06 | 00 | 98 C6 | 06 | 00 | 40 | 70 | 00 | 00 | |
MY |
| COMPUTER1 | BE EF | 03 | 06 | 00 | 3A 33 | 01 | 00 | 00 | 36 | 00 | 00 | |
|
| COMPUTER2 | BE EF | 03 | 06 | 00 | FA 31 | 01 | 00 | 00 | 36 | 04 | 00 | |
|
| COMPONENT | BE EF | 03 | 06 | 00 | 6A 30 | 01 | 00 | 00 | 36 | 05 | 00 | |
|
| BE EF | 03 | 06 | 00 | 5A 32 | 01 | 00 | 00 | 36 | 02 | 00 | ||
|
| VIDEO | BE EF | 03 | 06 | 00 | AA 32 | 01 | 00 | 00 | 36 | 01 | 00 | |
|
| INFORMATION | BE EF | 03 | 06 | 00 | FA 3E | 01 | 00 | 00 | 36 | 10 | 00 | |
| AUTO KEYSTONE EXECUTE | BE EF | 03 | 06 | 00 | 6A 3F | 01 | 00 | 00 | 36 | 11 00 | |||
|
| MY MEMORY | BE EF | 03 | 06 | 00 | 9A 3F | 01 | 00 | 00 | 36 | 12 | 00 | |
|
| PICTURE MODE | BE EF | 03 | 06 | 00 | 0A | 3E | 01 | 00 | 00 | 36 | 13 | 00 |
|
| FILTER RESET | BE EF | 03 | 06 | 00 | 3A | 3C | 01 | 00 | 00 | 36 | 14 | 00 |
|
| VOLUME + | BE EF | 03 | 06 | 00 | CA 3C | 01 | 00 | 00 | 36 | 17 | 00 | |
|
| VOLUME - | BE EF | 03 | 06 | 00 | 3A 39 | 01 | 00 | 00 | 36 | 18 | 00 | |
|
| Get | BE EF | 03 | 06 | 00 | 09 | 33 | 02 | 00 | 00 | 36 | 00 | 00 |
MY |
| COMPUTER1 | BE EF | 03 | 06 | 00 | C6 32 | 01 | 00 | 01 | 36 | 00 | 00 | |
|
| COMPUTER2 | BE EF | 03 | 06 | 00 | 06 | 30 | 01 | 00 | 01 | 36 | 04 | 00 |
|
| COMPONENT | BE EF | 03 | 06 | 00 | 96 | 31 | 01 | 00 | 01 | 36 | 05 | 00 |
|
| BE EF | 03 | 06 | 00 | A6 33 | 01 | 00 | 01 | 36 | 02 | 00 | ||
|
| VIDEO | BE EF | 03 | 06 | 00 | 56 | 33 | 01 | 00 | 01 | 36 | 01 | 00 |
|
| INFORMATION | BE EF | 03 | 06 | 00 | 06 | 3F | 01 | 00 | 01 | 36 | 10 | 00 |
| AUTO KEYSTONE EXECUTE | BE EF | 03 | 06 | 00 | 96 3E | 01 | 00 | 01 | 36 | 11 00 | |||
|
| MY MEMORY | BE EF | 03 | 06 | 00 | 66 3E | 01 | 00 | 01 | 36 | 12 | 00 | |
|
| PICTURE MODE | BE EF | 03 | 06 | 00 | F6 | 3F | 01 | 00 | 01 | 36 | 13 | 00 |
|
| FILTER RESET | BE EF | 03 | 06 | 00 | C6 | 3D | 01 | 00 | 01 | 36 | 14 | 00 |
|
| VOLUME + | BE EF | 03 | 06 | 00 | 36 3D | 01 00 | 01 | 36 | 17 | 00 | ||
|
| VOLUME - | BE EF | 03 | 06 | 00 | C6 38 | 01 | 00 | 01 | 36 | 18 | 00 | |
|
| Get | BE EF | 03 | 06 | 00 | F5 | 32 | 02 | 00 | 01 | 36 | 00 | 00 |
MAGNIFY |
| Get | BE EF | 03 | 06 | 00 | 7C | D2 | 02 | 00 | 07 | 30 | 00 | 00 |
|
| Increment | BE EF | 03 | 06 | 00 | 1A | D2 | 04 | 00 | 07 | 30 | 00 | 00 |
|
| Decrement | BE EF | 03 | 06 | 00 | CB D3 | 05 | 00 | 07 | 30 | 00 | 00 | |
FREEZE | Set | NORMAL | BE EF | 03 | 06 | 00 | 83 D2 | 01 | 00 | 02 | 30 | 00 | 00 | |
|
| FREEZE | BE EF | 03 | 06 | 00 | 13 D3 | 01 | 00 | 02 | 30 | 01 | 00 | |
|
| Get | BE EF | 03 | 06 | 00 | B0 | D2 | 02 | 00 | 02 | 30 | 00 | 00 |